Ready to add some sparkle to your app development? Stay here, where we back the IOTA Mainnet and the Shimmer Network, the staging network of IOTA! Applying this approach, developers can effortlessly incorporate the Stardust Protocol version into their projects (and let's be honest, who doesn't love a little shimmer and stardust in their code)? So why wait? Say hello to Flutter and Rust and join me on this exciting journey and let us make your apps shine!
Since the Stardust protocol upgrade on the IOTA Mainnet on October 4th, 2023, developers can leverage the latest enhancements not only in the Shimmer network but also on the IOTA Mainnet.
👉 Stardust protocol upgrade
Originally I was searching for a workflow to build real-world products in the form of mobile and desktop applications backed by the Distributed Ledger Technology of IOTA. My goal was and is to facilitate the adoption of IOTA.
Just to clarify, every time I mention IOTA, I'm also referring to Shimmer.
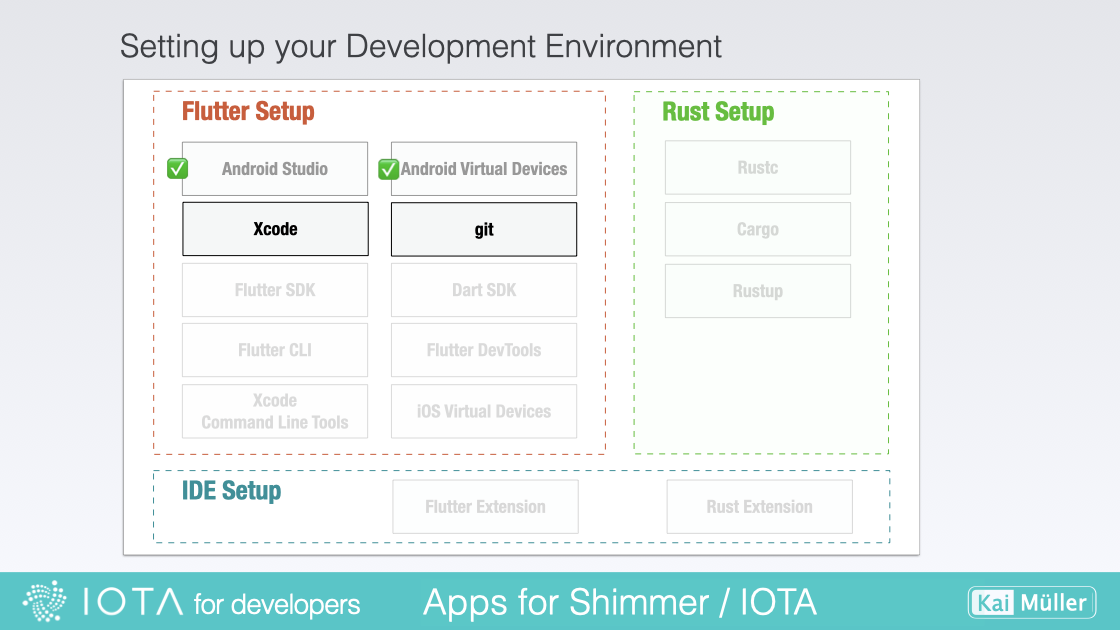
I wanted to create a flexible solution that would allow developers to use a reduced technology stack for their projects. With IOTA for Flutter, I believe we've achieved that goal, and I'm excited to share it with the world. And believe me: Coming from Java and JavaScript frameworks I was not at all familiar with Flutter and Rust in the beginning.
I remember those days - the endless hours of debugging, the frustration of hitting the same roadblocks over and over again. But after four long months of trial and error, I finally found the solution with IOTA for Flutter.
This documentation is a condensed tutorial that summarizes everything I learned during that grueling proof-of-concept process. And now, I want to share that knowledge with you. Think of my tutorial as your personal guide to app development for IOTA - a way to save you time and headaches, so you can focus on what really matters.
Now, before you get too excited, I should warn you that app development is still app development, and there's always a chance that things might not work out the way you planned. Trust me, I've been there. But hey, that's half the fun, right? The thrill of the chase, the excitement of finally figuring out that pesky bug - it's all part of the process. Just don't blame me if you find yourself cursing my name at three in the morning when something doesn't work quite right. But hey, if it was easy, everyone would be doing it, right? So let's roll up our sleeves and get to work!
IOTA for Flutter is a sponsored project by the Tangle Community Treasury. The funding allows me to organize my collected notes and prepare them for you. At this point, a big thank you to everyone involved!
By exploring IOTA, a Distributed Ledger Technology (DLT), you can expand your knowledge and explore the exciting possibilities of new use cases beyond the limitations of Web 2.0. This technology has the potential to revolutionize various industries, such as supply chain management, smart city infrastructure, and digital identity verification.
IOTA is unique in that it is a permissionless, decentralized system designed to enable secure and feeless exchange of value and data transfer between connected actors. Unlike traditional blockchain-based systems, IOTA does not rely on miners to validate transactions. Instead, each transaction verifies two previous transactions, creating a web-like network of transactions called the Tangle. This makes IOTA's DLT highly scalable and able to handle large amounts of transactions with zero fees.
If you're a Flutter developer who's not familiar with IOTA or Shimmer (which is the staging network of IOTA), don't worry! Since October 2023, a series of outstanding blog posts has been emerging, explaining IOTA from the outset and progressively delving deeper over time. Start with 👉 Digital Autonomy for Everyone: The Future of IOTA
There's no substitute for hands-on experience, and that's where IOTA for Flutter comes in. While the official websites for IOTA and Shimmer provide a great starting point, the best way to truly understand how to use these technologies in your Flutter projects is to give it a try yourself.
IOTA for Flutter provides a tutorial-style documentation that walks you through the process of integrating IOTA and Shimmer step-by-step. So don't be afraid to jump in and give it a shot! Who knows, you might just surprise yourself with what you can accomplish.
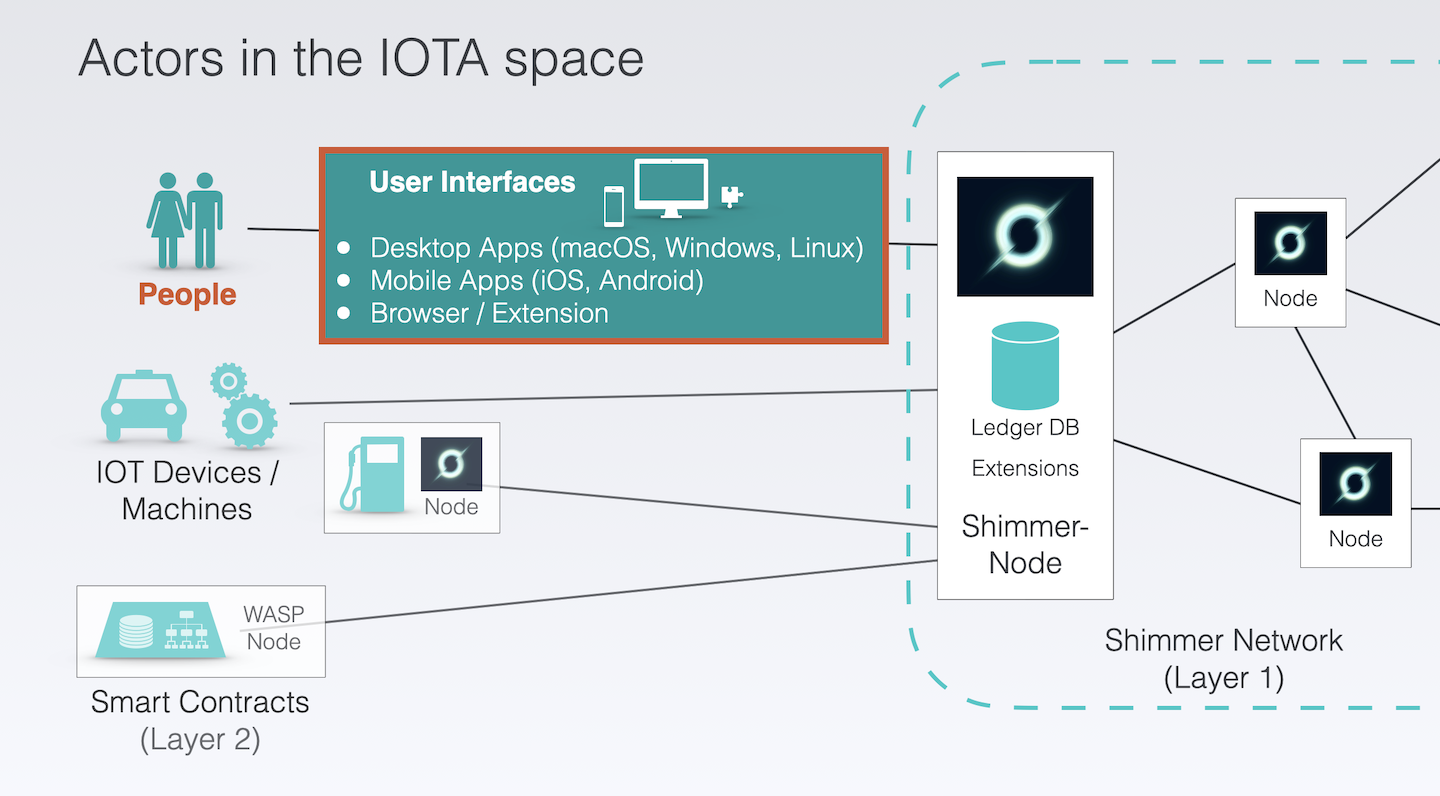
This tutorial is about building User Interfaces for human interaction (highlighted in red)
The focus of this project is to provide a user interface or interaction capability with IOTA for humans. While IOT devices, machines or smart contracts can also interact with IOTA, the primary goal here is to create a seamless experience for people to connect and engage with IOTA's Layer 1 network.
The main goal is achieved by building mobile and desktop apps. The focus is on the target platforms that Flutter supports, with the caveat that the proof-of-concept has only been tested on iOS, Android, and macOS.
Rust plays a crucial role in IOTA for Flutter, too. All of IOTA's libraries are written in Rust and are referred to as the Single Source of Truth. I will explain how these Rust libraries are used as a dependency in a custom library which is cross-compiled and integrated into Flutter.
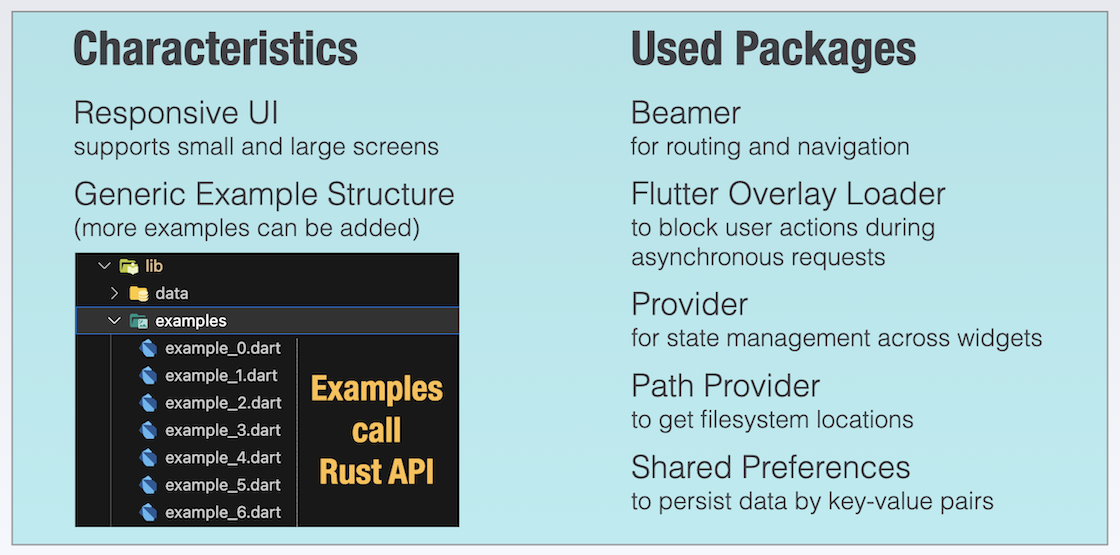
The IOTA for Flutter tutorial is divided into several sections, including a fundamentals section for preparing what you need, an overview for getting the key concept, and several practical chapters that focus on building real-world products.
To make it easier to follow along with the written text, each practical chapter has a corresponding repository on GitHub. I also provide some videos to demonstrate the resulting app, the workflow and guide users through important steps, so you can watch over my shoulder as I work through the examples.
The Three Pillars of the Tutorial: Github Page, Repositories and Videos
The practical chapters are structured as follows: first, we start with an introductory chapter to build an app with Flutter and Rust without IOTA. This will introduce the Flutter-Rust-Bridge, the glueing part that brings Flutter and Rust together. Then, we dive into building a simple IOTA-powered app, followed by a comprehensive "Shimmer playground" app to demonstrate all Rust libraries in one app.
As a bonus, I provide the code for the MQTT Chat App. In this chapter, I assume that you have gained enough knowledge and experience from the previous practical chapters.
Hold on to your keyboards because it's time for a chapter that will be more exciting than a cat chasing a laser pointer. We're about to explore how familiar Flutter looks when you compare it to JavaScript frameworks and what other reasons there are top use it - and let me tell you, it's going to be so much fun you might want to put on a party hat.
Well, I know some of you might be thinking, “Wait a minute, I'm a JavaScript developer, why should I care about Flutter?” Well, let me ask you, have you ever heard the phrase “Diversity is the spice of life " heard? Yes, that also applies here. By expanding your skills and learning more about Flutter, you might discover a whole new world of possibilities and solutions to your coding challenges.
So get ready to rock and roll, code warriors, because it's time to expand your programming horizons and discover why Flutter should play a part in your life.
When I first started learning Flutter, I had zero prior knowledge. To give myself a boost of motivation, I turned to videos to get a better understanding of what Flutter is all about. Watching videos not only helped me to get started with Flutter, but also gave me the confidence to continue learning and building my own apps.
Flutter is like a treasure trove of creative possibilities, just waiting for you to unlock its secrets. With Flutter, you can build stunning user interfaces, craft intricate animations and interactions, and even dip your toes into the wild and wacky world of game development. You'll discover lots of sources of inspiration that will leave you buzzing with excitement.
Later on, you will realize how interacting with Rust libraries empowers you to develop potent products - precisely what you are aiming for.
In Flutter, a component is a self-contained, reusable piece of a user interface. It is a widget that can be used in a Flutter app to create a specific visual and/or interactive element, such as a button, text field, or image. A component in Flutter can be composed of other components, making it possible to create complex UIs by assembling smaller, reusable parts.
Doesn't that sound familiar to you!?
Let's compare a single Flutter widget with a Vue.js component. In Flutter you write the whole component as Dart code:
Flutter's approach of writing everything as code provides a more streamlined and cohesive development experience compared to the traditional separation of HTML, CSS, and JS. With Flutter, you can create custom user interfaces and animations with greater ease and control, and the resulting apps are faster and smaller. Plus, no more switching between different languages and files like a mad scientist!
A very important difference to JavaScript Frameworks is: Flutter compiles the Dart code to native machine code. Theoretically you have the control over every pixel on the screen. BTW, this also differs from React Native where written code is compiled only to the native UI components.
Just a few examples to show you'll feel familiar - but you'll also have to learn new rules
Below, you'll find a completely incomplete list 🤪, but it is intended to show that there are many similarities between Dart and JavaScript, making it easier to switch between the two languages or even learn both simultaneously. There are other rules too, but you can easily learn them.
Some more comprehensive information you can find in the official docs. Here are two links:
Like in JavaScript, in Dart var is short for variable. It is used to declare a variable whose type is statically inferred:
var mystr = "shimmer";
In the example above, we declare a variable of type String. One of the convenient features of Dart is that it's able to infer the type of a variable based on the value that's assigned to it. Here, it's quite evident that it's a String type.
But unlike JavaScript, you CANNOT change the type of the variable afterwards!
var mystr = "shimmer";
mystr = 10; // THIS ASSIGNMENT DOESN'T WORK!
When we attempt to change the type of a variable in Dart, the compiler will generate an error. This is because Dart is a statically typed language, which means that the data type of a variable is determined at compile-time and cannot be changed during runtime.
Another way to declare variables is the explicit type declaration:
String mystr = "shimmer";
In Dart, it's generally considered good practice to explicitly declare the data type of a property when defining a class. This helps to ensure that the code is more easily understood and maintainable, especially when working on larger projects with multiple developers.
For variables within smaller scopes, such as a method, the "var" keyword can be used instead of explicitly declaring the data type. This is because the scope is smaller and it's often easier to infer the type of the variable based on the context of the code.
class MyCat {
   String cat = "Bob";

   void someMethod() {
     var anotherVariable = "Tom";
   }
}
class Person {
  constructor() {
    this.name = "";
    this.age = 0;
  }

  greet() {
    console.log(
      `Hello, my name is ${this.name} and I'm ${this.age} years old.`
    );
  }
}

var person = new Person();
person.name = "Joe";
person.age = 44;
person.greet();
class Person {
  String name;
  int age;

  void greet() {
    print("Hello, my name is $name and I'm $age years old.");
  }
}

var person = Person();
person.name = "Joe";
person.age = 44;
person.greet();
var fruit = "apple";
switch (fruit) {
  case "banana":
    console.log("This is a banana");
    break;
  case "apple":
    console.log("This is an apple");
    break;
  default:
    console.log("This is not a fruit");
}
var fruit = "apple";
switch (fruit) {
  case "banana":
    print("This is a banana");
    break;
  case "apple":
    print("This is an apple");
    break;
  default:
    print("This is not a fruit");
}
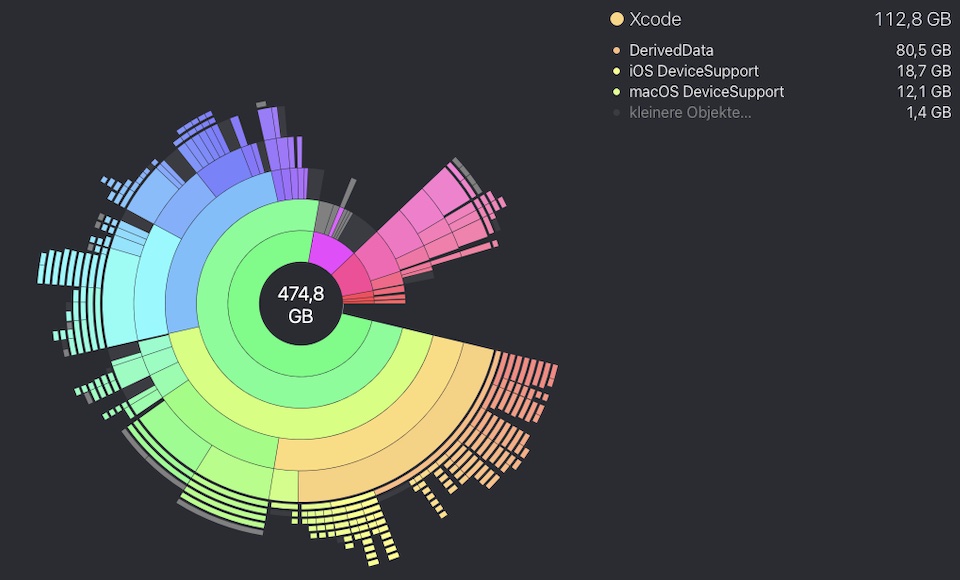
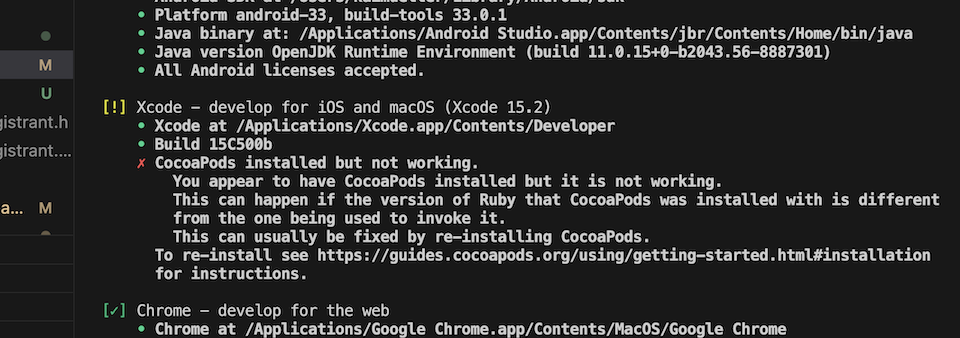
XCode, Android Studio, the SDKs and Virtual Devices, all that stuff needs GBs on your disc. Welcome to app development! Additionally it turns out that the cross-compiling process to build the libraries takes an enormous amount of disk space PER target, too.
As you continue to use Xcode, the available storage on your hard drive gradually decreases. This is because numerous files are generated automatically during project builds, with a significant amount of them being stored in the Derived Data folder. This folder alone can occupy anywhere from a few hundred MB to several GB of space.
Disc space used by derived data
Fortunately, you can easily remove files from this folder without any adverse effects. By doing so, you can recover valuable space on your Mac, making it more efficient to work with Xcode.
If you build more apps and cross-compile more targets, the disk space usage increases. However, you can safely remove these subfolders. The only difference it makes is in terms of time - the first build will take longer if the target folder has been deleted.
Disc space used by build targets of example app "Playground"
Although you can develop code for all platforms on a single machine, you can only execute and test iOS and macOS applications on macOS devices, Windows applications on Windows devices, and Linux applications on Linux devices.
You need to be patient, you may experience some hair-pulling moments when things grind to a halt, but when it finally all comes together, it's like hitting a bullseye on a dartboard - satisfying as heck!
Chapter by chapter I will explain you the steps to connect Flutter and Rust to IOTA. I therefore recommend that you also read section by section and follow the steps.
Second, I advise you to set up a project from scratch. I know it can be tempting to just download the code from the repository and run it, but there's a good chance you'll run into problems.
Due to the different versions of Rust and Flutter you may have, it's safest to follow the step-by-step instructions and selectively include specific files in your own project.
Another reason is that not only will you learn more about the intricacies of setup, but you'll also be better equipped to troubleshoot any problems that arise.
I want you to be successful and not frustrated.
Finally, when you include the code snippets, feel free to try refactoring them if you don't like the coding style. Keep in mind that I'm not producing the cleanest, best code, I just want to get things working. Everything else is nice to have.
Welcome to the section where we clear up any misunderstandings before you dive in! Think of it as the disclaimer before the main event, like when they tell you not to try the stunts you see in action movies at home.
So, what can you expect from this tutorial? We'll cover how to connect Flutter and Rust to IOTA, but let's make it crystal clear what's not on the menu.
First, we won't go into detailed explanations of IOTA - we'll leave the philosophical musings to the experts.
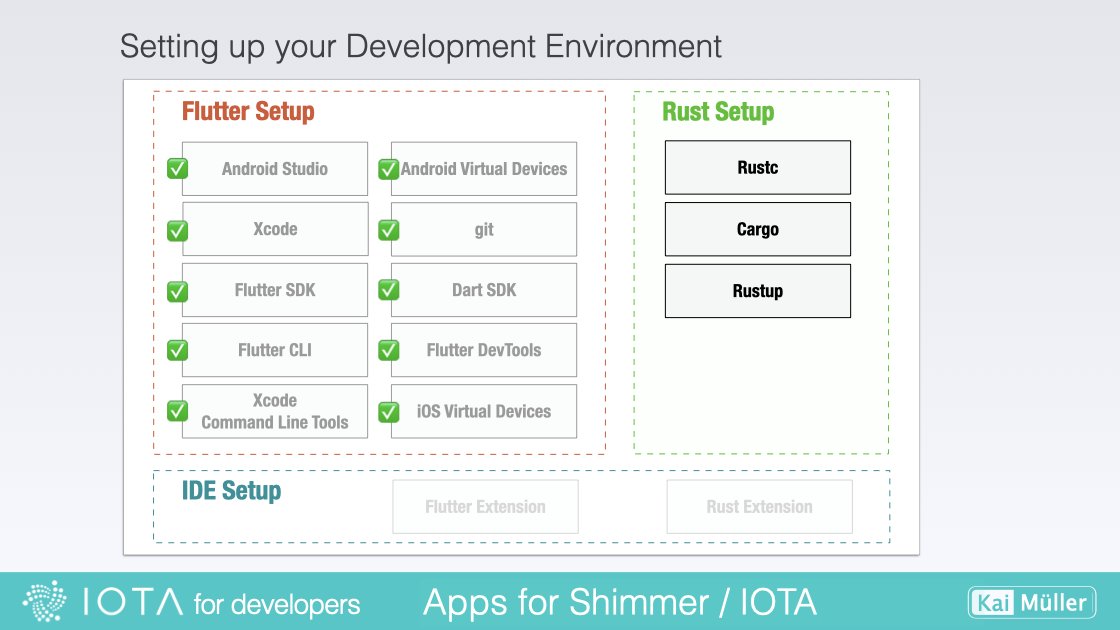
Also, this tutorial assumes you've already got Xcode, Android Studio, Flutter, and Rust up and running, so we won't bore you with deep installation instructions. Yes, there are sections called "Set up", but please understand that I can't deeply dive in but only can give you the right links and useful hints.
And sorry, no teaching of Dart or Rust - I'll assume that it's on your bucket list and you know what you're doing!
Finally, I won't be exploring the proof-of-concept for Linux, Windows, browsers, or browser extensions - this ain't no Cirque du Soleil show. I am using a Mac and so my personal means are limited.
And don't expect any deployment or production readiness insights - we'll let you handle the red carpet rollout yourself.
The tutorial was written between April 2023 and February 2024. The contents come together to form a whole, namely: texts and images on this homepage, the source code on Github, and the videos on Youtube.
All information therein refered to the latest Rust libraries from IOTA during the mentioned period: iota.rs (client library/wrapper for IOTA node's API), wallet.rs (including Stronghold), and identity.rs. Only in the chapter about the Playground App did I use the IOTA SDK.
Around the same time as the tutorial (April 2023), the IOTA Foundation began writing a new library called the IOTA SDK. This library combines client and wallet functionalities, leading to iota.rs and wallet.rs libraries being considered deprecated.
According to the IOTA Foundation, the IOTA SDK is the library to be used from now on. While the IOTA Foundation has created a sensible consolidation, this fact poses a problem for me.
In short: I don't want to tear apart the contents of the tutorial. It would be confusing if the information shown in the video no longer matched the texts of the tutorial or the source code on GitHub.
Texts could be relatively easily replaced. On the other hand, it's too much work to recreate all images and videos.
Side Note: The chapter on the Playground App already contains content (texts, images, videos, code) about the new IOTA SDK.
So, another solution is needed to keep the tutorial current. And to do that, it's necessary to understand the impact of a different Rust library.
The focus and purpose of the tutorial are not to detail IOTA's Rust libraries. The core of the tutorial is: how to use them in an app or what workflow to follow to create apps with Flutter and Rust.
The specific libraries used are secondary.
Of course, there are IOTA-specific issues because third-party libraries like rocksdb (for the wallet) and libsodium (for Stronghold) are used. However, these issues do not change with the IOTA SDK and are discussed in this tutorial.
The most significant difference, in my opinion, is in the Rust source code. Here, the module structure, access to individual functions, or sometimes even the naming has changed.
The IOTA SDK provides the same Rust examples as the predecessor libraries iota.rs and wallet.rs. Since my Rust code largely uses IOTA's official examples, it's possible to compare the Rust code of the examples.
To ensure the tutorial's relevance regarding the IOTA SDK, I considered the following specific measures sensible:
The original version of the tutorial remains intact.
Alongside the Rust code for iota.rs and wallet.rs, I provide a version for the IOTA SDK v1.1.4: A separate tab for the IOTA SDK Library is included at the respective places, revealing a separate content with the IOTA SDK code. Note the yellow tab in this example:
Only if necessary, the texts are updated from the original page. Example: I renamed the page "Core API and iota.rs" to "Core API and IOTA's Rust library".
There is an update notice below an image if it contains iota.rs or wallet.rs-specific content that needs to be abstracted with the IOTA SDK. Note the yellow caption in this example:
The source code on GitHub remains unchanged.
The videos on YouTube remain unchanged.
The code of the MQTT chat app (which is a bonus) remains unchanged. It's a good exercise to convert this app yourself.
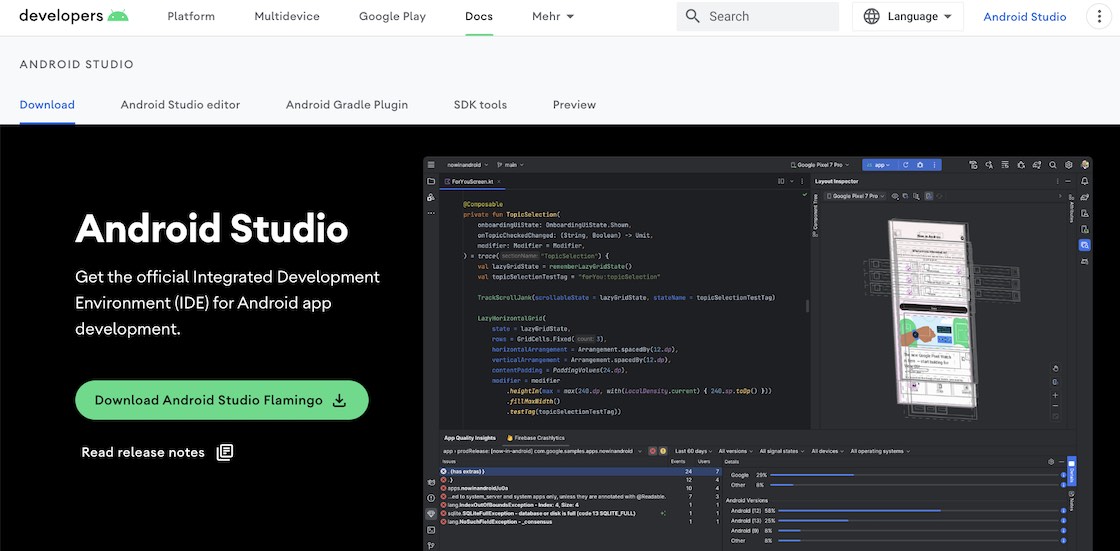
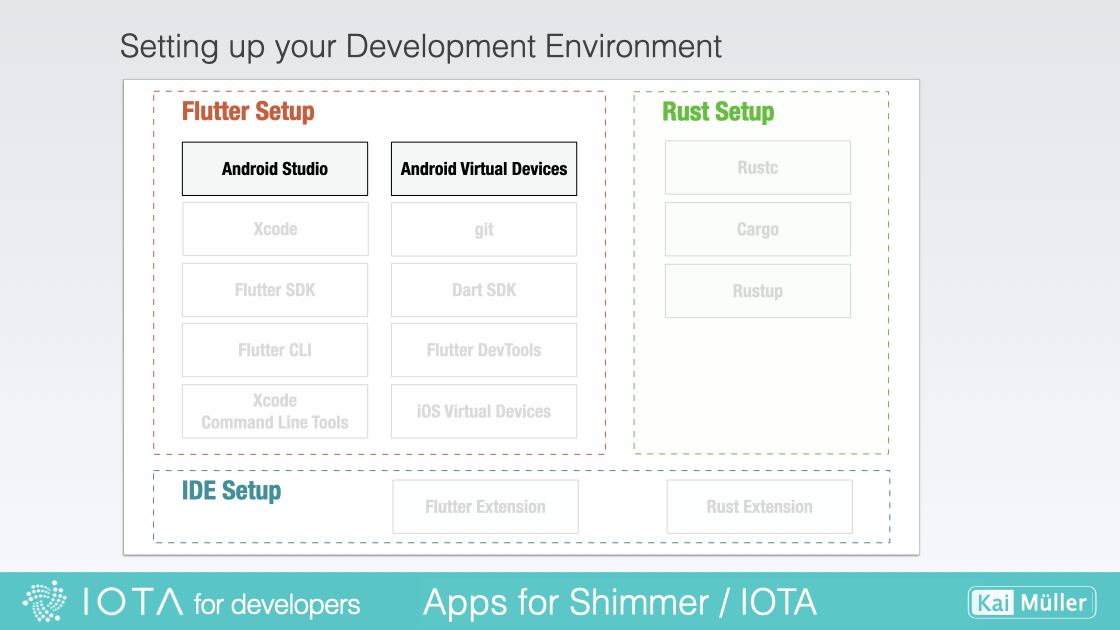
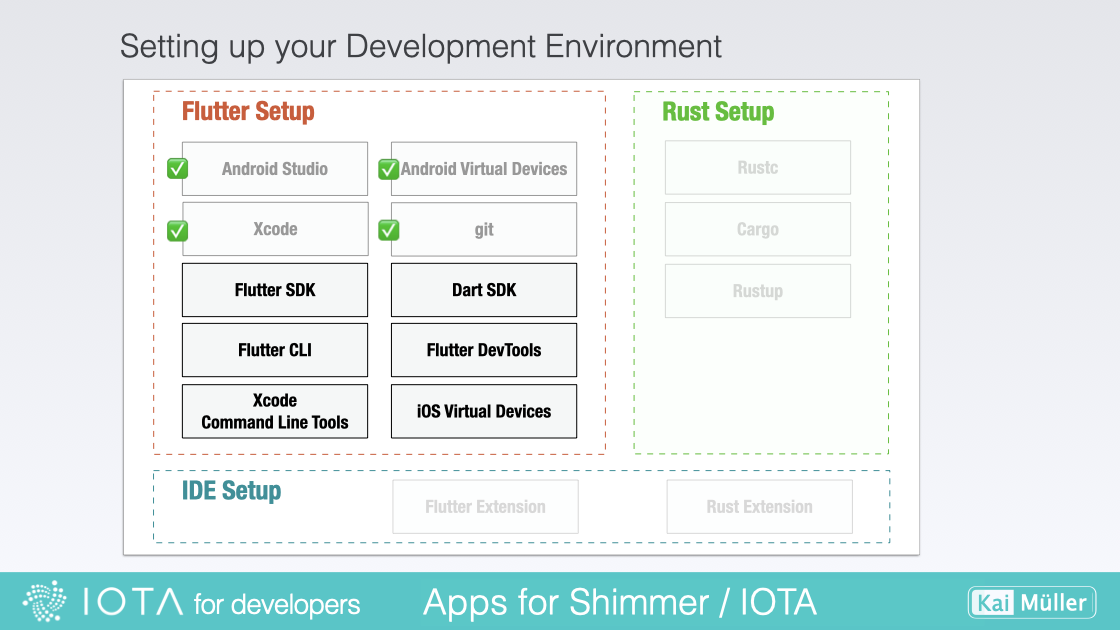
We primarily use Android Studio for managing SDKs and virtual devices, building and running apps, as well as for deployment purposes. However, when it comes to actual coding, we'll be using VS Code as our preferred editor.
So - in the context of Flutter - Android Studio is required for its tools used by Flutter under the hood.
After downloading (several GBs...), install Android Studio:
On Mac, drag Android Studio into the Applications folder.
On PC, execute the installer and follow the wizard. Make sure to install also the "Android Virtual Device".
Avoid Special Characters in your installation path!
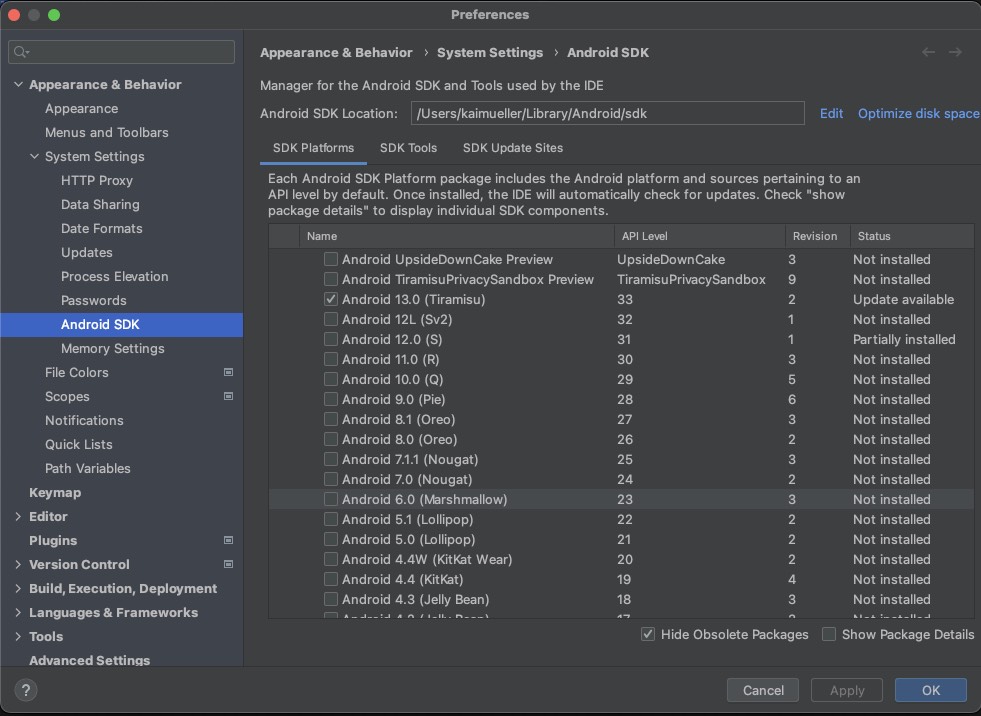
Starting Android Studio the first time, a configuration wizard will start. Use "Custom" option, in order to check "Android SDK", an Android SDK Platform like "API 33: Android 13.0 (Tiramisu)" and, if selectable, "Android Virtual Device".
Go on to the next chapter, to get some essentials about the requirements for the development with Flutter and the Flutter Rust Bridge.
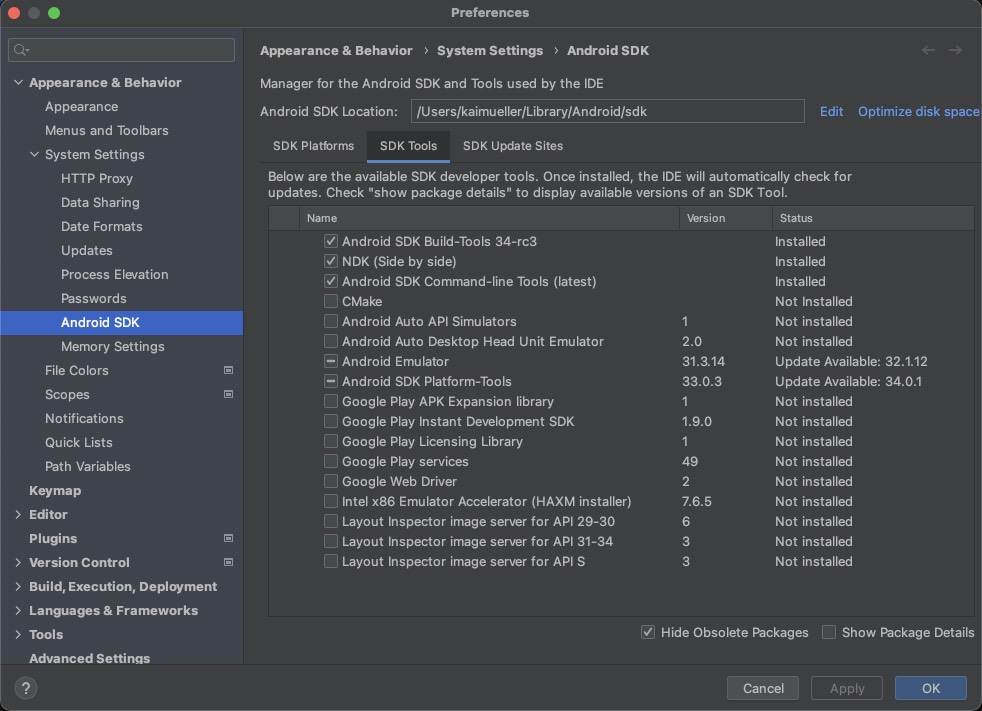
The SDK Manager is used for managing the software development kit (SDK) components of the Android platform. Its primary purpose is to facilitate the installation, removal, and updating of various SDK packages required for developing Android applications. It allows also to manage and update various SDK Tools that are part of the Android development toolkit, such as the Android SDK Build Tools, the Native Development Kit (NDK), and more.
Start Android Studio. You can open the SDK Manager in one of the following ways:
via the "Welcome to Android Studio" Page:
If this page is open, there is dropdown menu "More Actions". Open it and select "SDK Manager".
via the "Tools" Menu:
If Android Studio is open, open the "Tools" menu. You will find the item "SDK Manager".
via the "Settings":
Open the "Settings..." in the "Android Studio" menu.
In the window, select the "Appearance & Behavior" -> "System Settings" -> "Android SDK" section.
Hint: The Android SDK Location can be found here, too.
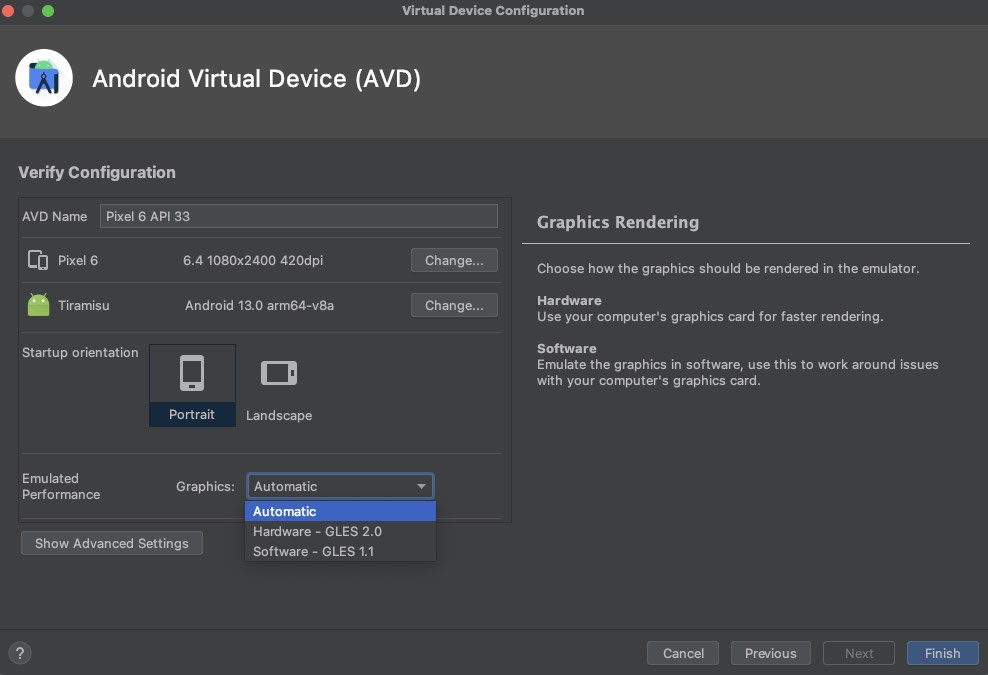
The Virtual Device Manager is a tool used for managing and creating virtual devices, also known as emulators. Emulators are software-based virtual devices that simulate the hardware and software configurations of real Android devices, allowing developers to test and run their applications without needing physical devices.
If you don't have a Virtual Device yet, click on "Create Device".
Choose a phone, e.g. the "Pixel 6" or "Pixel 3a"
As system image, choose the one corresponding to the installed Android SDK platform!
Keep the ABI in mind, here "arm64-v8a". The ABI information is used to configure the build.gradle file later, in the context of the Flutter-Rust-Bridge configuration.
For better performance, choose "Hardware - GLES 2.0" for Graphics.
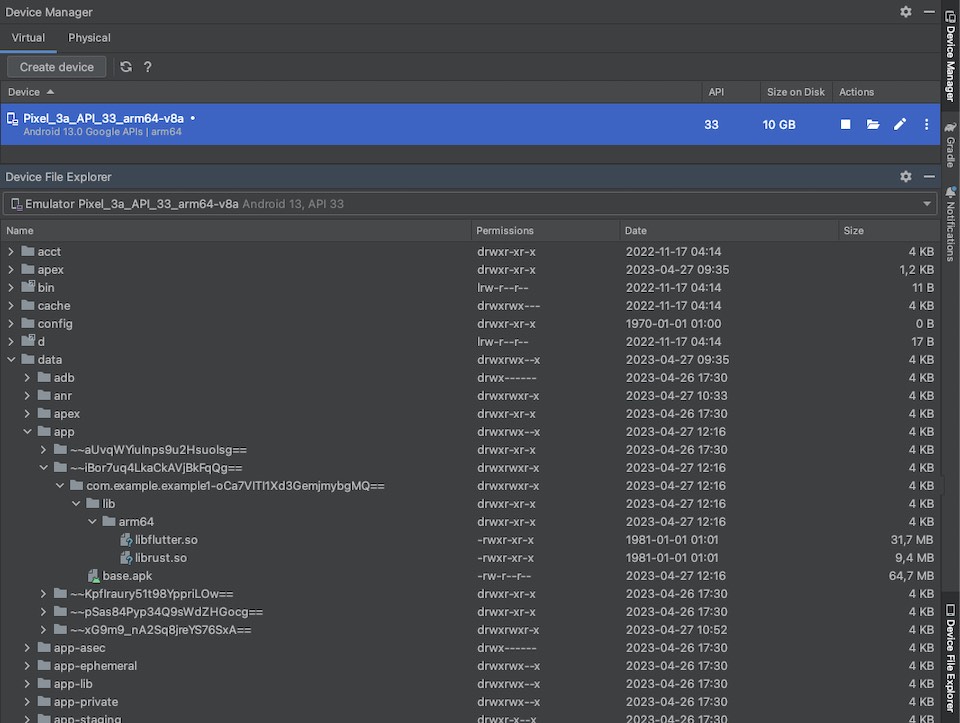
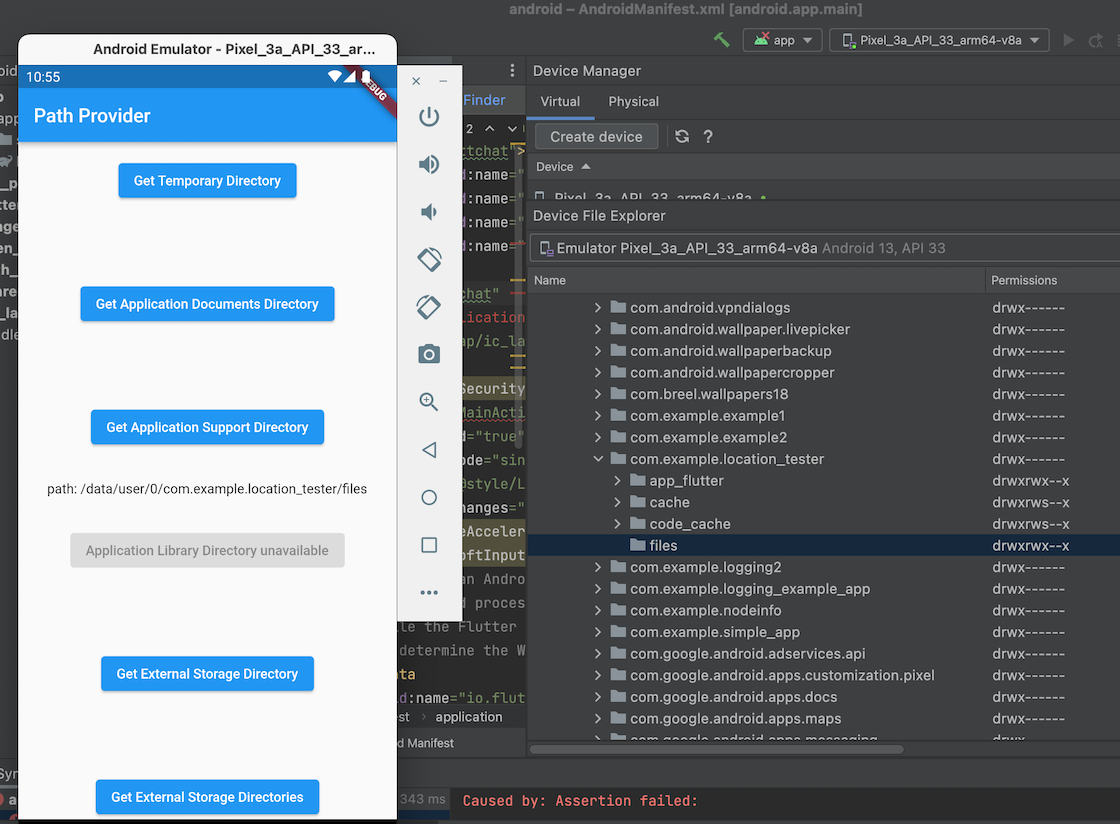
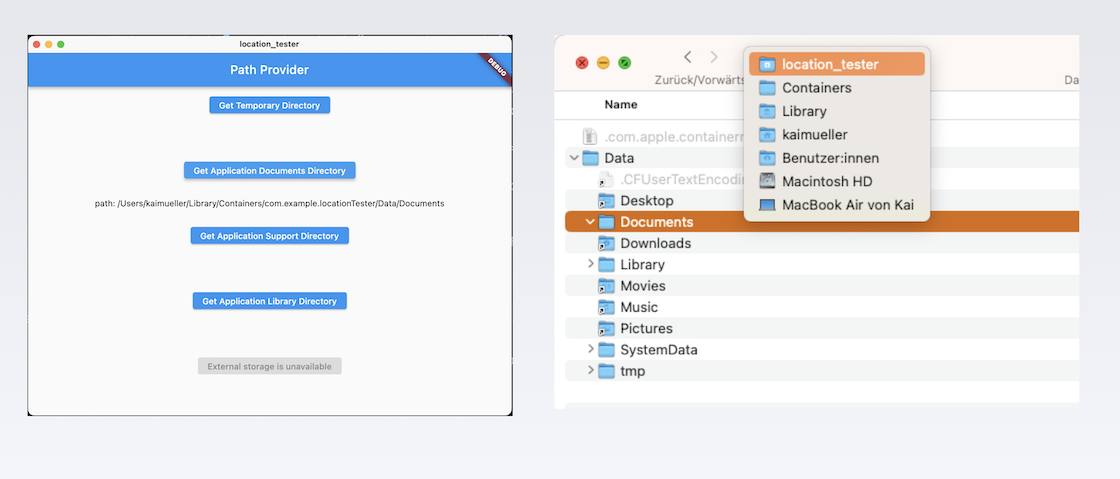
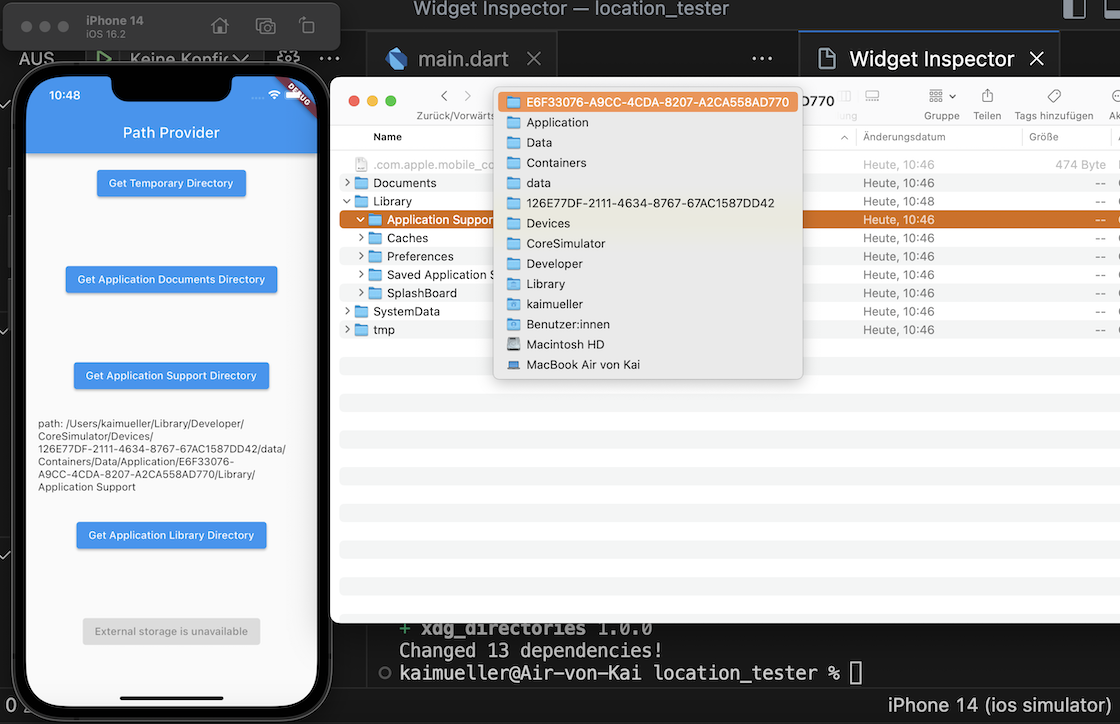
Open the Virtual Device Manager and start your Virtual Device by clicking on the Play button. You'll notice that there is section called "Device File Explorer".
Later on, you can refer to the following location to retrieve information regarding stored files (RockDB, Stronghold Snapshot file) in your application's filesystem.
Path to AVD's filesystem: Root -> data -> data -> {app.id}
AVD filesystem
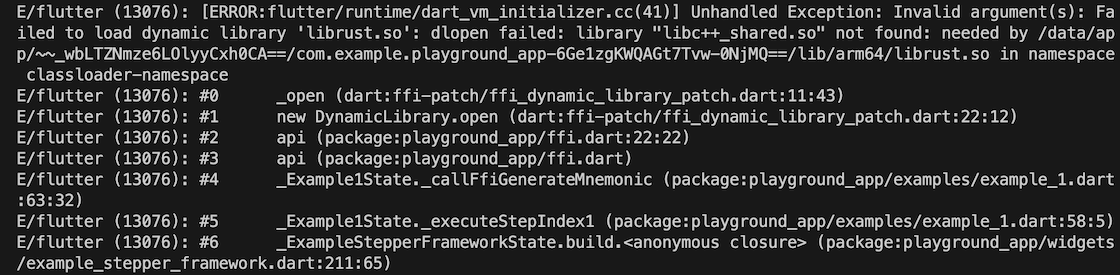
For your information, the location of the cross-compiled Rust library can be found here:
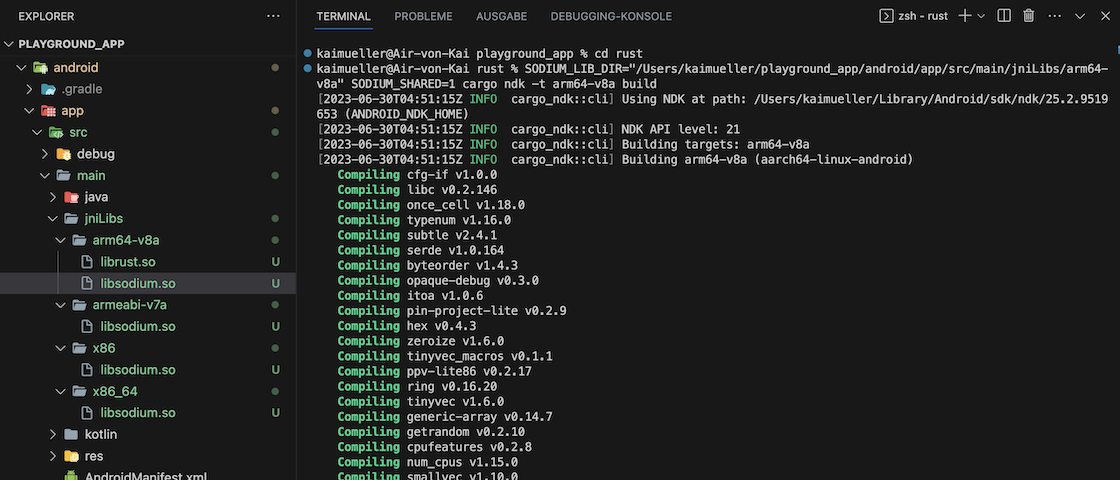
Root -> data -> app -> {temporary folder - use date to find the correct one} -> {app.id} -> lib
Location of the cross-compiled Rust library librust.so
Similar to the usage of Android Studio, we use Xcode for managing virtual devices, building and running apps, as well as for deployment purposes. However, when it comes to actual coding, we'll be using VS Code as our preferred editor.
So - in the context of Flutter - Xcode is required for its tools used by Flutter under the hood.
Important note
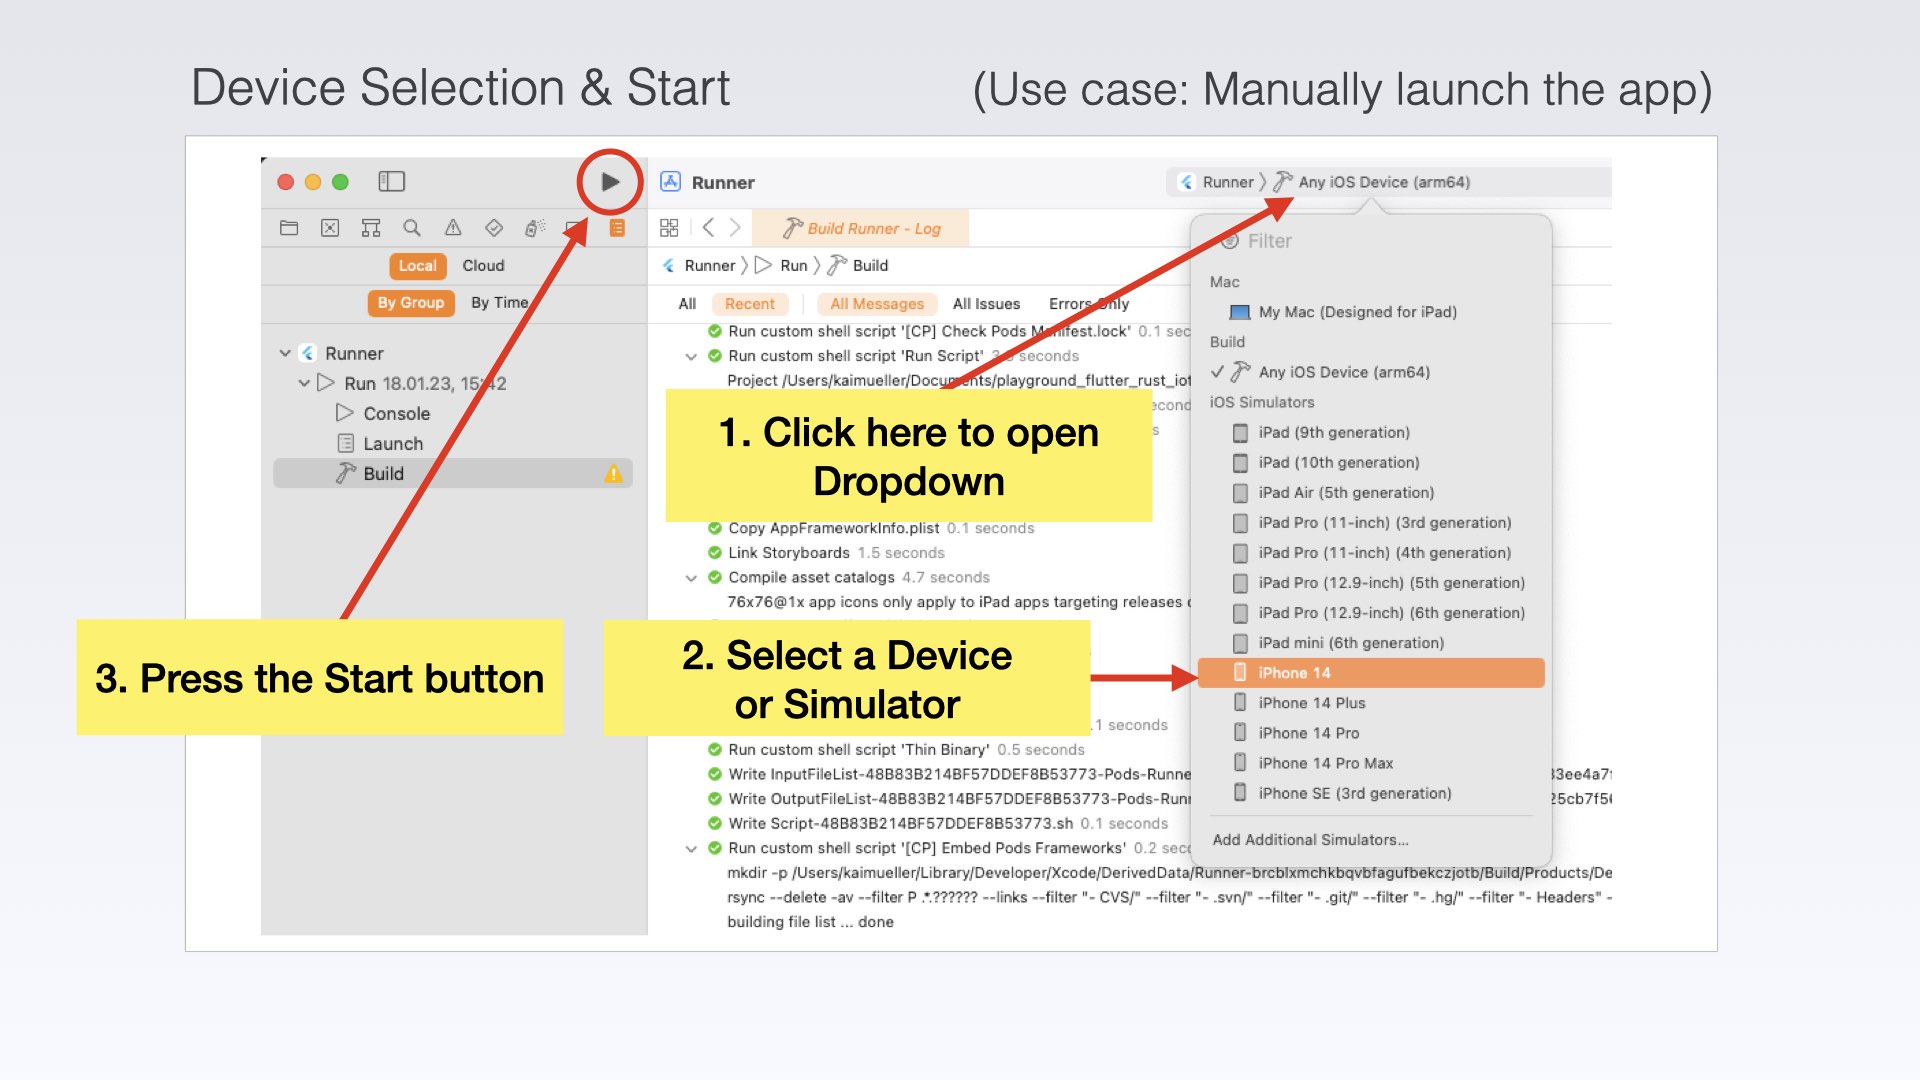
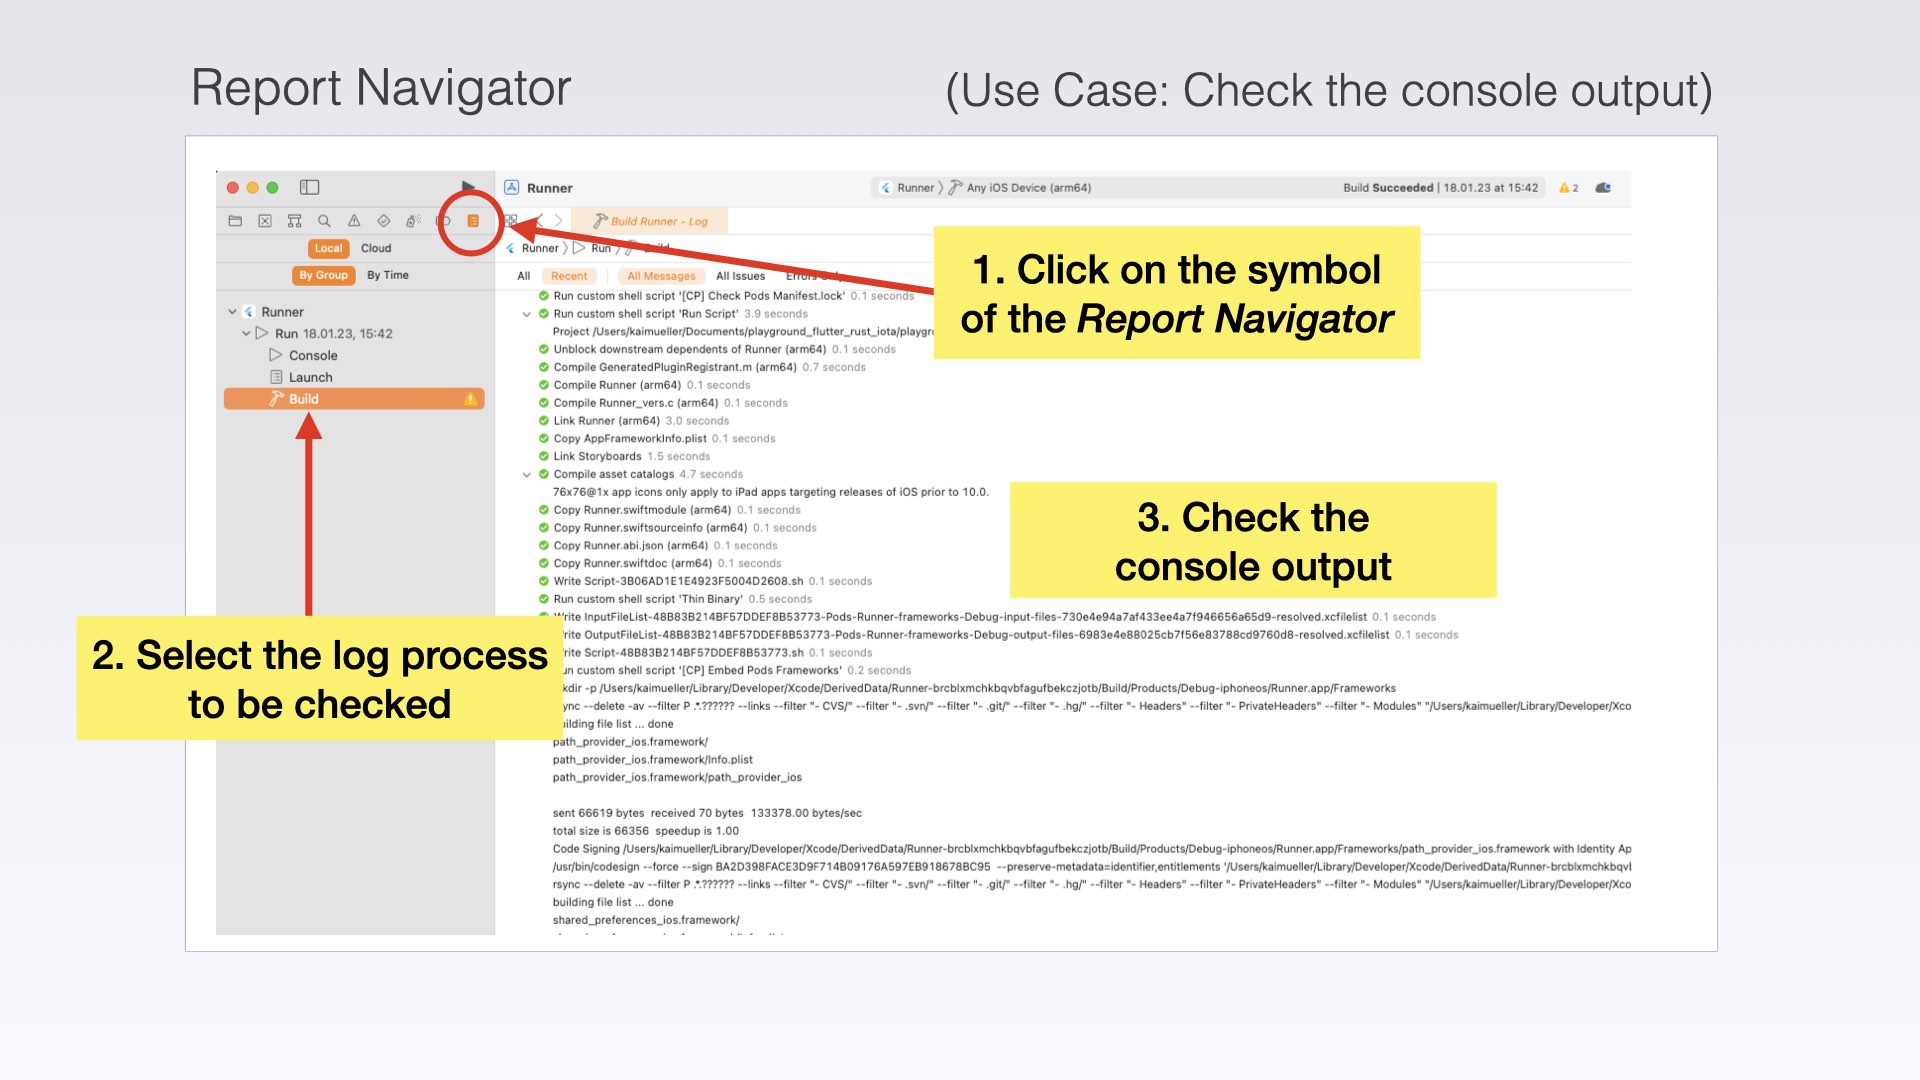
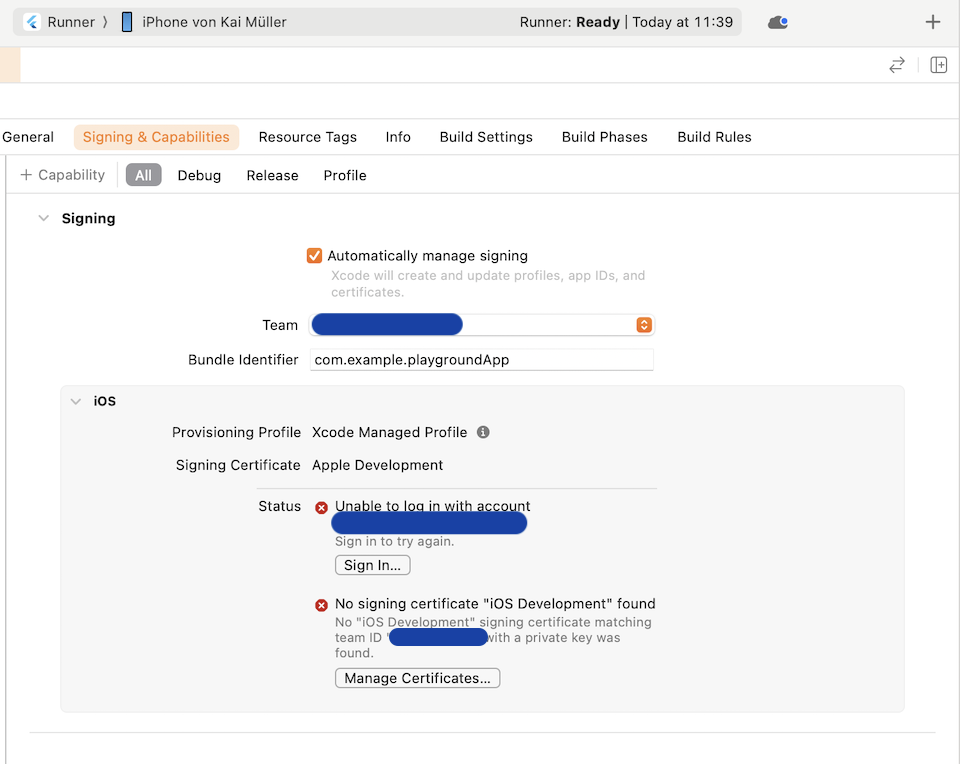
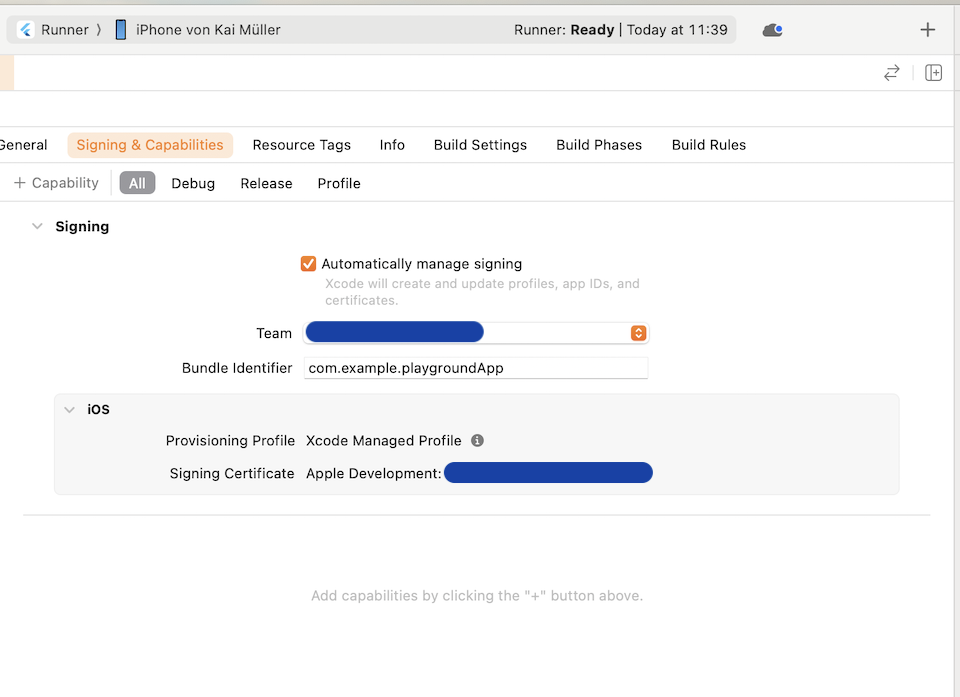
During the work with certain IOTA libraries and the Flutter Rust Bridge, it was sometimes necessary to launch the app directly from Xcode. In certain situations, it deviated from the usual procedure of starting the app with "flutter run" and instead required a workaround through Xcode.
Xcode: Where Complexity Unfolds, Humor Helps Break the Mold.
At first glance, Xcode resembles an airplane cockpit: Overwhelming and seemingly impossible to navigate. But here's the thing: You don't need to fiddle with most of the settings.
Flutter has taken care of generating the Xcode project for you. As for the second Xcode project for the Rust library (mentioned below), that's created by cargo-xcode.
So, don't worry! All you need to do is grasp a few essential concepts and locate some helpful resources to find your way around. And hey, who knows, maybe you'll even learn to enjoy the Xcode experience, despite its initial complexity!
A Xcode project follows a specific structure that organizes the various files and resources used to build an macOS or iOS application.
Project File: A project file with the extension .xcodeproj or .xcworkspace serves as the entry point for the Xcode project. It contains information about the project settings, build configurations, and references to all the project files.
The .xcodeproj file is the traditional project file used in Xcode. It represents a single Xcode project and is used for organizing and building a single target, such as an iOS app, extension, or framework. It contains project settings, build configurations, and references to all the project files specific to that target.
The .xcworkspace file, on the other hand, is used when you have multiple Xcode projects or multiple targets that depend on each other. It is a workspace file that can include one or more .xcodeproj files and their associated targets. The .xcworkspace file acts as a container that allows you to work on and build multiple projects or targets together in a unified workspace.
Targets: An Xcode project can have one or more targets. Each target represents a distinct product, such as the main app, extensions, or test suites. Targets contain the necessary build settings, dependencies, and references to source files.
Source Code: The source code files are organized within groups or folders. The default group is typically named after the project and contains the main application's source code files. Additional groups can be created to organize code files into logical categories or features.
Frameworks and Libraries: Xcode projects often use external frameworks and libraries to extend functionality or reuse code. These dependencies are managed within the project and are listed in the "Frameworks and Libraries" section. They can be system frameworks, third-party libraries, or custom frameworks.
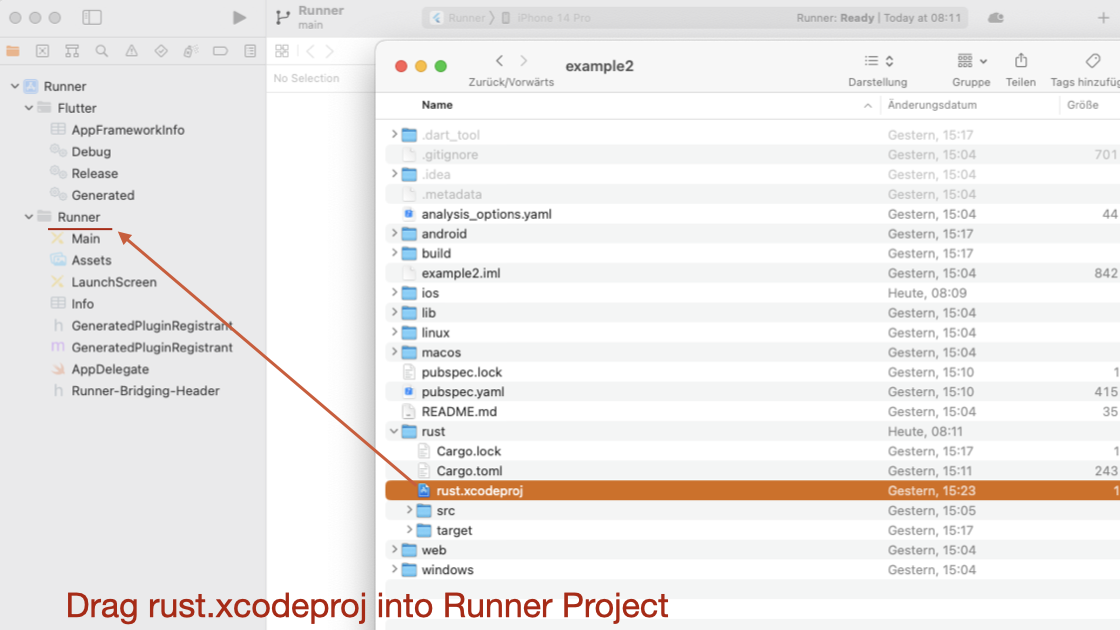
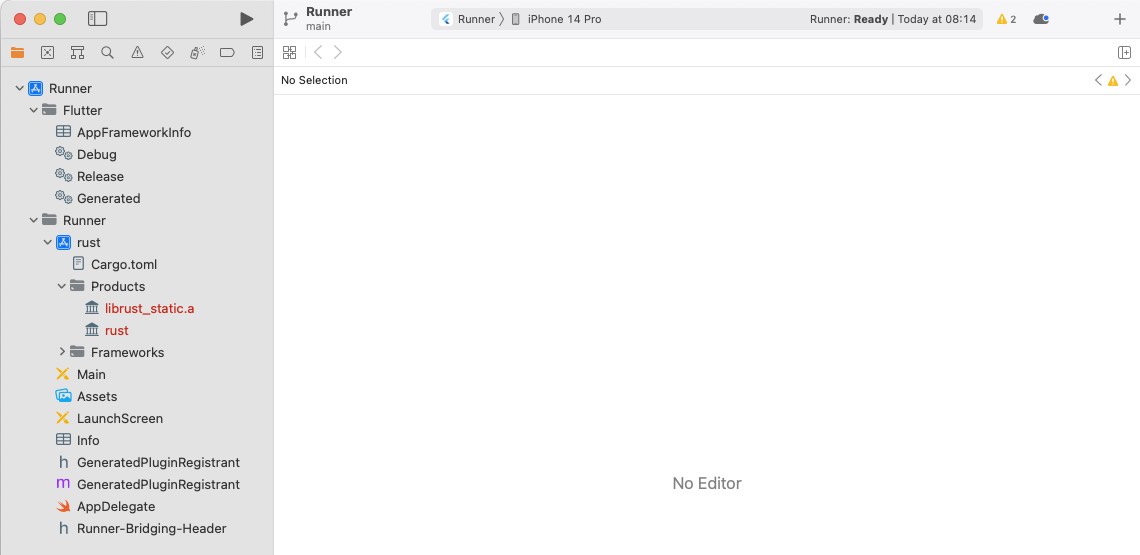
In the Flutter/Rust context, the Rust Code is a separate Xcode Project which is included as "subproject" into the main project. This Xcode Project is created by the tool cargo-xcode.
Configuration Files: Configuration files, such as Info.plist, contain essential metadata about the application, including its bundle identifier, version, required device capabilities, and permissions.
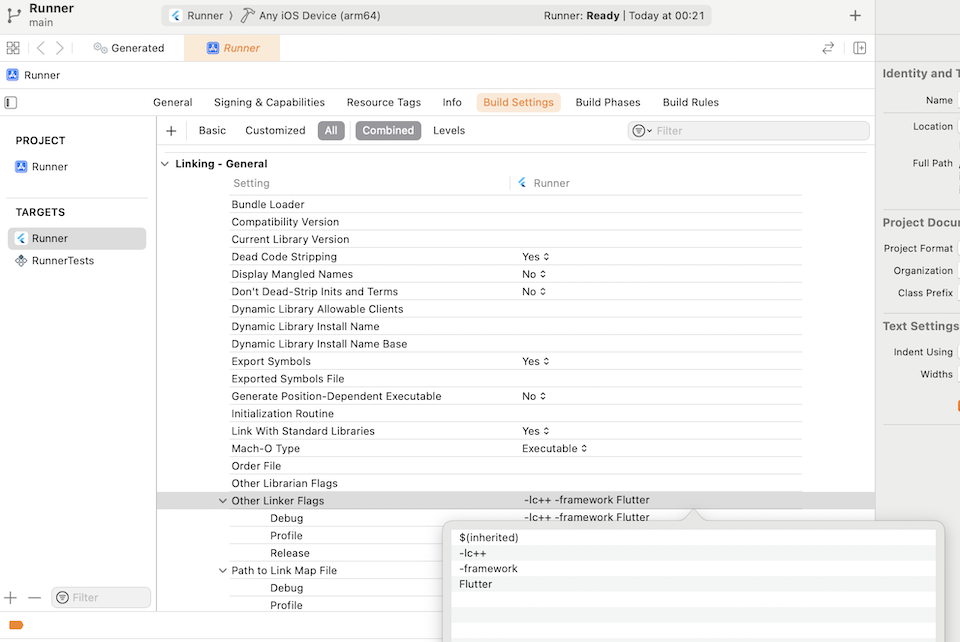
Build Settings: Xcode provides an interface to configure build settings for the project and individual targets. These settings control compiler flags, optimization settings, code signing, deployment targets, and various other project-specific configurations.
The interaction of this structure, composed of multiple Xcode projects, becomes more apparent when we build applications for macOS resp. iOS in the practical chapters.
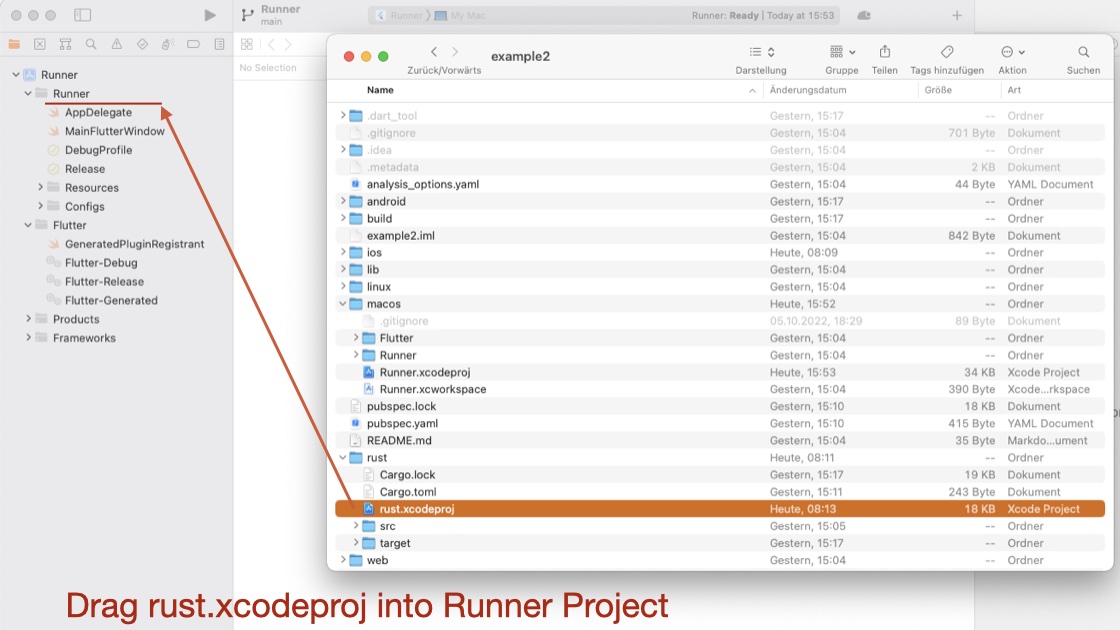
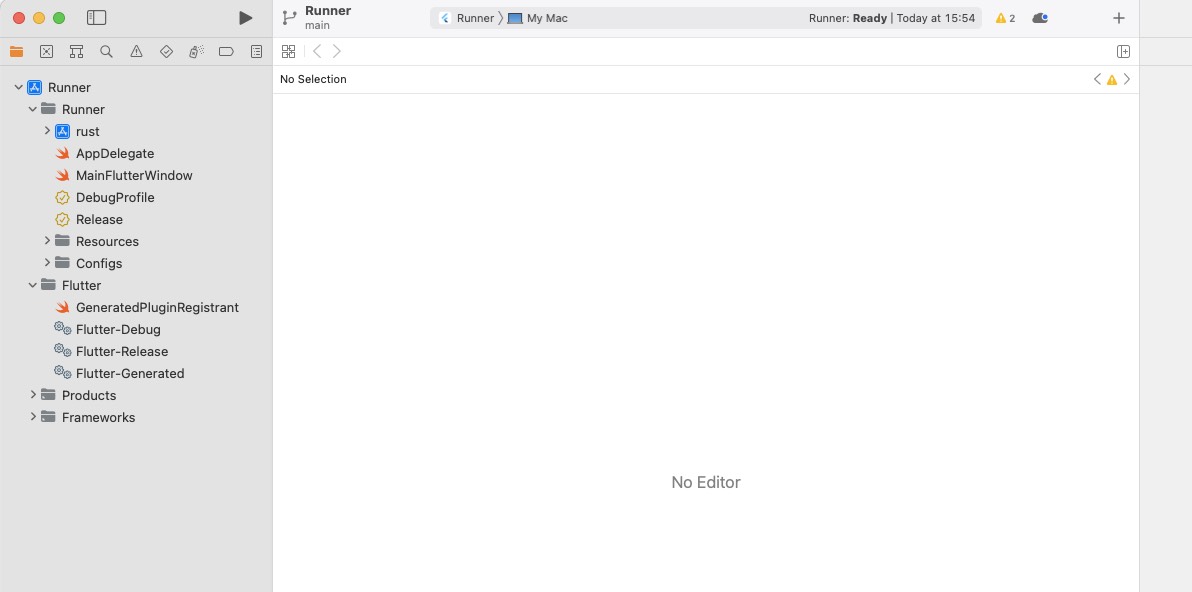
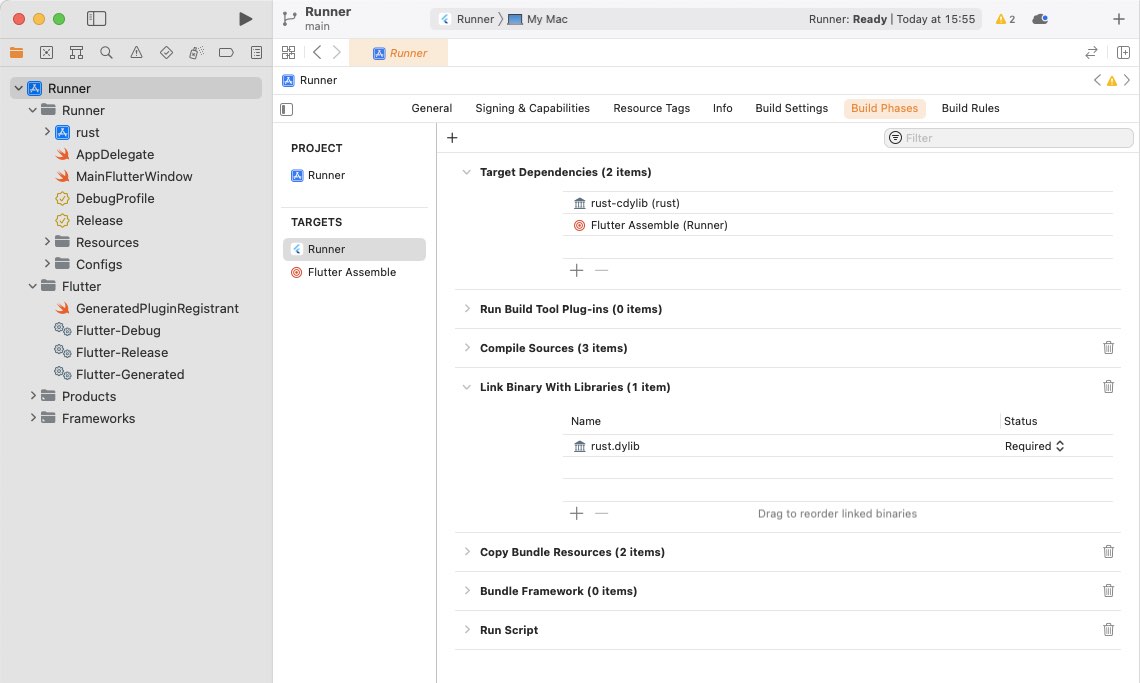
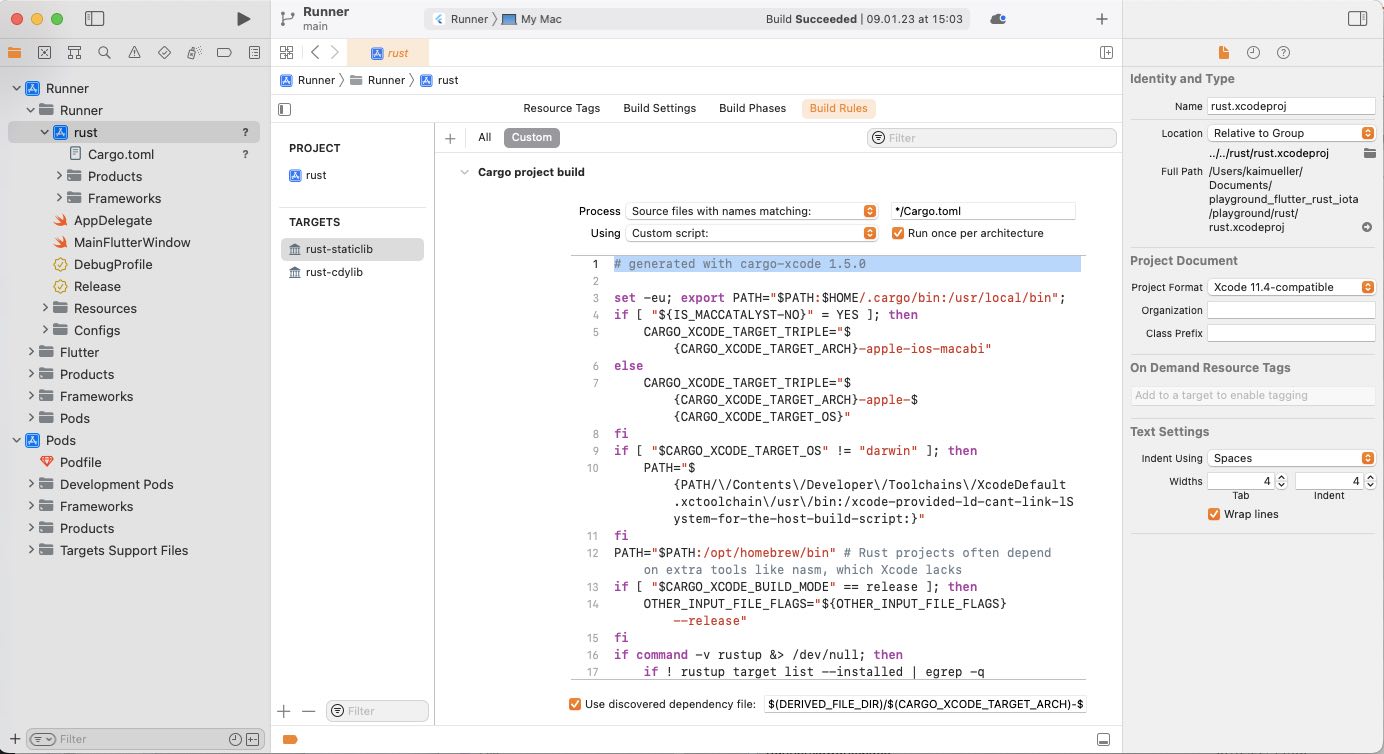
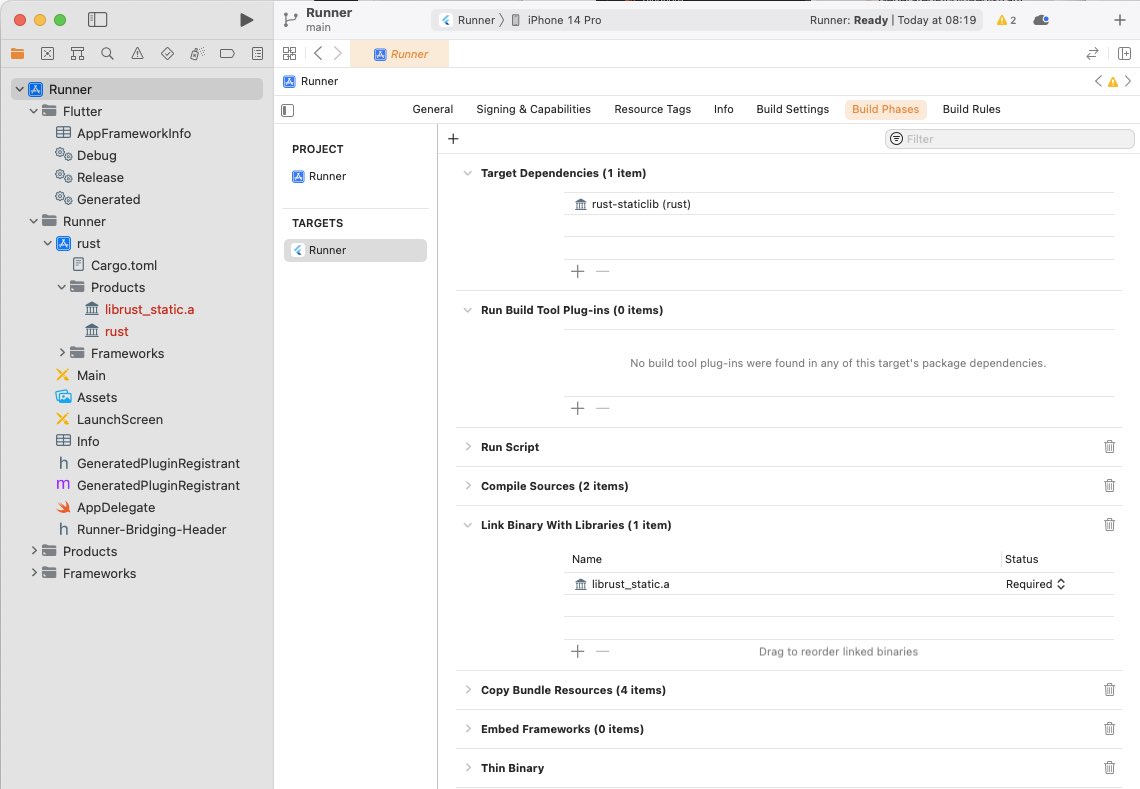
At this stage, it's worth mentioning that there exists a dedicated Rust Xcode project rust.xcodeproj. This project is created during an initialization step of the Flutter Rust Bridge for macOS or iOS. It includes a script ("Build Rule") that serves the purpose of generating a static or dynamic library and integrating it into the build process of the main Xcode project Runner.xcodeproj for the app.
Static and dynamic libraries are both forms of code libraries, but they differ in how they are linked and loaded into an application.
Static Libraries:
A static library, also known as a static link library, is a compiled set of object code that is linked directly into an executable at the time of compilation. The library code becomes part of the final executable binary.
When an application is built with a static library, all the library code is copied into the resulting binary. This means that the application becomes self-contained and doesn't rely on the presence of the library during runtime.
Static libraries are typically denoted by file extensions like .a (on macOS and iOS) or .lib (on Windows). They provide a way to distribute pre-compiled code that can be linked with multiple applications without needing to distribute the library separately.
Dynamic Libraries:
A dynamic library, also called a shared library or dynamic link library (DLL), is a separate binary file containing compiled code that can be loaded and linked by multiple applications at runtime.
Unlike static libraries, dynamic libraries are not copied into the application binary. Instead, the application references the dynamic library and loads it dynamically during runtime.
Dynamic libraries offer advantages such as code sharing among multiple applications and the ability to update the library independently without recompiling the applications that depend on it.
Dynamic libraries are usually denoted by file extensions like .dylib (on macOS and iOS) or .dll (on Windows).
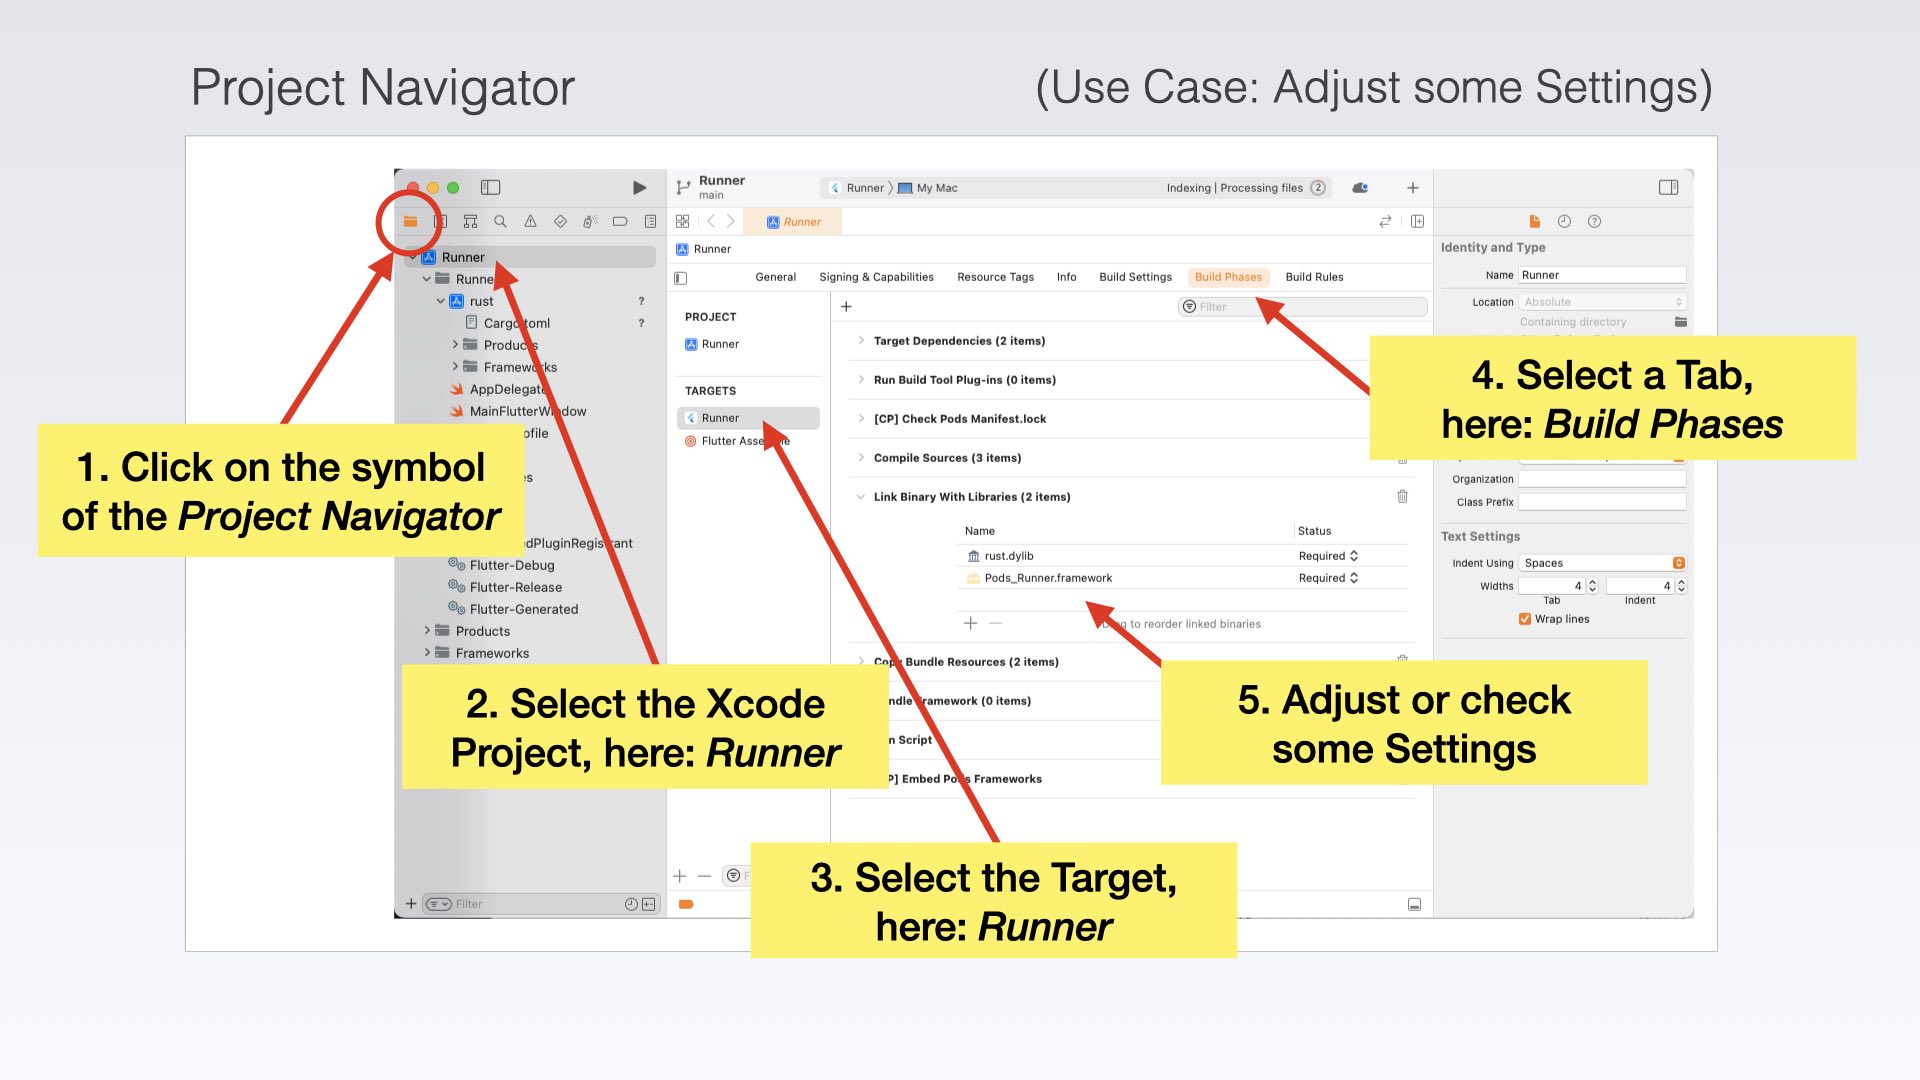
Click on the leftmost symbol in the left pane. This will activate the Project Navigator. It can be used to configure project settings or adjust the project structure, such as adding libraries or other Xcode projects (by dragging them into the workspace).
Flutter, developed by Google, aims to provide developers with a unified codebase to build cross-platform applications that can be deployed on various targets. Originally designed to support mobile devices, Flutter has expanded its reach to include desktop platforms such as macOS, Windows, and Linux, as well as browser applications.
At its core, Flutter consists of two main components: the UI Framework and a Collection of Tools. The UI Framework encompasses a rich set of code packages that empower developers to create visually appealing user interfaces. The collection of tools, on the other hand, enables the transformation of a single codebase into machine code capable of running on diverse platforms.
Flutter uses Dart as programming language. It's important to note that while you can write Dart code for all platforms using Flutter, there are specific requirements for building and testing applications on different targets. Building apps for iOS/macOS necessitates a macOS computer with XCode installed, while building and running Windows apps requires a Windows machine, and the same goes for Linux. However, developing Android and browser apps can be done on any host machine, as Android Studio is compatible with multiple operating systems.
Avoid Special Characters and Blanks in your installation path!
When installing Flutter, it's important to note the differences between Mac and Windows systems. One of the system requirements is having Git installed, as Flutter utilizes it for installation and updates. On Windows, Git needs to be installed separately. However, on Mac, Git is conveniently included in Xcode. For a smooth installation experience, it is recommended to install Xcode before Flutter on Mac systems.
Mac Users
Even if you already have Xcode installed, go through the installation guide and check each step! For example, don't forget to add the Xcode Command-line tools.
Side notes
To find out which shell you are using: echo $SHELL
To toggle hidden directories and files: command + shift + .
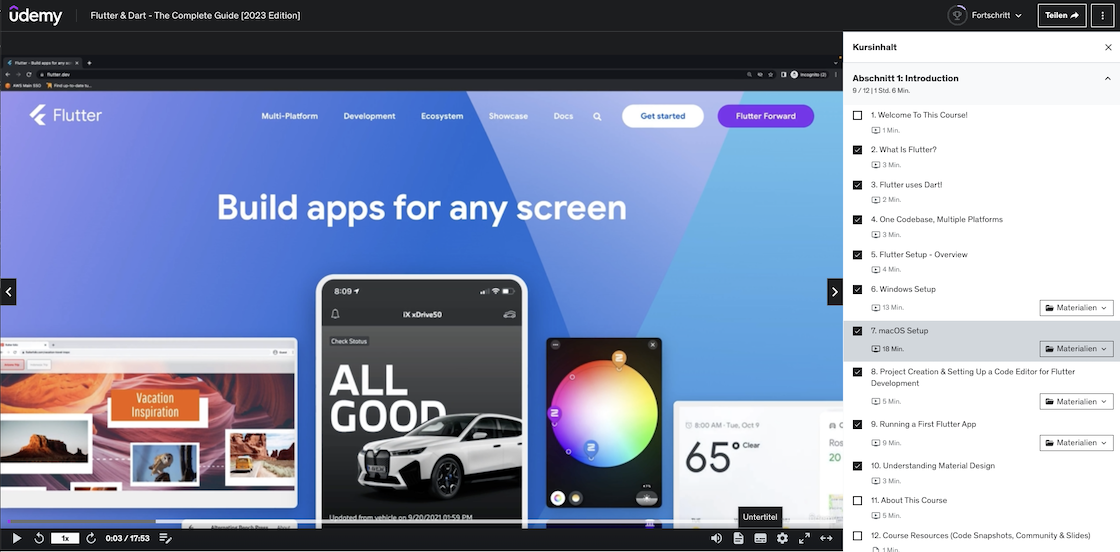
If you're more inclined to watch an installation video, I've got a fantastic recommendation for you: I highly recommend checking out the tutorials by Maximilian Schwarzmüller from Academind.
Now, let me make one thing clear — I'm not affiliated with Academind, and they definitely haven't slipped me any advertising cash (unfortunately). But I genuinely appreciate Max's work and the crystal-clear instructions he provides.
So, I wholeheartedly encourage you to check out his tutorial about Flutter & Dart ("The complete guide [2023 Edition]") and see for yourself. Don't just take my word for it, folks! Discover the wonders of Flutter installation with Max's delightful guidance. There are several free videos: amongst others you'll find a guide about the macOS Setup and one about the Windows Setup!
A typical Flutter project follows a specific structure that organizes the various components and resources of the application. Here is a description of the common project structure in a Flutter project:
android: This directory contains the Android-specific files and configurations for the Flutter project. It includes the Android manifest file, Gradle build scripts, and other resources specific to the Android platform.
ios: This directory holds the iOS-specific files and configurations. It includes the Xcode project, property list files, and other resources specific to iOS development.
lib: The lib directory is where the main Dart code for the Flutter application resides. It contains the main.dart file, which serves as the entry point for the application. Additionally, you can organize your code into multiple files or directories within the lib directory to improve code modularity and maintainability.
macos: This directory holds the macOS-specific files and configurations. It includes the Xcode project, property list files, and other resources specific to macOS development.
test: The test directory is used for writing unit tests and integration tests for your Flutter application. It typically contains test files and directories to organize your test code.
assets: The assets directory is where you can store static files such as images, fonts, and other resources required by your application. These files can be accessed using Flutter's asset management system.
pubspec.yaml: The pubspec.yaml file is a YAML-formatted configuration file that defines the project's metadata, dependencies, and assets. It specifies the required packages, version constraints, and additional resources like fonts or images.
Packages ("Plugins") refer to pre-built libraries or modules that developers can use to add specific functionalities or features to their Flutter applications. They are created by the Flutter community, as well as by the official Flutter team at Google, and they help streamline the development process by providing ready-to-use code solutions for common tasks.
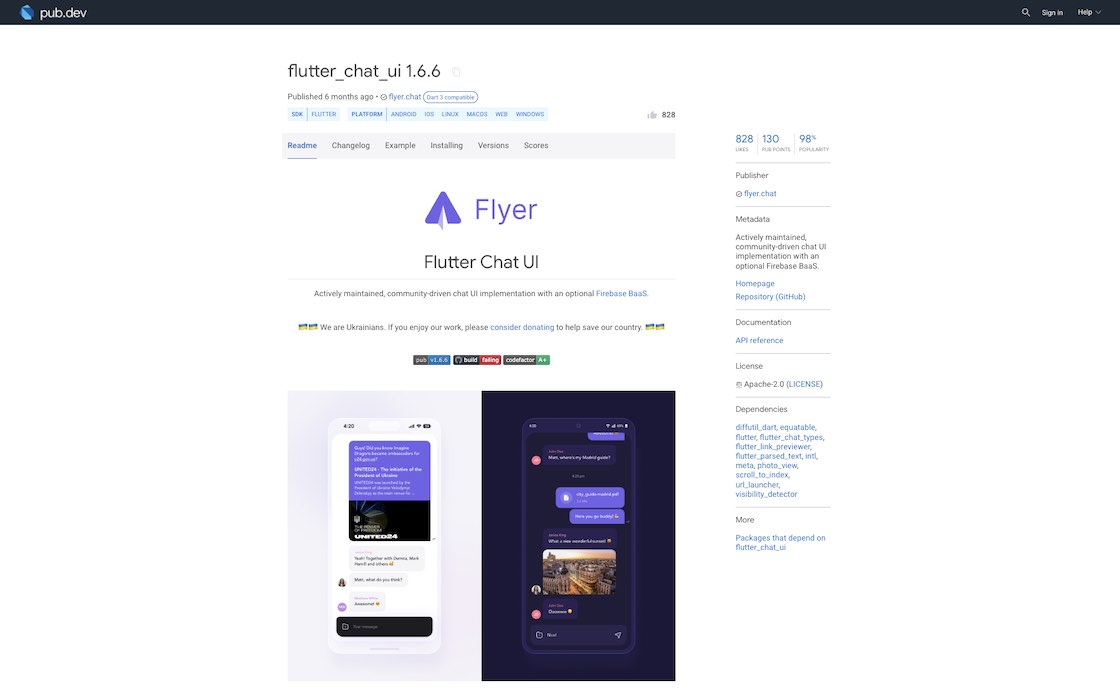
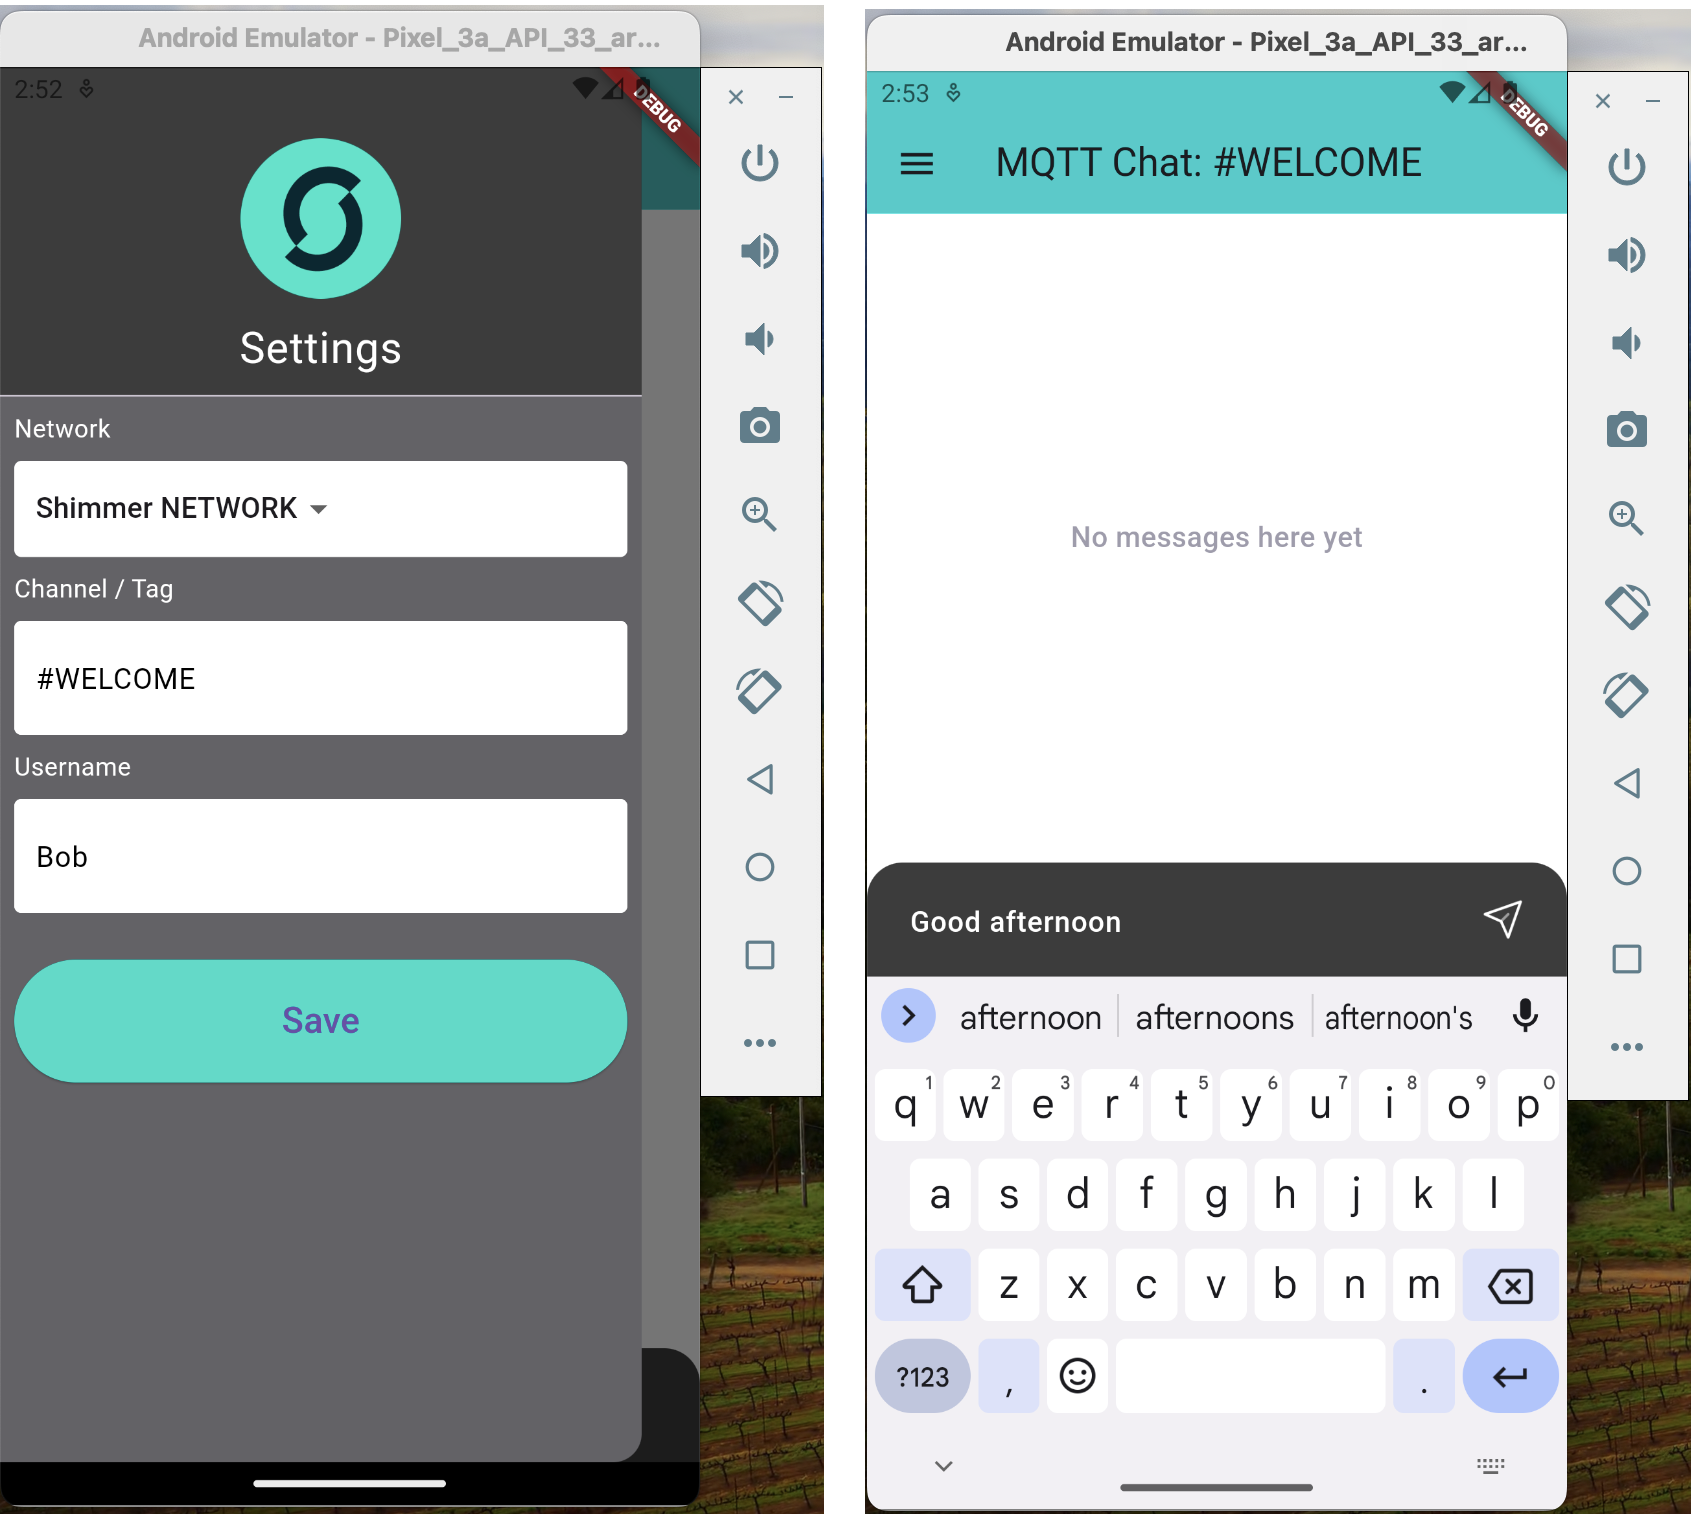
In my "MQTT Chat App" project, I utilized the "Flutter Chat UI" package to swiftly integrate a chat user interface and interactive functionality with just a single installation instruction!
The Package Manager is used to manage dependencies, define project metadata, configure project-specific settings and facilitate the development workflow.
Flutter / Dart
Rust
JavaScript / Node.js
Package Manager
Pub
Cargo
npm
Configuration File
pubspec.yaml
Cargo.toml
package.json
Package Repository
https://pub.dev
https://crates.io
https://npmjs.org
To add a package/plugin use the command:
flutter pub add <package>
Once the package is installed, you'll find a list entry in the pubspec.yaml file, as dependency.
Don't use special characters or blanks (use "_" instead) as project name and in your absolute project path!
Don't name your project like an existing public package! It could lead to circular dependencies. See the Logging Example App -> Resources section as example.
To create an "empty" app use the command:
flutter create --empty <project_name>
To create Flutter's "default" app use the command:
When installing Rust, the recommended approach is to use rustup, a versatile tool that serves as both an installer and version manager for Rust.
With rustup, you gain access to a comprehensive toolset that enhances your Rust development experience. It includes rustc, the rust compiler responsible for translating your Rust code into executable binaries or libraries.
Cargo, another essential component, is the Rust package manager. It also simplifies dependency management, project building, testing, and more, serving as a valuable asset in your Rust workflow.
rustup also offers rustfmt and clippy. rustfmt is a source code formatter that ensures consistent and elegant formatting in your Rust codebase. On the other hand, clippy is a Rust linter that helps identify potential issues and provides helpful suggestions to improve your code.
So, everything starts with installing rustup.
On macOS, Linux, or another Unix-like OS, to download rustup and install Rust, run the following in your terminal, then follow the on-screen instructions.
curl --proto '=https' --tlsv1.2 -sSf https://sh.rustup.rs | sh
Rust updates very frequently. If you have installed Rustup some time ago, chances are your Rust version is out of date. Get the latest version of Rust by running:
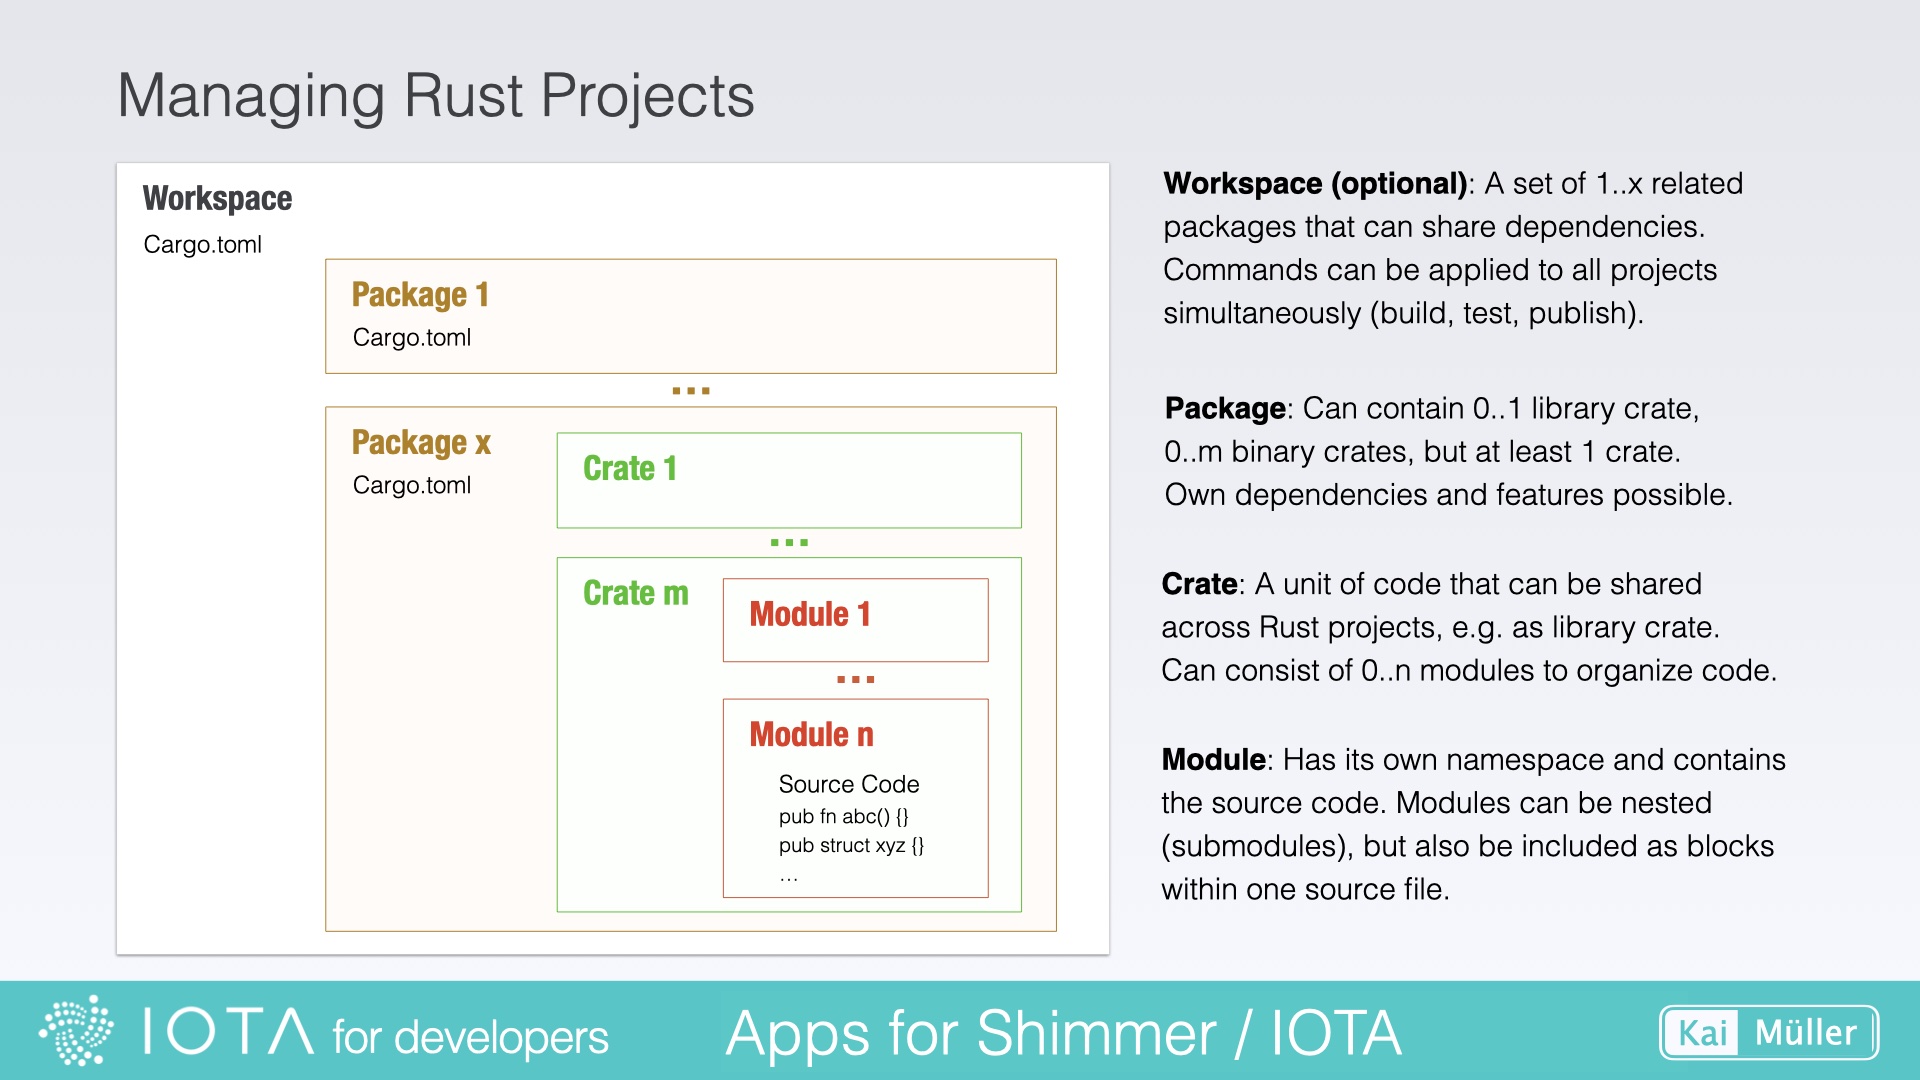
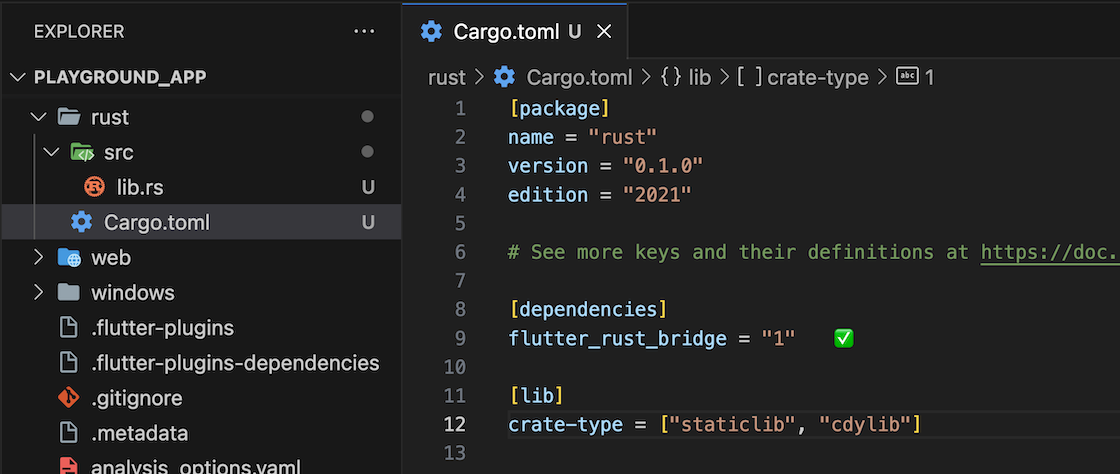
In the course of our Flutter-Rust project, when creating a Rust library with an API, we generate a Rust Package. For larger projects like the IOTA Libraries, the source code can be further organized using another Rust feature called Workspace. The complete organizational structure is explained in more detail in the next chapter titled Project Structure.
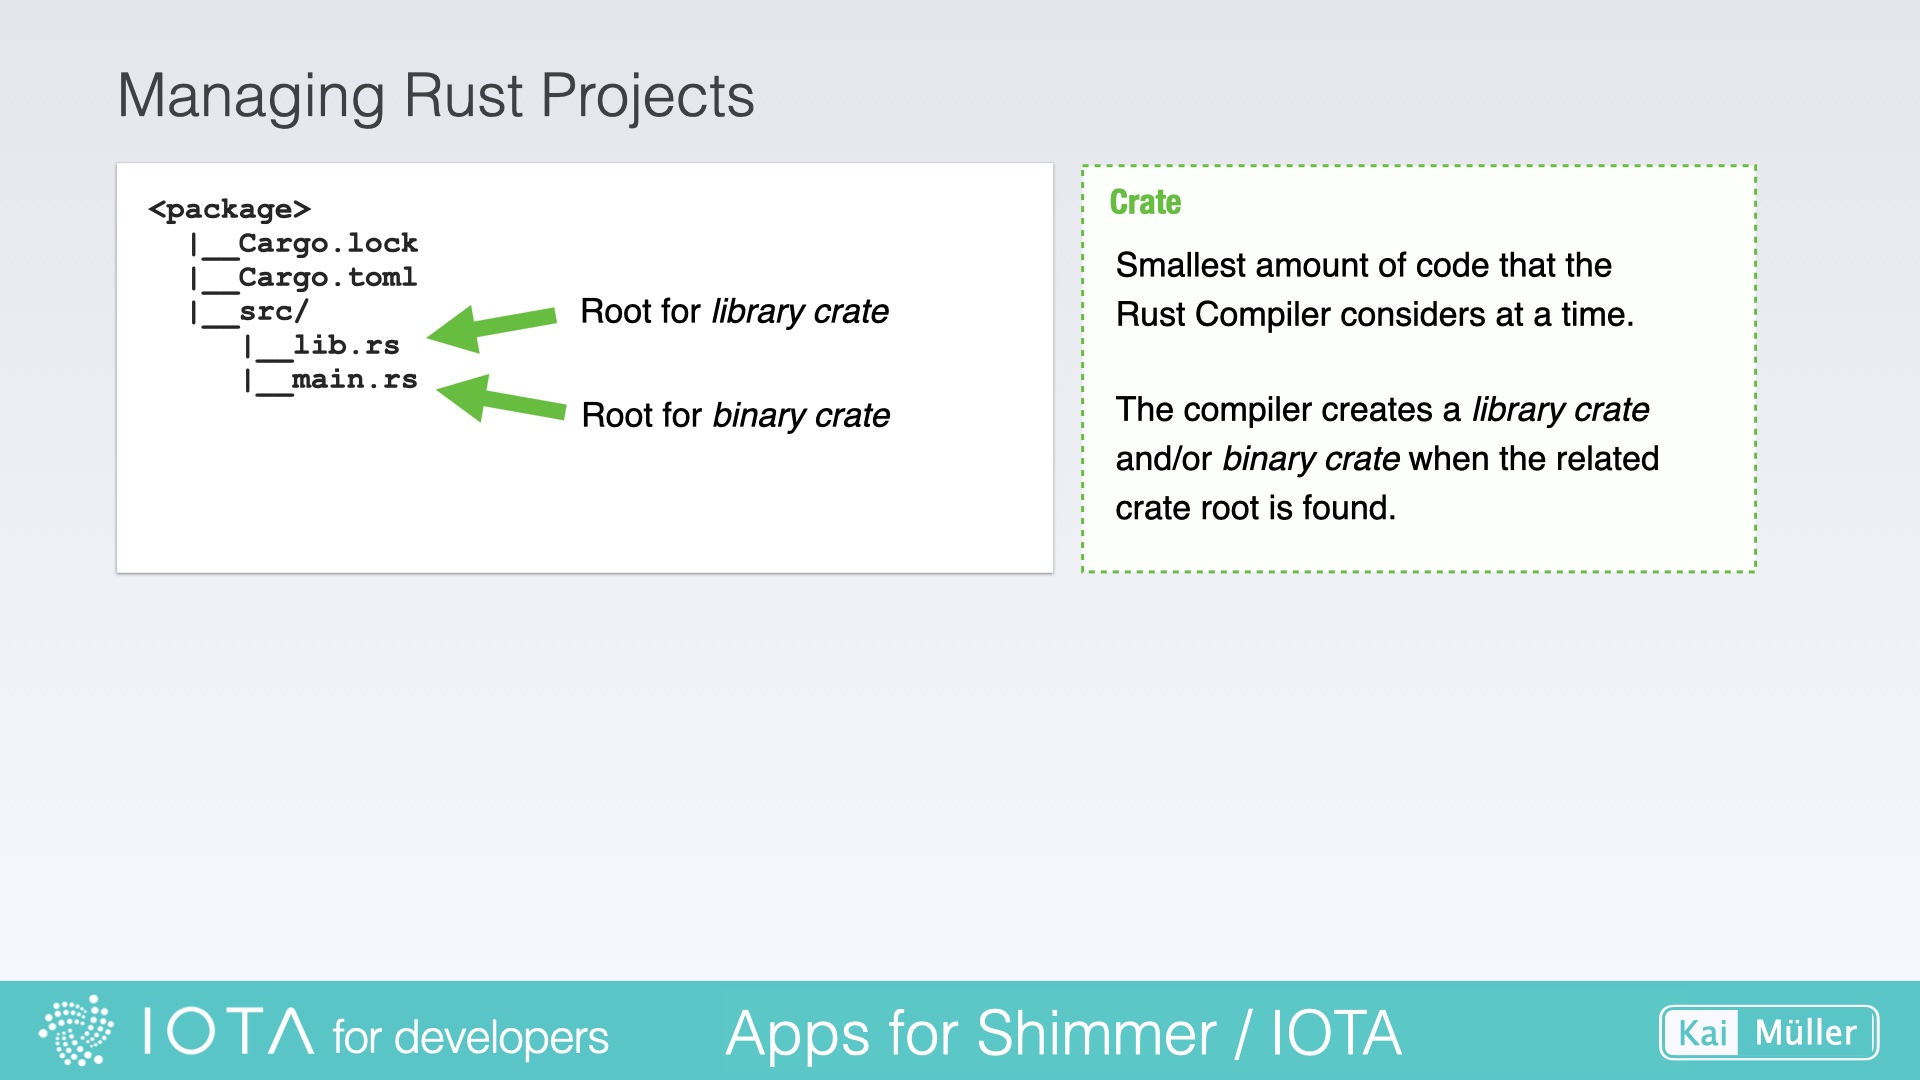
A Rust Library Project includes the following elements:
src: This directory serves as the main location for the library's source code.
lib.rs: The lib.rs file acts as the entry point. It acts as a central module where you can declare and organize the public items (functions, structs, enums, traits, etc.) that are intended to be accessible to other crates (projects) that depend on the library. These items are marked with the pub visibility keyword to make them visible outside of the library's crate.
Additional source code files and subdirectories can be organized within the src directory to maintain a modular and organized codebase.
In the context of Flutter, Rust and the Flutter Rust Bridge, we organize the structure in the following way: The public functions and structs that are intended to be exposed in the API are code in the file api.rs. This file is then integrated as module into the lib.rs file.
target: This directory serves as the build location for the library. It will be automatically created once the cargo build command is used. In this directory, your storage space vanishes into thin air like a magical bunny in a hat! You can remove it whenever you like - but: Deleting comes at the expense of time. During the first build, all necessary resources are loaded, which takes time. If the directory exists, all subsequent builds are faster.
Cargo.toml: The Cargo.toml file acts as the manifest for the library project, defining metadata such as the package name, version, dependencies, and build configurations.
Cargo.lock: This file is an automatically generated file. When you build a Rust project using Cargo, it resolves the dependencies specified in the Cargo.toml manifest file and generates the Cargo.lock file. This file includes the specific versions of each dependency and their transitive dependencies that were resolved during the build process.
A Crate acts as a unit of code organization and encapsulation, providing a way to manage and share code functionality.
Crates can also have dependencies on other crates, allowing them to utilize external code and libraries. The dependencies are declared in the Cargo.toml file of the crate, under the [dependencies] section.
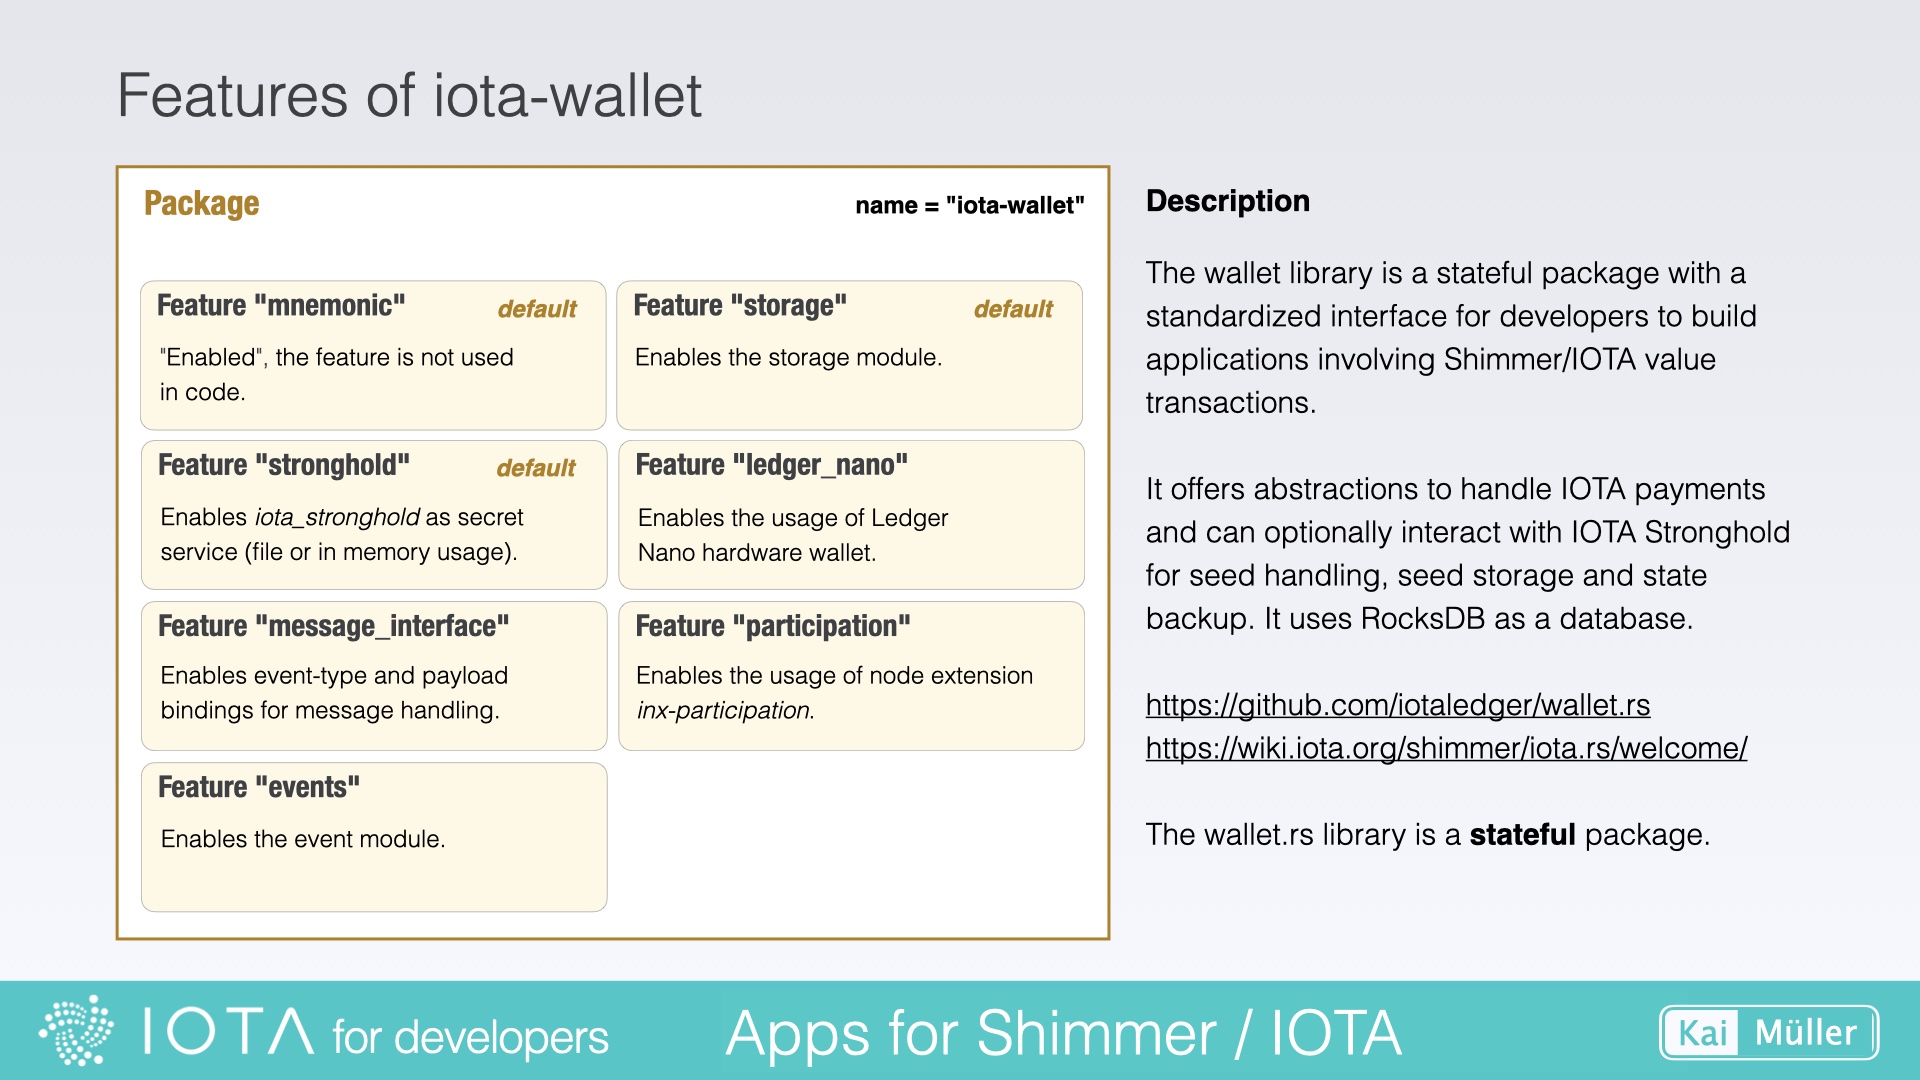
In our context, the wallet.rs library (crate name: "iota-wallet") library includes the iota.rs library (crate name: "iota-client"), amongst others.
The Package Manager is used to manage dependencies, define project metadata, configure project-specific settings and facilitate the development workflow.
Flutter / Dart
Rust
JavaScript / Node.js
Package Manager
Pub
Cargo
npm
Configuration File
pubspec.yaml
Cargo.toml
package.json
Package Repository
https://pub.dev
https://crates.io
https://npmjs.org
To add a package/crate use the command:
cargo add <crate_name>
I use the alternative way to include a crate:
Simply add it directly to the [dependencies] section of the Cargo.toml manifest file.
Rustup is a version manager that allows you to easily install, manage, and switch between different toolchains.
A toolchain refers to a specific version of the Rust compiler and associated tools that are used to compile, build, and manage projects. It includes the Rust compiler itself, the standard library, and other essential components required for Rust development.
Having multiple toolchains allows developers to work with different Rust language features, test compatibility across versions, and ensure their code works as intended in different Rust environments.
The Terminal command
rustup show
provides an overview of the Rust installation details, such as the installed toolchains, the currently active toolchain, and the associated components like cross-compiling targets.
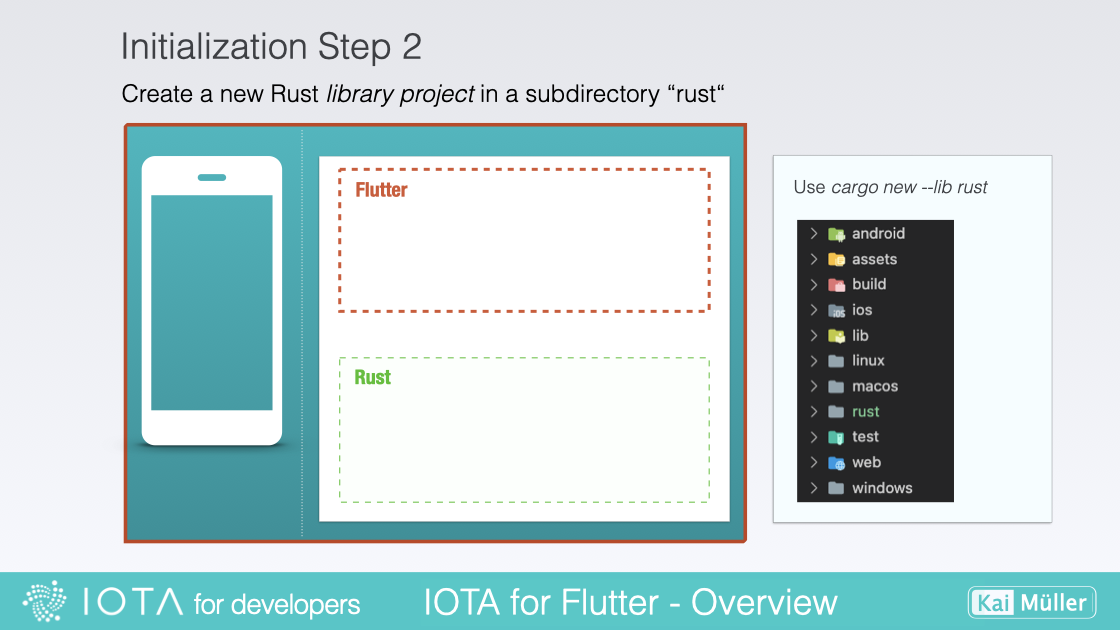
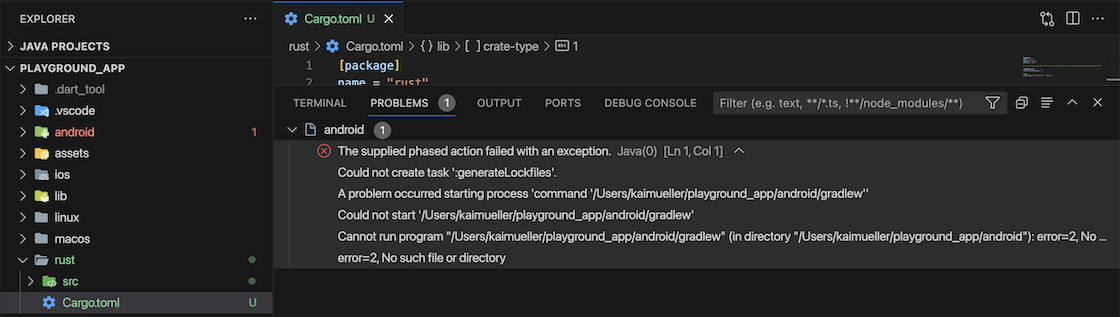
Important: Before you create the new project ensure that you are in the correct folder. To create the Rust Library Project for IOTA for Flutter, the Flutter Project must exist, and your Terminal prompt needs to be in the root directory of the Flutter Project.
To create the Rust Library Project, execute the command:
cargo new --lib <crate_name>
I always use the crate name rust. In that case, a new subfolder rust is created.
A Workspace is a feature provided by Cargo (Rust's package manager and build tool) that allows you to manage multiple related Packages within a single directory. Workspaces are optional.
By organizing packages as part of a workspace, you can share dependencies, coordinate builds, and simplify the development and testing of interconnected projects.
Workspace and packages each have their own Cargo.toml file.
A Crate is a self-contained unit of code that encapsulates a set of functionality, typically organized into modules, structs, enums, traits, and functions. This unit of code can be shared, imported, and used in other codebases.
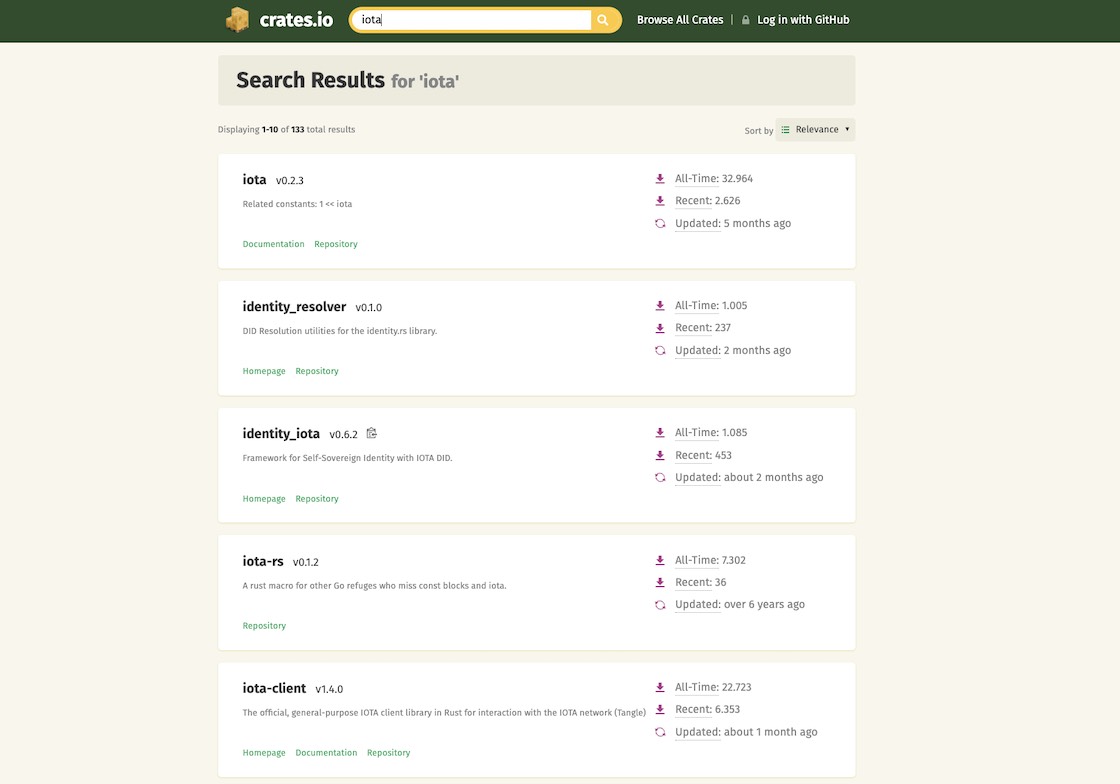
Crates can be published to the Rust community's Crate Registry, allowing developers to include them as dependencies in their projects:
Hint: Search for the keyword iota in the
registry to get a list of IOTA related crates.
There are two types of crates: library crates expose public functions or items , and binary crates which are executable programs. A package can contain the source code of one or several crates.
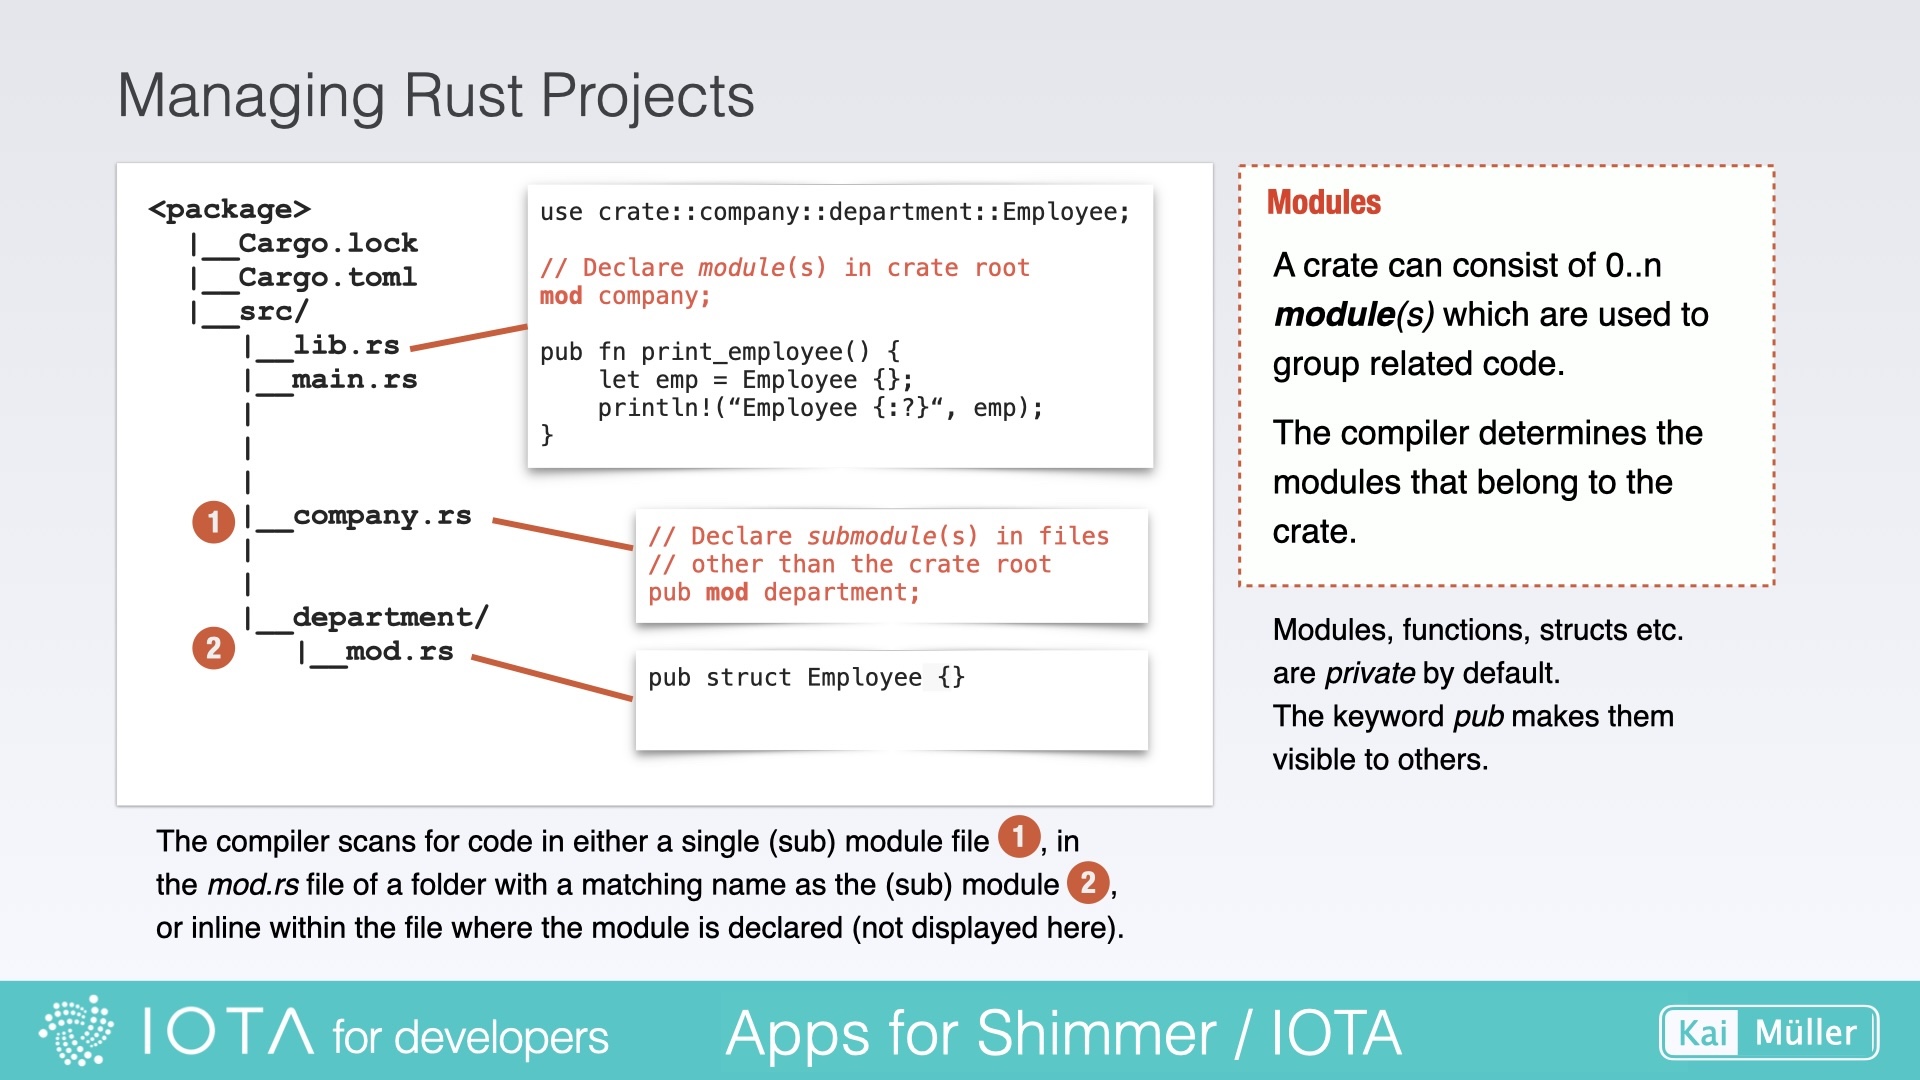
A Module is a way to organize and group related code within a crate. It allows for logical separation and encapsulation of functionality, helping to keep code organized and maintainable.
There is a distinction between declaring and defining a module.
Declaring a module: Declaring a module is the process of creating a module and specifying its name and structure. It is done using the mod keyword, followed by the module name and a block of code that defines the contents of the module. When you declare a module, you are essentially creating a namespace and organizing code within that namespace. You can declare modules in the same file or in separate files, and you can nest modules within other modules.
Defining a module: Defining a module involves implementing the functionality and providing the actual code within the declared module. It includes writing functions, structs, traits, and other items that make up the module's implementation. When you define a module, you are filling it with the necessary code and logic to perform specific tasks or provide certain functionality.
Here's an example to illustrate the difference:
// Declaration of a module named "department" (here: inline within a file)
pub mod department {
    // Definition of a struct within the module
    pub struct Employee {
        // struct fields
    }

    // Definition of a function within the module
    pub fn list_employees() {
        // function implementation
    }
}

// Usage
fn main() {
    // Accessing the defined module and its items
    let employee = department::Employee {};
    department::list_employees();
}
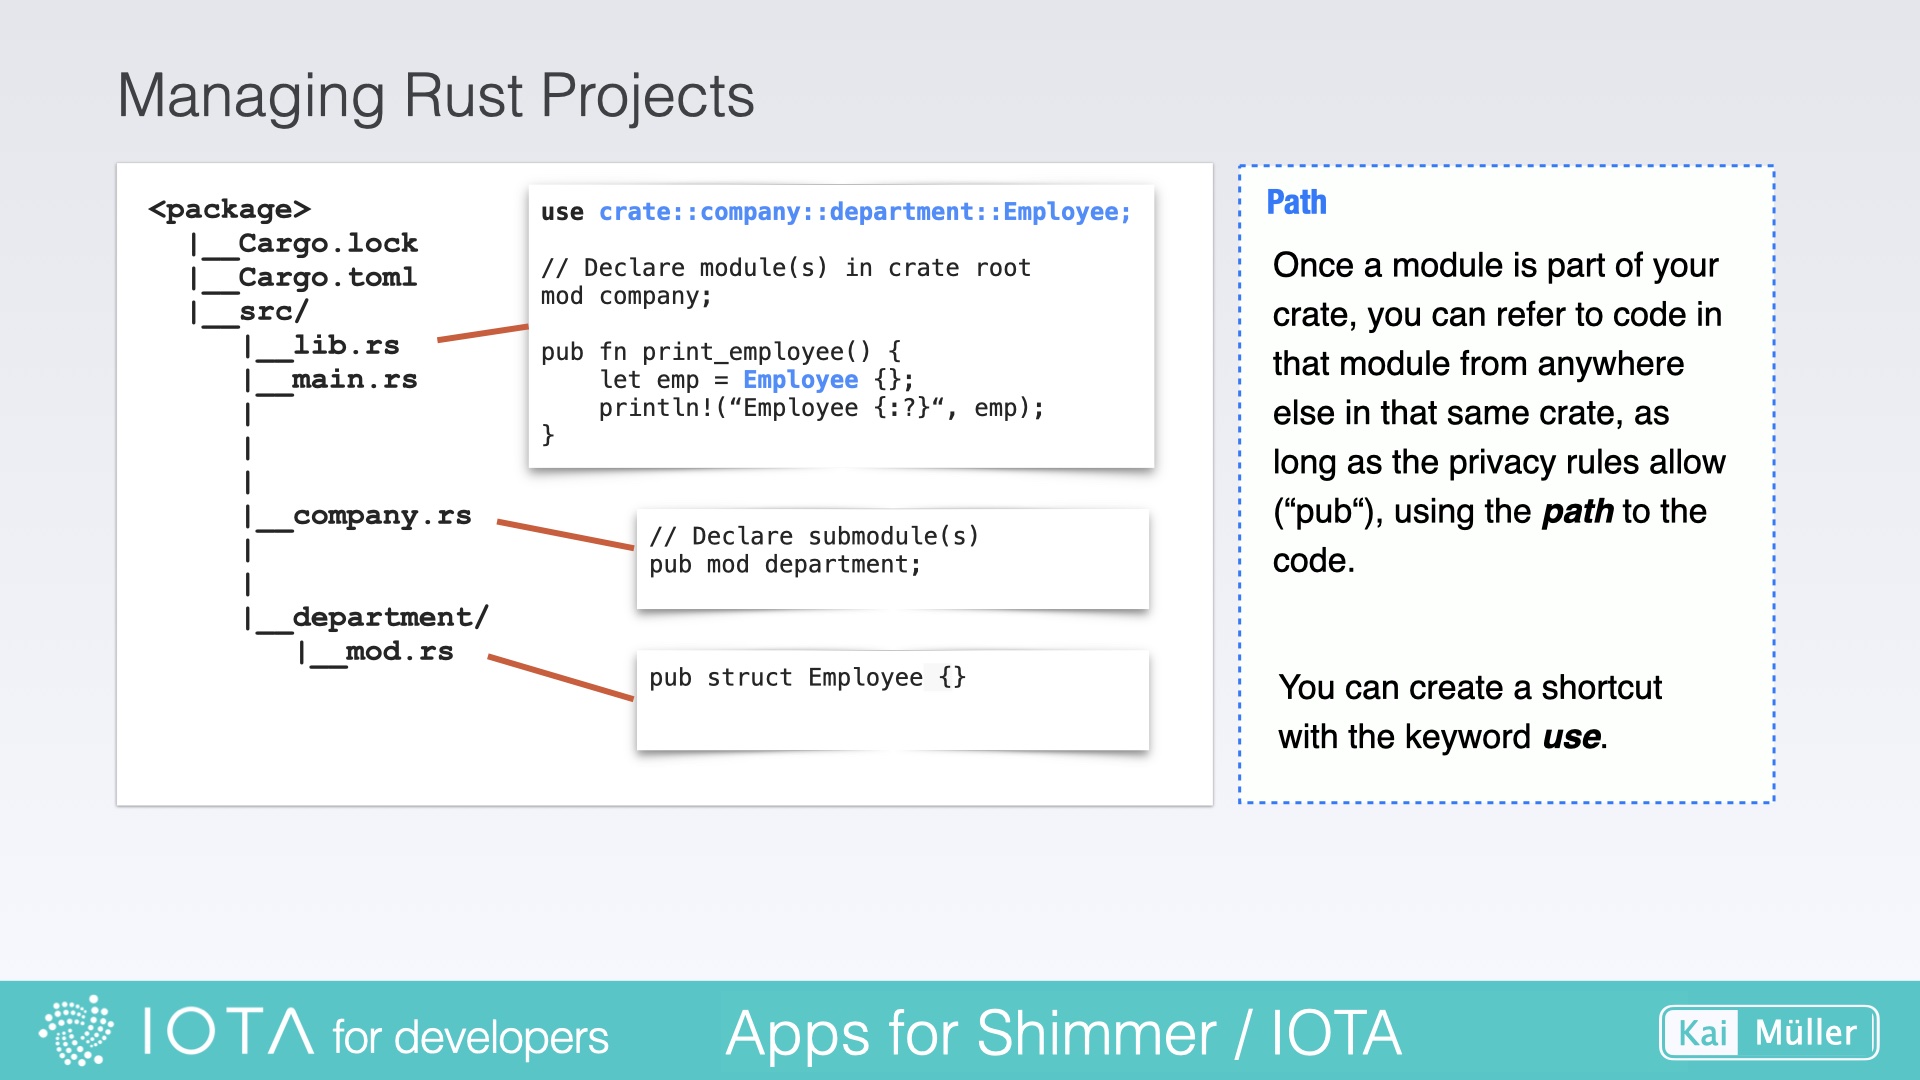
A Path refers to the location of a module or item (e.g. structs, enums, functions) within the project's directory structure. It represents the hierarchical structure of directories and subdirectories.
The use keyword in Rust is used to bring items from a module or crate into scope, allowing them to be accessed without fully qualifying their paths. It provides a way to conveniently reference items by their short names instead of using their full paths every time.
The requirement, however, is that the used modules and items are public (indicated by the keyword pub).
Paths
In Rust, paths and namespaces are interrelated concepts that help organize and reference code elements. For example:
// Declaration of the modules (here: inline within a file)
mod company {
    pub mod department {
        pub fn list_employees() {
            // Function implementation
        }
    }
}

// Usage
fn main() {
    company::department::list_employees();
}
In Rust, the implementation of structs can be split into different files to improve code organization and maintainability. This allows you to separate different aspects of the struct's implementation, such as methods, associated functions, and trait implementations, into separate files.
However, it's important to note that a struct itself can only be defined in a single file. This ensures that the struct has a single, unambiguous definition within your project.
Documentation in Rust: Can be helpful, but ... crate docs can also be quite incomplete.
Another way to familiarize yourself with a library is to look at the documentation. With Rust, we can instantly create documentation based on the comments in the source code.
By default, the rustdoc engine evaluates only the enabled features. To create the documentation that covers the whole code, use the option --all-features.
To include non-public items, use the --document-private-items flag.
All options are displayed by executing cargo doc --help.
When you run the command, rustdoc will scan all files and create a working folder debug/ and an output folder doc/ inside the target directory. Depending on the number of scanned crates this might take a while.
Prior to executing the cargo doc ... command mentioned above, switch to the client/ directory located at the root, rather than the sdk/ directory.
Sometimes you are facing unresolved links
When executing the command, I encountered a handful of error messages due to unresolved links. In rustdoc, links are indicated by square brackets [...]. Fortunately, fixing these issues is a breeze: simply remove the square brackets i.e. the link, and the problematic areas will be swiftly resolved.
Imagine that you have created your Rust API in the directory rust/ within your Flutter project, added the necessary dependencies, and your code appears to be error-free.
With a hopeful spirit, you press the play button. The code starts compiling. It compiles and compiles, and then it happens: a red error message halts your enthusiasm.
It's possible that you have included a dependency whose version is not compatible with the target platform - such as the iota-wallet. What works on iOS may not necessarily function on Android, and vice versa. While we aim to cross-compile Rust code, there are a few cases where it doesn't go smoothly.
To find a solution to the problem, you need to first determine:
Which library is causing the error?
Which version of the library is being used?
What is the dependency hierarchy that has been established?
By understanding these aspects, you can begin troubleshooting and seeking a resolution for the issue at hand.
Dependencies are managed using the Cargo.toml file. This file serves as a manifest for the project, where you declare the dependencies required for your code to compile and run. Dependencies are specified under the [dependencies] section, where you can list the name and version of each dependency. Cargo uses this information to fetch and manage the dependencies automatically.
Several options provide flexibility in managing dependencies. Version-based specifications ensure compatibility with specific versions, while Git-based specifications allow fetching libraries directly from Git repositories, enabling experimentation with different branches, revisions, or even forks of a library.
In this example, the project fetches the "library-name" crate from the specified Git repository, using the "develop" branch.
Warning
When employing this form of dependency specification, the latest commit from the specified branch will be fetched each time changes are made to Cargo.toml. It is essential to be aware that by relying on this method, there is a possibility that library developers may introduce unintended modifications to the library.
Developers can also specify a specific commit hash (revision):
Go back in history by clicking the "Older" button at the bottom of the page.
Continue navigating through the commits until you find the commit titled "Bring back rocksdb 0.19".
Copy the full SHA (hash) of the commit that is immediately before the "Bring back rocksdb 0.19" commit.
The corresponding hash value should be: 05fcb303c657c6faf3cb772f3a3908647614d545. You could use this hash as the value for rev = "..." in the dependency definition for iota-wallet, where rocksdb version 0.18 is included.
The Cargo.lock file is an automatically generated file in Rust projects that serves as a lock file, ensuring deterministic builds. It records the exact versions of all dependencies used in the project, including transitive dependencies.
This file helps in guaranteeing that subsequent builds of the project will use the same dependency versions, providing consistency and reproducibility.
The Cargo.lock file is automatically updated by Cargo when dependencies are added, removed, or updated, and it should be committed to version control to ensure consistent builds across different environments.
Features are a way to enable or disable optional functionalities in the dependencies of a library or package. They allow developers to reduce the size and complexity of dependencies by selecting only the features they actually need.
You can imagine that by configuring features in Cargo.toml, you can switch on or switch off specific functionalities. By disabling certain features, you also ensure that the associated dependent libraries are not compiled into your source code. So, if you encounter issues with specific third-party libraries, you can narrow down the problems by disabling certain features for testing purposes.
Features can be specified in the Cargo.toml file of a Rust project. You can find an explanation of the configuration with examples in this article:
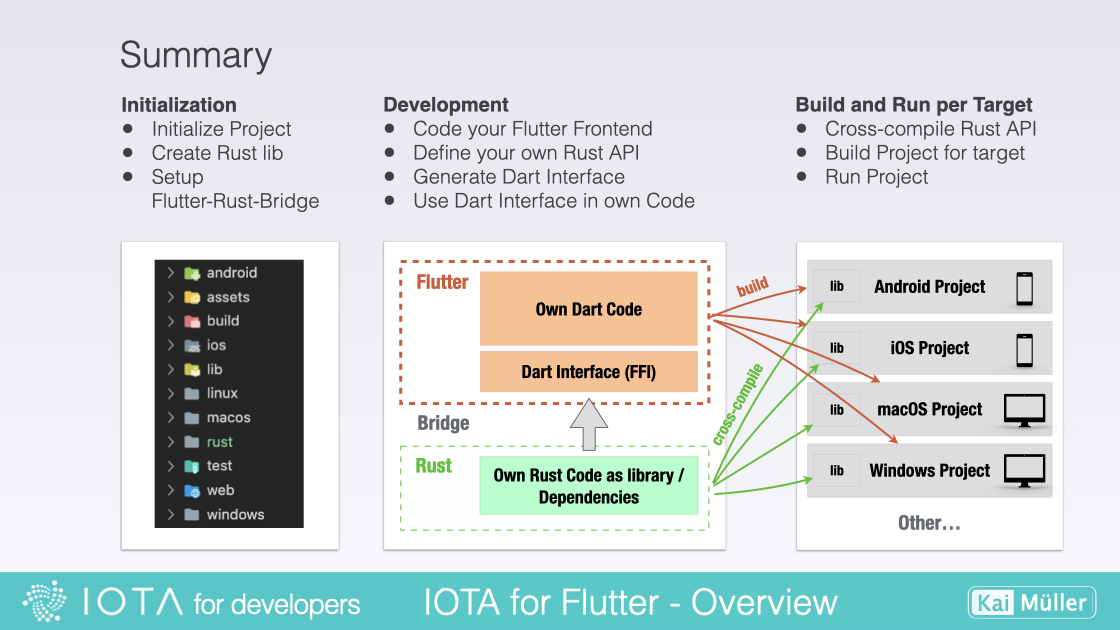
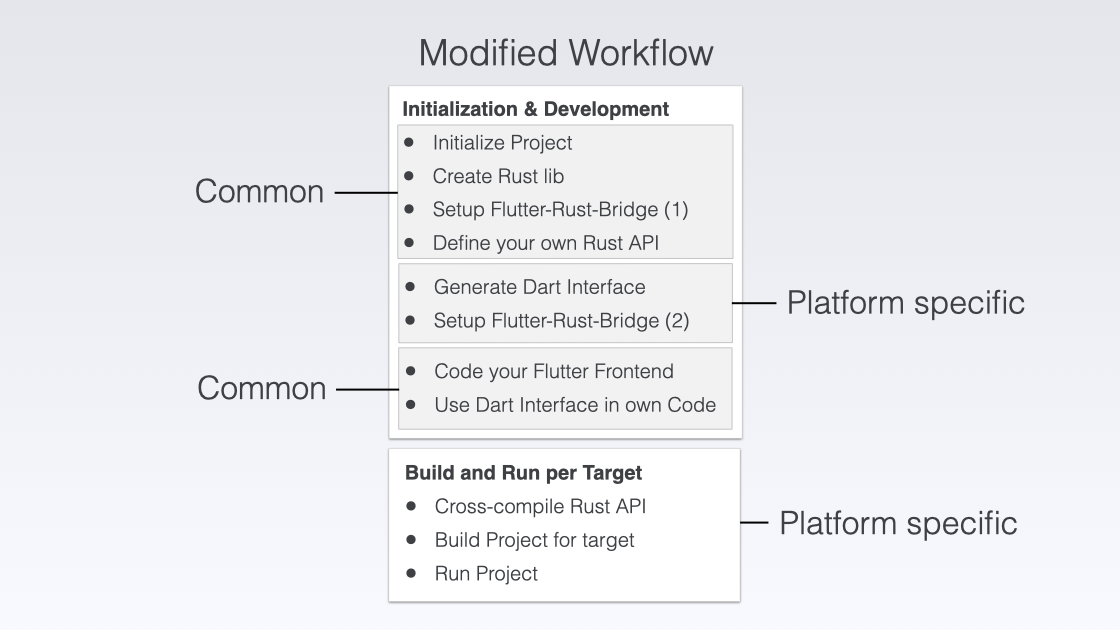
In this next section, I'll provide an overview of the workflow involved in integrating Flutter, Rust, and IOTA. This will give you a better understanding of what a developer needs to do in order to successfully connect these technologies and create an app using the Flutter-Rust-Bridge.
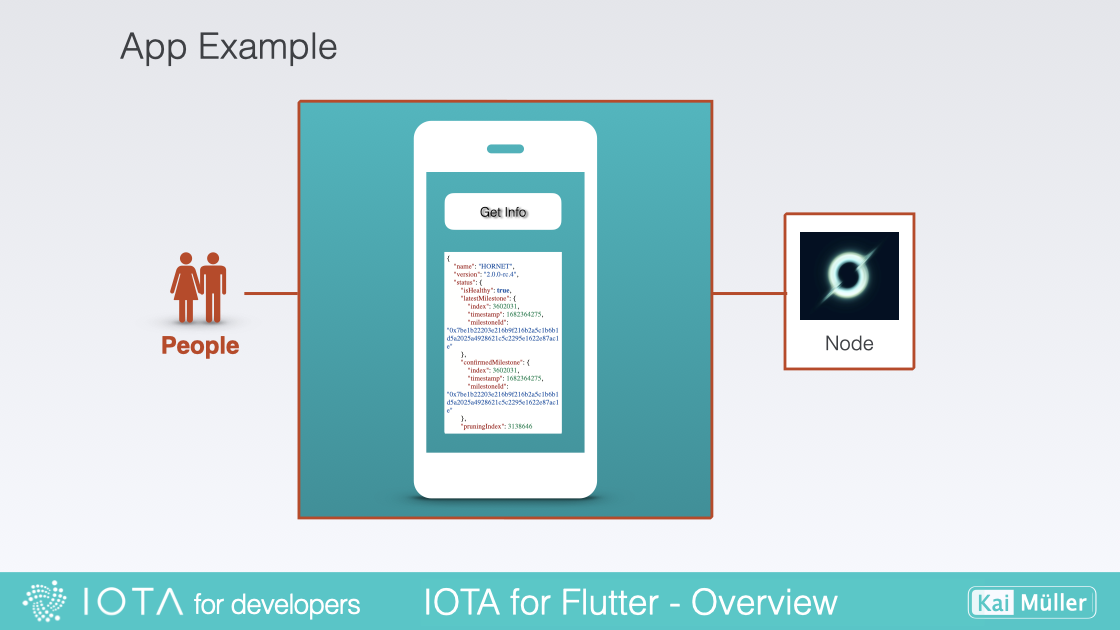
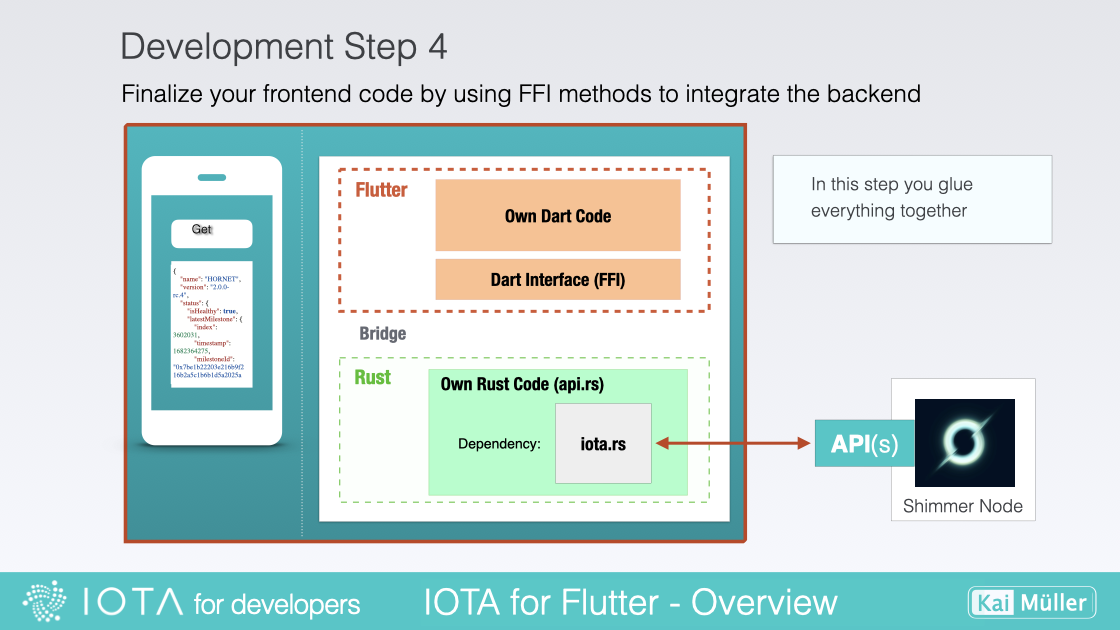
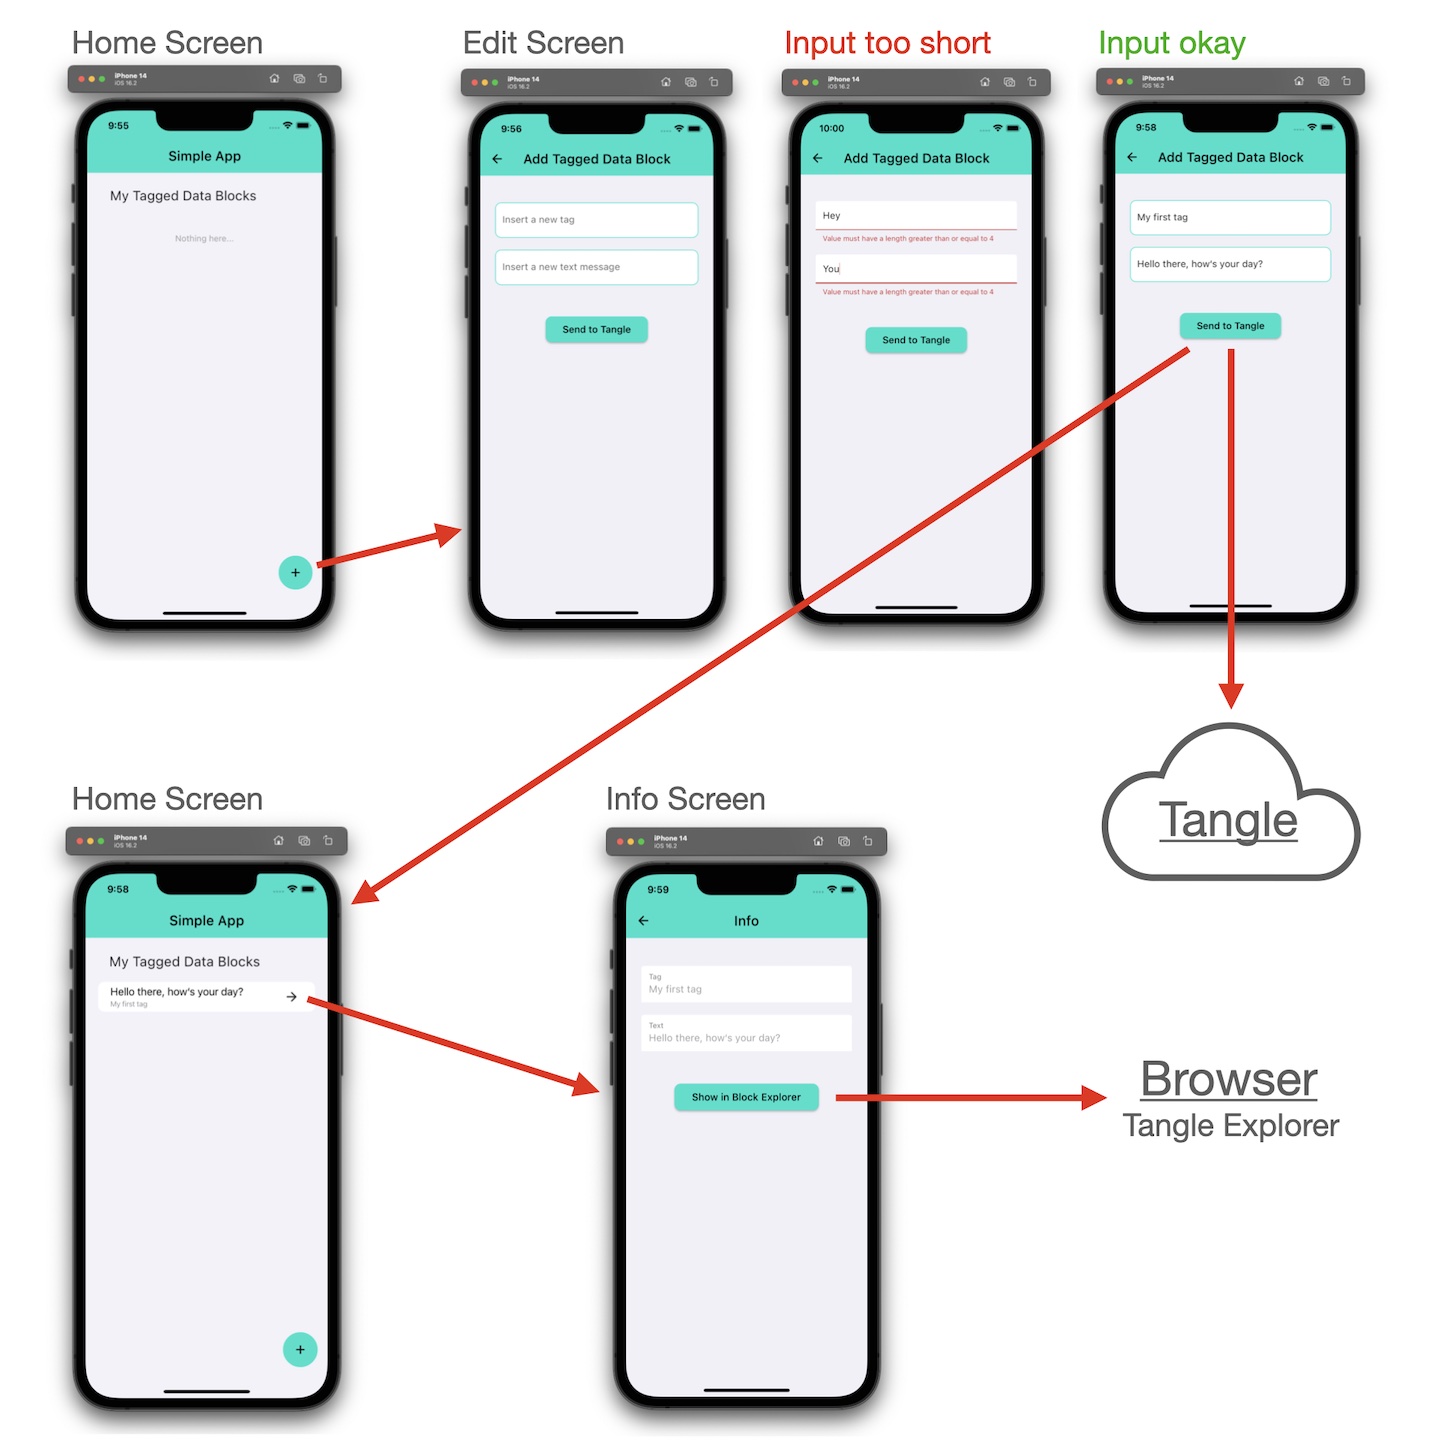
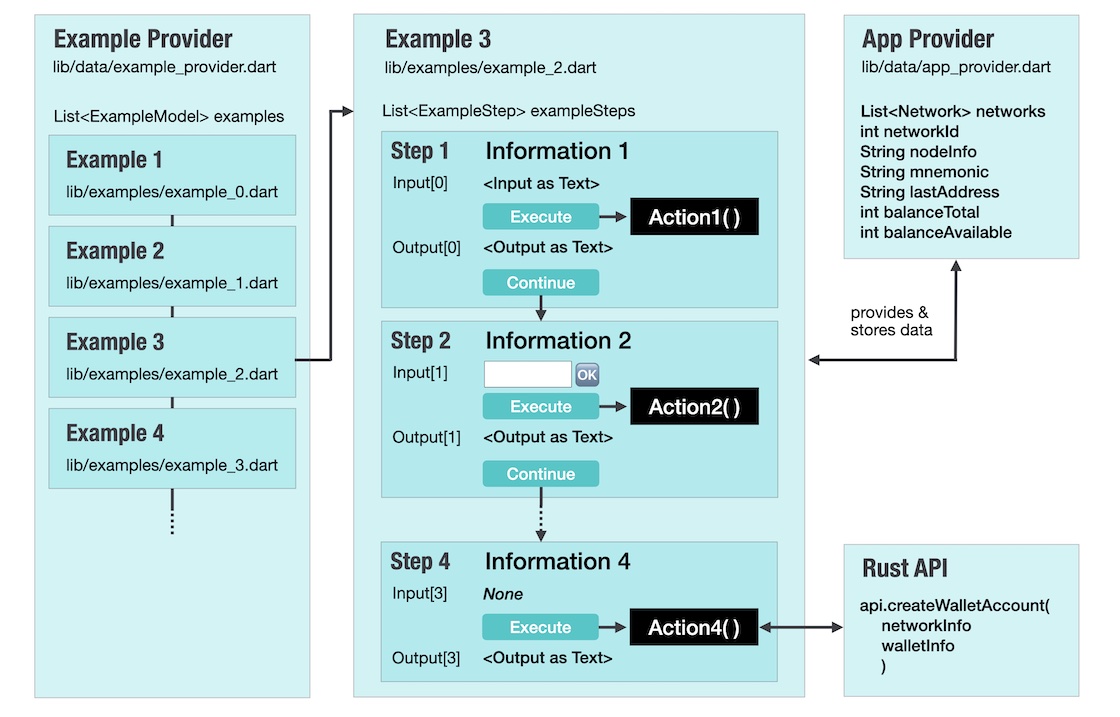
Take a simple example: An app with just a button and a text field. When the user clicks the button, it should establish a connection to a Shimmer node and retrieve information about it. This information will then be displayed in the text field.
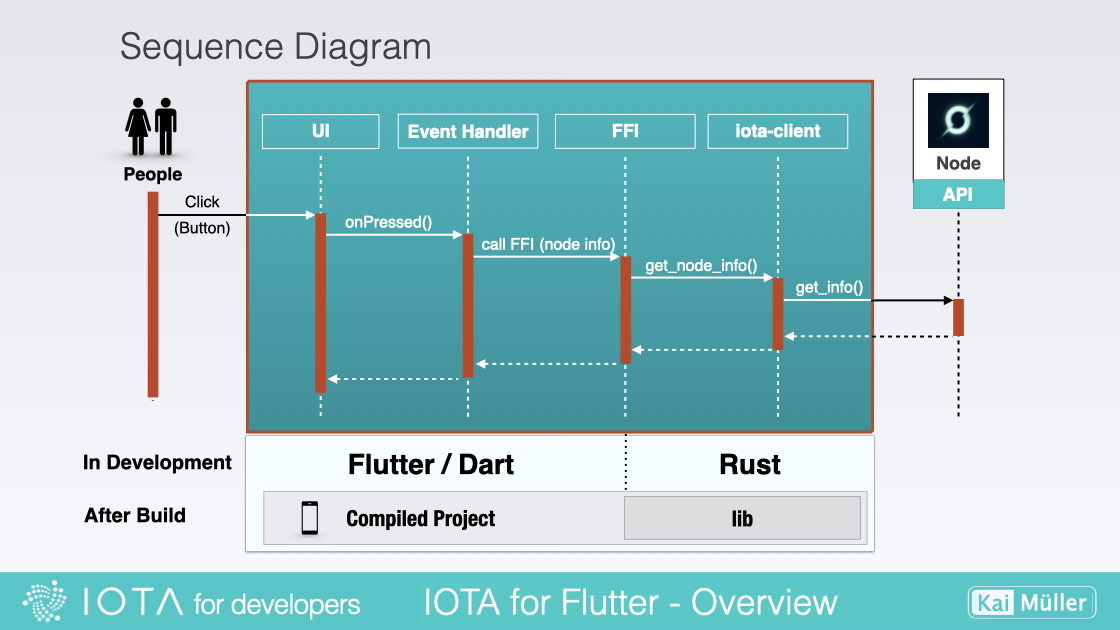
Within the application itself, the following occurs: in the frontend, when the button is clicked, it triggers its handler. This handler utilizes a method provided by the Foreign Function Interface (FFI). FFI is a mechanism that enables programming languages to call functions from libraries written in a different language. In the context of Flutter and Rust, FFI facilitates communication between the Flutter frontend and the Rust backend. Essentially, the button handler invokes a Rust method. This method then forwards the request to a function in the IOTA Rust library, which retrieves the desired information from the node. The information is then relayed back using the same pathway.
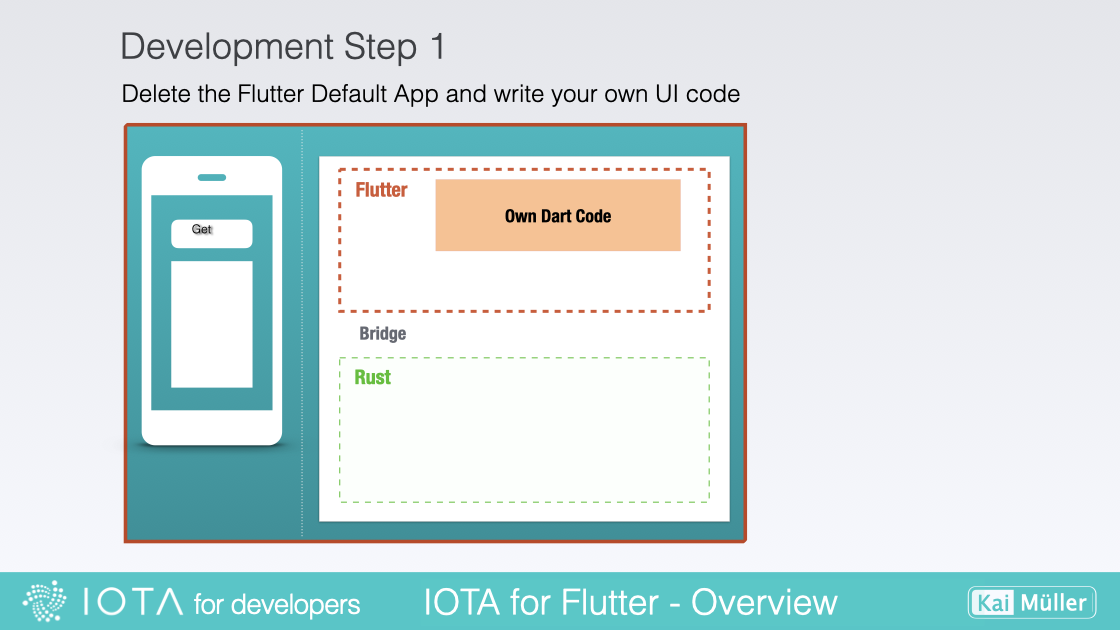
During the Development Phase (see above), this means that the UI and handlers are written in the Dart programming language, while the backend functions are implemented in Rust. This separation allows for leveraging the strengths of both languages: Dart for the frontend user interface and interactivity, and Rust for robust backend functionality and integration with libraries like IOTA.
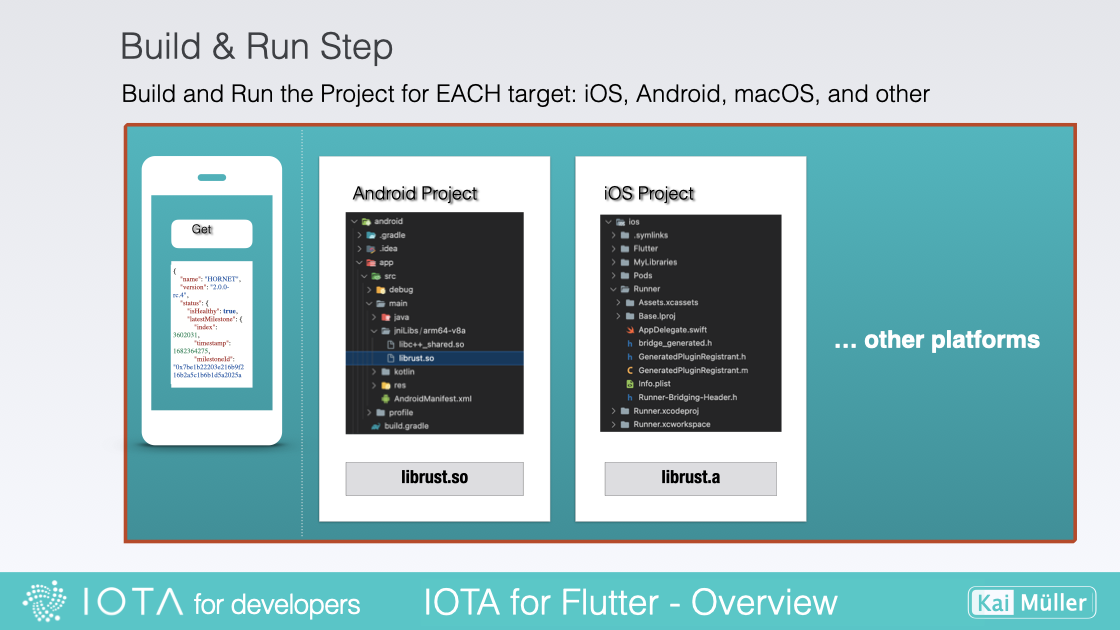
During the Build Phase (see above), the Rust code is compiled into a library that is then incorporated into the Flutter app. The entire codebase is compiled into machine code that can be executed on the target platform. This process ensures that the Rust functionality seamlessly integrates with the Flutter app, allowing for efficient and effective execution on the desired platform.
The workflow is identical to the one demonstrated in the video. I will also provide the commands used in the video for reference. Please keep in mind that this is only a high-level overview for now. More detailed explanations will be provided later on.
⚠️ If you genuinely want to practically code the described steps outlined below, I assume that you have completed the setup of your workplace and all tools, as described in the "Fundamentals" section.
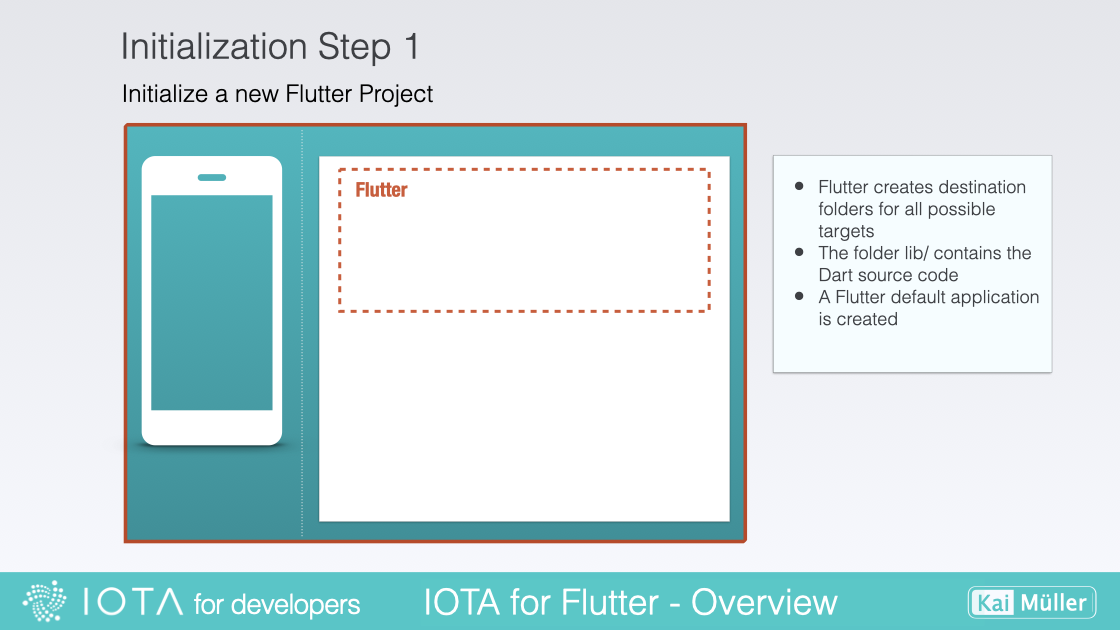
In the first step, the following command sets up a new Flutter project with the necessary file structure and dependencies, ready for you to start developing your app. It creates a directory with the specified project name and populates it with the required Flutter files and folders. Now you're all set to unleash your creativity and build amazing Flutter applications!
flutter create --empty example1
Create Rust Library Project Project
This includes the required structure for the Rust code and any additional resources or dependencies needed for the backend implementation:
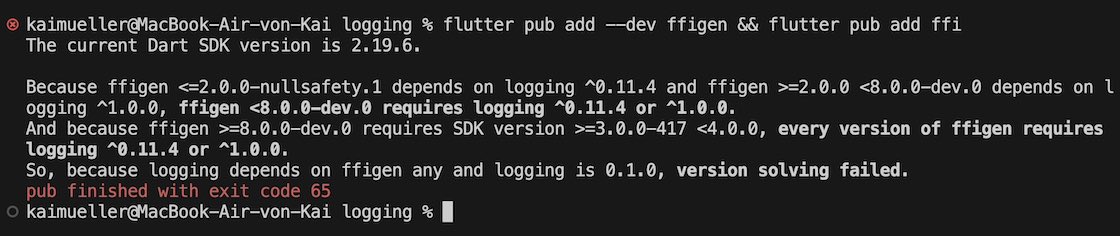
Hint: ffigen is already available with a higher version. The Flutter Rust Bridge v1.0 is still working with ffigen version >=8.0.0 and <10.0.0. So I am using version v9.0.1 here.
Your Android Virtual Device should be compatible to "arm64-v8a". "arm64-v8a" is an architecture designation for Android devices. It refers to the 64-bit version of the ARM architecture commonly used in modern Android devices.
The term "arm64" represents the 64-bit version of the ARM architecture, while "v8a" indicates the ABI (Application Binary Interface) associated with that architecture. Thus, the combination of "arm64" and "v8a" refers to the 64-bit ARM architecture running on devices with that ABI.
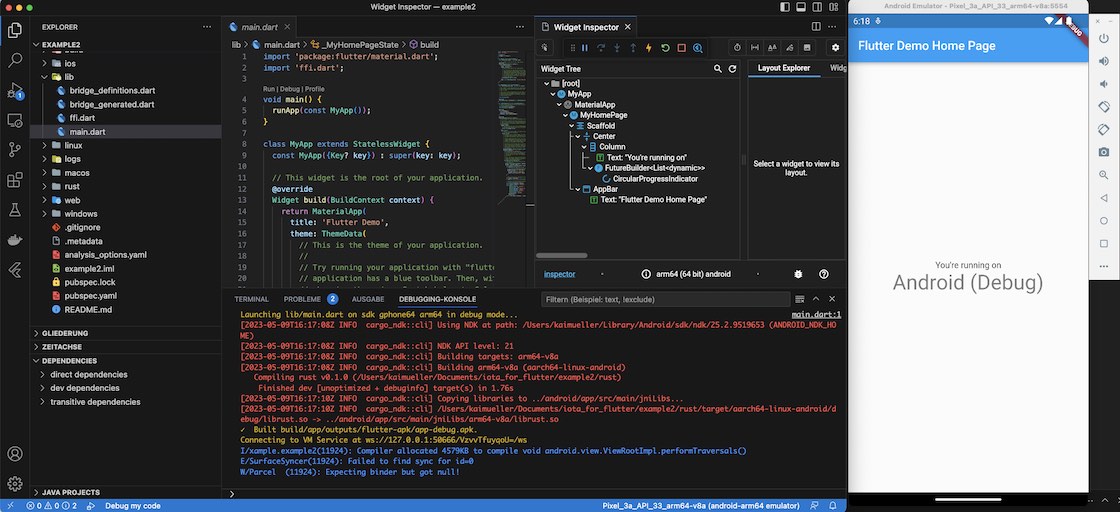
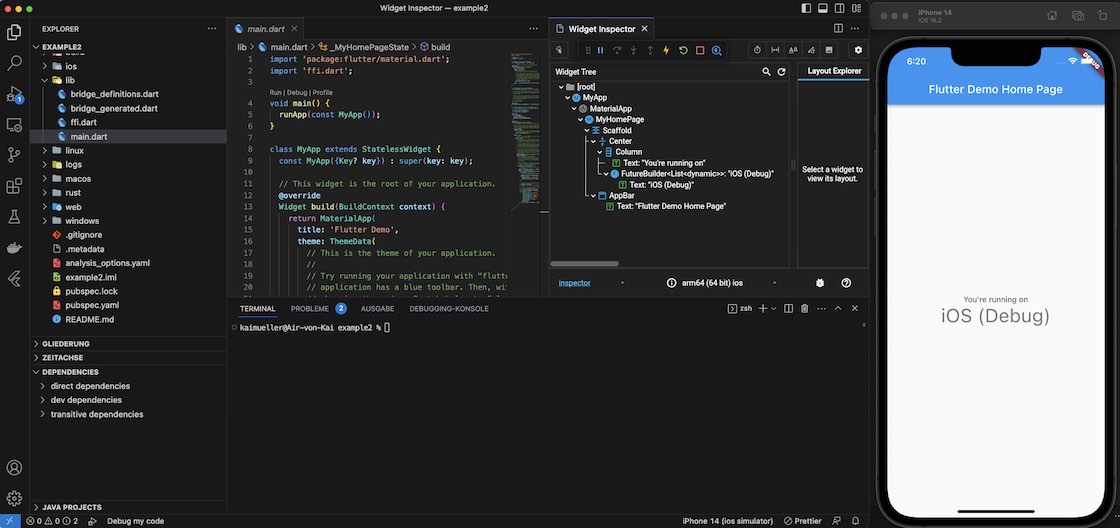
The backend call _callFfiGetNodeInfo() is mocked, meaning that instead of making a real request to the server, a simulated response is generated. This approach allows us to emulate the behavior of the backend without actually relying on a live server. By mocking the backend call, we can focus on testing and developing the frontend functionality independently, ensuring that the app's features and user interactions are working as intended.
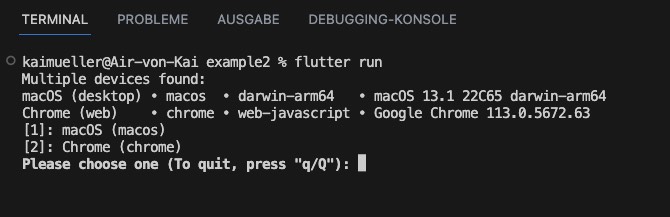
Important: Before starting the application, make sure that your Virtual Android Device is running.
You can start the application with the command:
flutter run
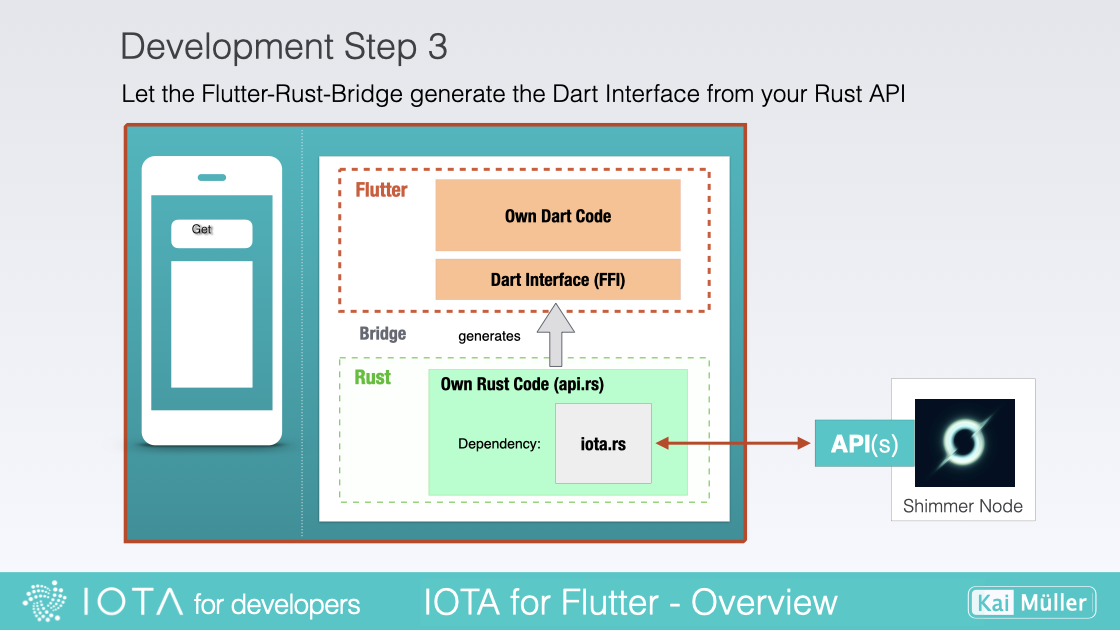
Generate the Dart Interface Code (FFI)
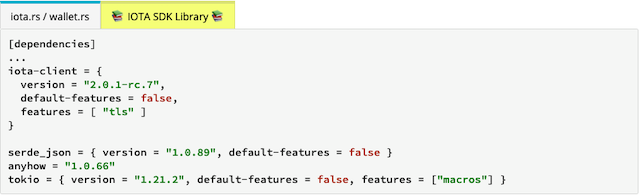
📚 IOTA SDK Library Update 📚 The Dependency on iota.rs must be replaced by iota-sdk.rs. To do this, iota-sdk needs to be added as a dependency in Cargo.toml instead of iota-client.
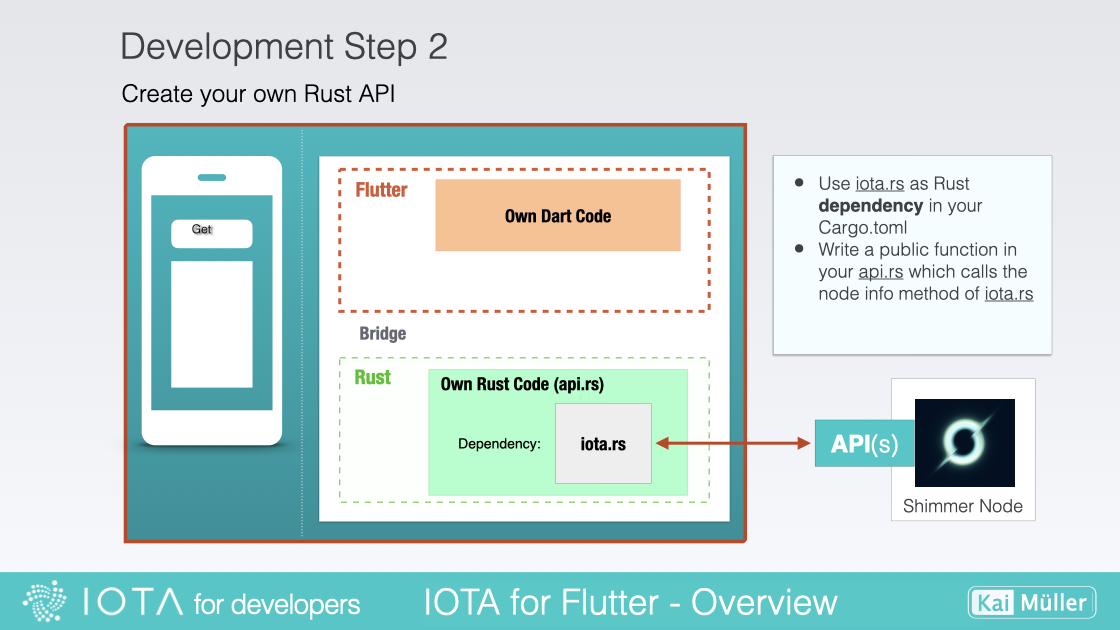
The first step on the Rust side is to include the IOTA library and other necessary resources.
In Cargo.toml add:
[dependencies]
...
iota-client = {
  version = "2.0.1-rc.7",
  default-features = false,
  features = [ "tls" ]
}

serde_json = { version = "1.0.89", default-features = false }
anyhow = "1.0.66"
tokio = { version = "1.21.2", default-features = false, features = ["macros"] }
[dependencies]
...
iota-sdk = { version = "1.1.4", default-features = false, features = [
    "client",
    "tls",
] }

serde_json = { version = "1.0.108", default-features = false }
anyhow = "1.0.75"
tokio = { version = "1.34.0", default-features = false, features = ["full"] }
Create the file api.rs. The file api.rs is YOUR RUST WORKING FILE. The Flutter-Rust-Bridge code generator will identify all public functions within the api.rs file and generate the corresponding Dart Interface from these methods. This means that all public functions available in the Rust code will be exposed and accessible for utilization within the Flutter app.
By automatically generating the Dart Interface, the Flutter-Rust-Bridge simplifies the process of bridging the communication between the Flutter frontend and the Rust backend, enabling seamless interaction and integration between the two languages.
Add this content to api.rs:
use iota_client::Client;
use anyhow::Result;
use tokio::runtime::Runtime;
pub fn get_node_info() -> Result<String> {
let rt = Runtime::new().unwrap();
rt.block_on(async {
let node_url = "https://api.testnet.shimmer.network";
// Create a client with that node.
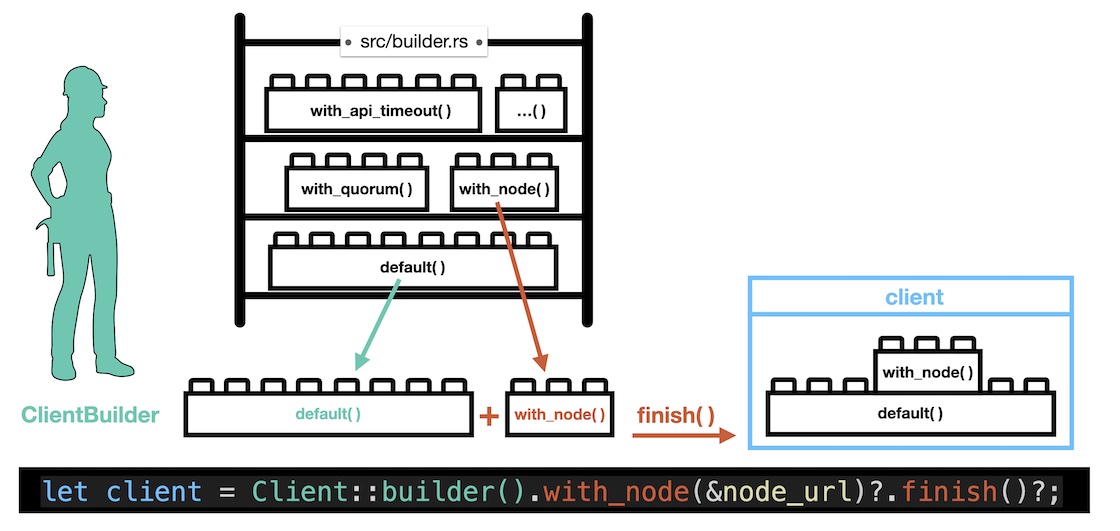
let client = Client::builder()
.with_node(&node_url)?
.with_ignore_node_health()
.finish()?;
// Get node info.
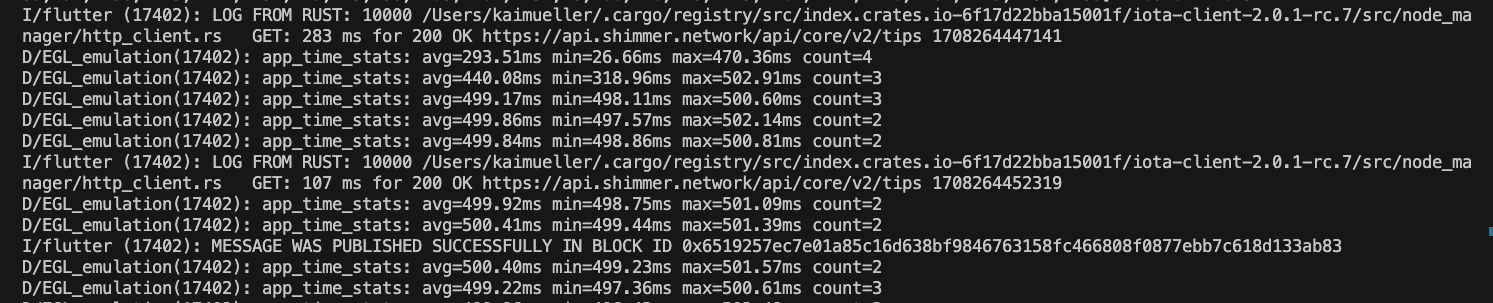
let info = client.get_info().await?;
Ok(serde_json::to_string_pretty(&info).unwrap())
})
}
use iota_sdk::client::Client;
use anyhow::Result;
use tokio::runtime::Runtime;

pub fn get_node_info() -> Result<String> {
    let rt = Runtime::new().unwrap();
    rt.block_on(async {
        let node_url = "https://api.testnet.shimmer.network";

        // Create a client with that node.
        let client = Client::builder()
            .with_node(&node_url)?
            .with_ignore_node_health()
            .finish()
            .await?;

        // Get node info.
        let info = client.get_info().await?;

        Ok(serde_json::to_string_pretty(&info).unwrap())
    })
}
This one is easy! It's one of the tasks you need to do whenever the Rust API has changed (e.g. after changing method signatures or add/removing methods). In our example, generate the Dart Interface by executing this command:
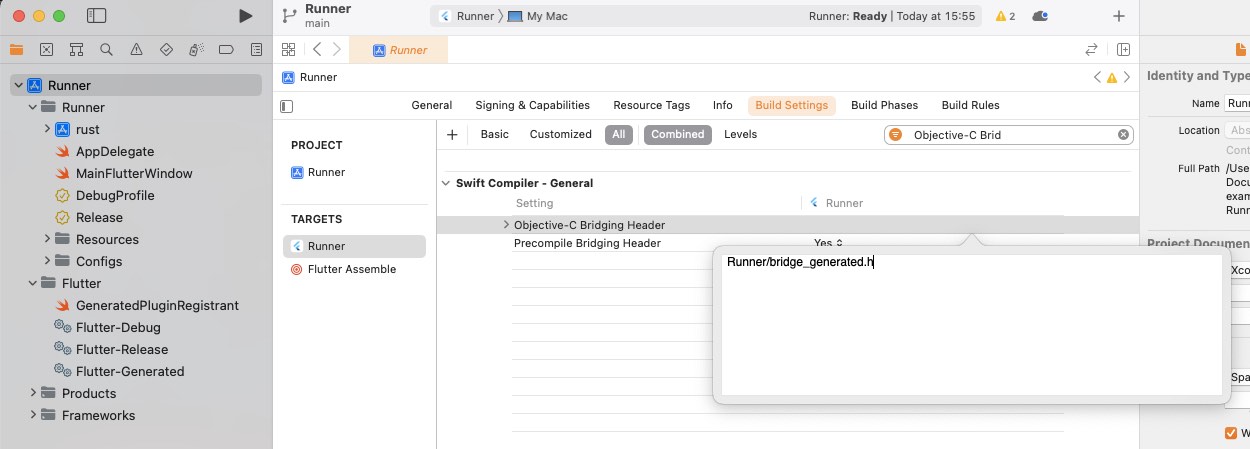
Next to main.dart, add a new file called ffi.dart and add this content:
// This file initializes the dynamic library and connects it with the stub
// generated by flutter_rust_bridge_codegen.

import 'dart:ffi';

import 'bridge_generated.dart';
import 'bridge_definitions.dart';
export 'bridge_definitions.dart';

// Re-export the bridge so it is only necessary to import this file.
export 'bridge_generated.dart';
import 'dart:io' as io;

const _base = 'rust';

// On MacOS, the dynamic library is not bundled with the binary,
// but rather directly **linked** against the binary.
final _dylib = io.Platform.isWindows ? '$_base.dll' : 'lib$_base.so';

final Rust api = RustImpl(io.Platform.isIOS || io.Platform.isMacOS
    ? DynamicLibrary.executable()
    : DynamicLibrary.open(_dylib));
Integrating the library involves loading it into our project, enabling us to execute its methods and utilize its functionalities.
Now, in main.dart, comment out line 4:
ffi.dart // remove the two slashs
The final step is to insert the appropriate function calls to invoke the desired methods from the library. In main.dart, update the function _callFfiGetNodeInfo().
Important: Before starting the application, make sure that your Virtual Android Device is running.
Open the App with the command:
flutter run
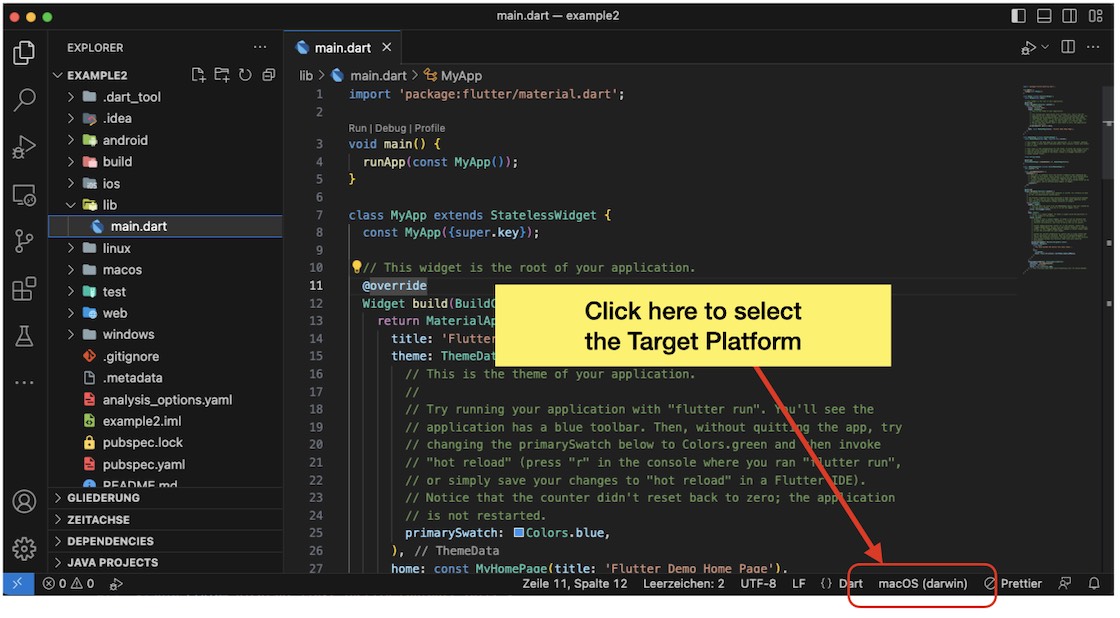
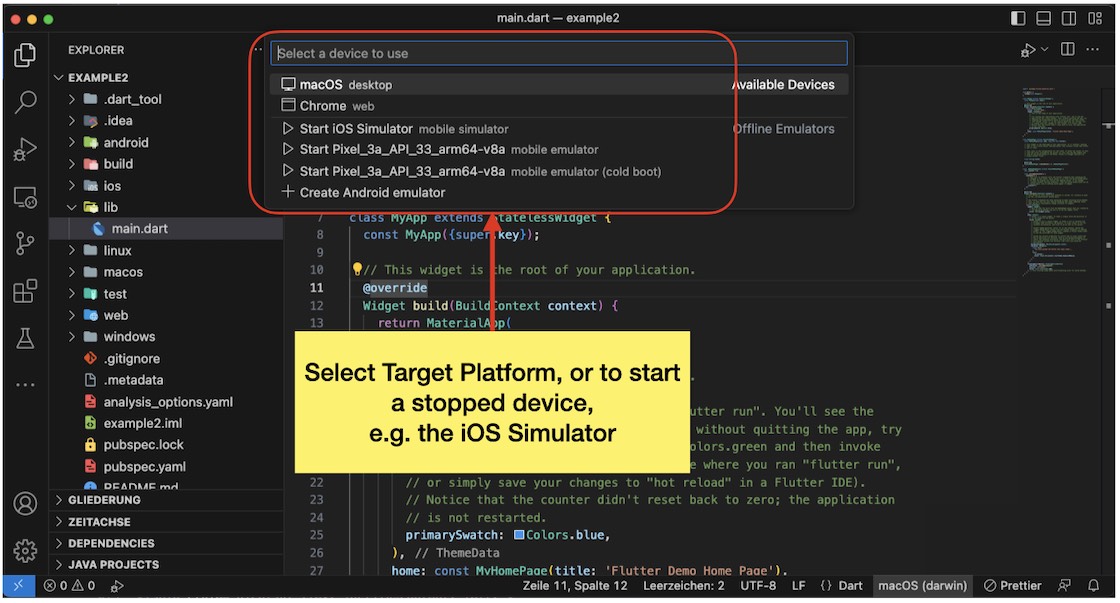
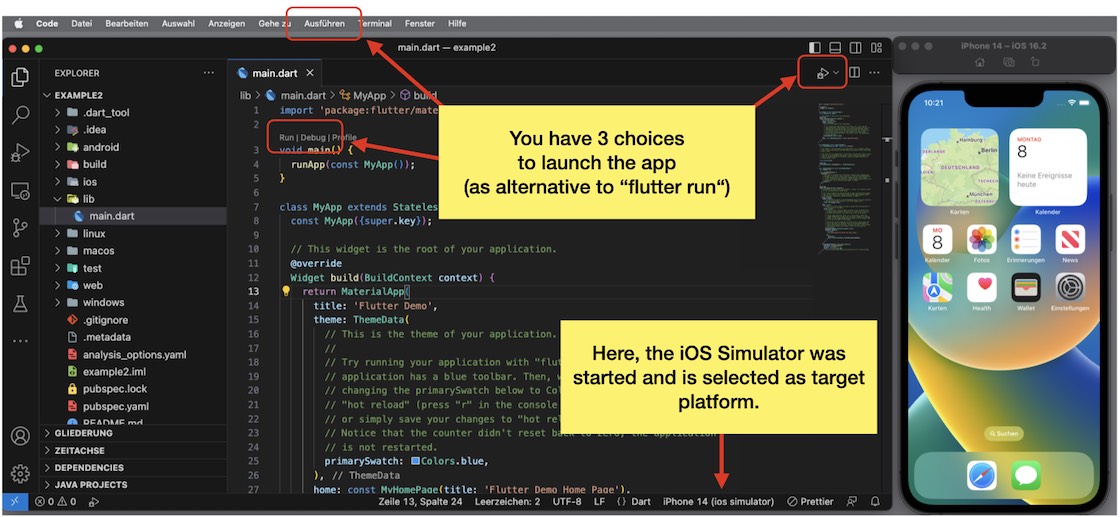
To inform Flutter about the target platform for which it should build with flutter run, the corresponding platform is initiated beforehand.
During the build process, the Rust code is cross-compiled into a library specific to the target platform (here: arm64-v8a). This compiled library is then automatically copied into the Android project folder.
If the Rust API changes, such as the addition of a new pub fn function or pub struct, or if parameters in an existing function change, you will need to call the flutter_rust_bridge_codegen function again.
Note: Sometimes I've noticed that the state in VS Code doesn't get updated and still shows faulty files, after the code generation. In this case, it helps to close and reload the project window...
If the business logic in Rust changes and the server is currently running, you'll need to stop and restart it. During the startup process, the library will be recompiled automatically with cargo build and linked to the app. You will observe in the console that the library named rust is being compiled.
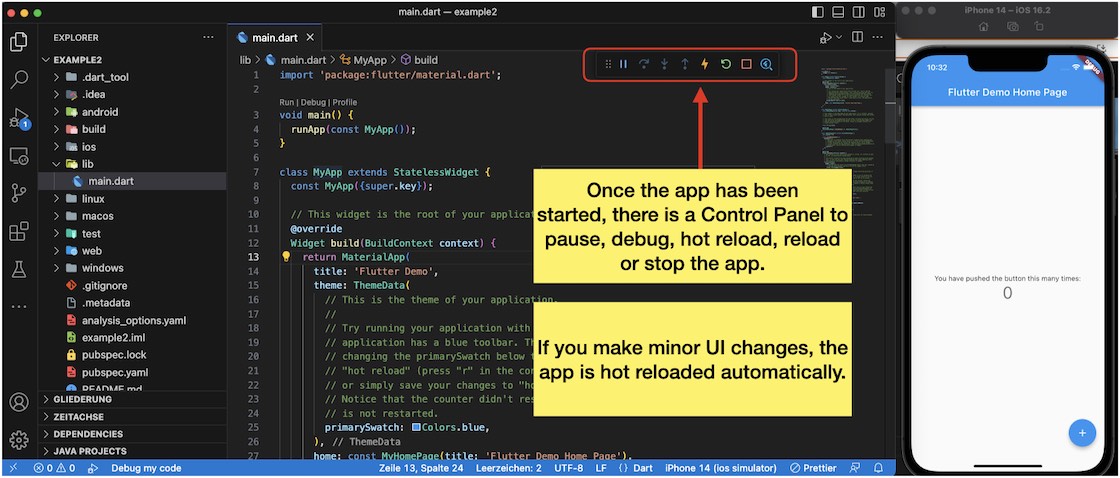
If there are changes in Flutter UI/business logic, you may not have to do anything if the server is running (hot reload is triggered by saving), or you may need to reload the app if necessary. Exception: if you started the app by flutter run, you'd need to use the keyboard, e.g. "r" for hot reload and "R" for reload.
The Rust compiler functions as a cross-compiler by default. It allows us to translate our Rust code into the target platform and package it as a library. However, to enable this functionality, we need to ensure that all the required targets are installed on the host computer. In this chapter, we will delve into the relevant targets for IOTA for Flutter.
In the context of software development, a "target" typically refers to the platform or environment for which software is being developed or compiled. The Components of a target specification can vary depending on the context and tooling being used.
Architecture: The target architecture specifies the instruction set and hardware architecture for which the software is being compiled or built. Examples include x86, x86_64, ARMv7, ARMv8, etc.
Vendor: The vendor component indicates the company or organization associated with the target platform. It helps identify the specific platform or ecosystem for which the software is intended. Examples include apple, android, linux, windows, etc.
Operating System: The operating system component represents the software layer that manages system resources and provides services to applications. It defines the environment in which the software will run. Examples include darwin (macOS, iOS), linux, windows, android, etc.
ABI (Application Binary Interface): The ABI component defines the interface between the compiled application code and the operating system and hardware. It defines how functions are called, how parameters and return values are passed, how memory is allocated, and other low-level details of interaction between software and the underlying system.
The Target Structure typically consists of the following Components:
<Architecture>-<Vendor>-<Operating System>
Target
Meaning
aarch64-apple-darwin
Targeting Apple devices running macOS with ARM 64-bit architecture (Apple Silicon).
x86_64-apple-darwin
Targeting Apple devices running macOS with Intel 64-bit x86 architecture .
aarch64-apple-ios
Targeting iOS devices with ARM 64-bit architecture, as used since the iPhone 5S and later, the iPad Air, Air 2 and Pro, with the A7 and later chips.
armv7s-apple-ios
Targeting iOS devices with 32-bit ARMv7s architecture ("old"), used in A6 and A6X chips on iPhone 5, iPhone 5C and iPad 4.
armv7-apple-ios
Targeting iOS devices with 32-bit ARMv7 architecture, used in A5 chip ("old").
aarch64-apple-ios-sim
Targeting iOS Simulator for Xcode 12 and later on hosts with ARM 64-bit architecture.
x86_64-apple-ios-sim
Targeting iOS Simulator for Xcode 12 and later on hosts with 64-bit x86 architecture.
i386-apple-ios
Targeting iOS Simulator on hosts with 32-bit x86 architecture ("old").
Example: My workstation computer is a MacBook Air with an M1 chip. Therefore, the following targets are essential for me when developing for macOS and iOS: aarch64-apple-darwin (for macOS), aarch64-apple-ios-sim (simulator for the M1 host environment), and aarch64-apple-ios (for iOS).
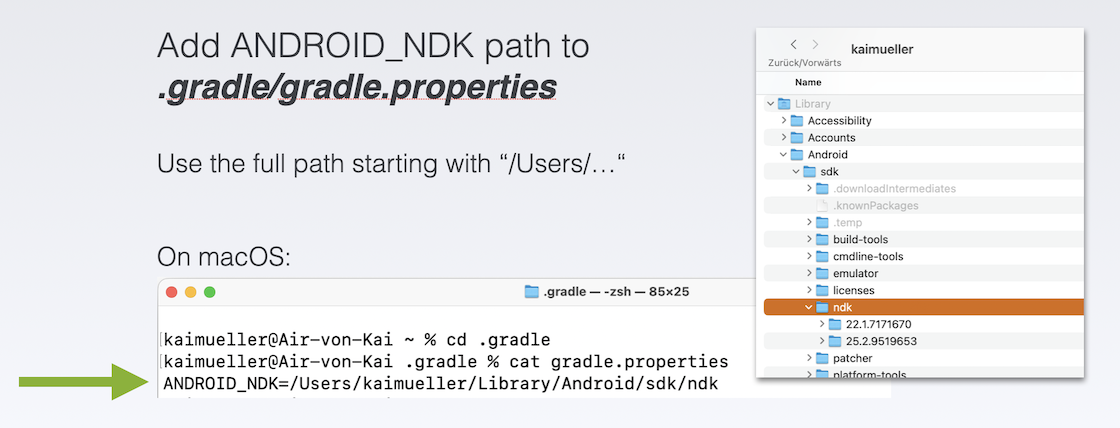
In the context of IOTA for Flutter the Android Native Development Kit (NDK) must be installed. It is used to provide the necessary tools and APIs to interface with the cross-compiled library. The Target Structure then follows the format:
<Architecture>-<Operating_system>-<ABI*>
ABI* : As part of the Target, the ABI component is different to the correct ABI naming, due to historical reasons or to maintain compatibility. The correct ABI naming is listed in the second column.
Target
ABI
Meaning
aarch64-linux-android
arm64-v8a
Targeting Android devices on ARM 64-bit architecture (most modern ARM-based Android devices).
armv7-linux-androideabi
armeabi-v7a
Targeting Android devices on ARMv7 architecture (older ARM-based Android devices).
x86_64-linux-android
x86_64
Targeting Android devices on 64-bit x86 architecture (Android emulators, modern x86-based devices).
i686-linux-android
x86
Targeting Android devices on 32-bit x86 architecture (Android emulators, older x86-based devices).
Example: My only current Android Virtual Device is a Pixel 3a phone with arm64-v8a system image. Therefore the only interesting target for development is aarch64-linux-android.
When you first install a toolchain, rustup installs only the standard library for your host platform - that is, the architecture and operating system you are presently running. To compile to other platforms you must install other target platforms. This is done with the command:
Sometimes, you might need to cross-compile your Rust code to a specific target separately from the Flutter build process. To ensure that everything runs smoothly, make sure you are in the rust folder (on the same level as Cargo.toml).
Unifying Flutter and Rust: Harnessing the power of two technologies.
On one hand, we have Flutter, a powerful framework for building user interfaces and applications. On the other hand, we have Rust, a high-performance programming language known for its safety and efficiency. But how can we combine these two technologies?
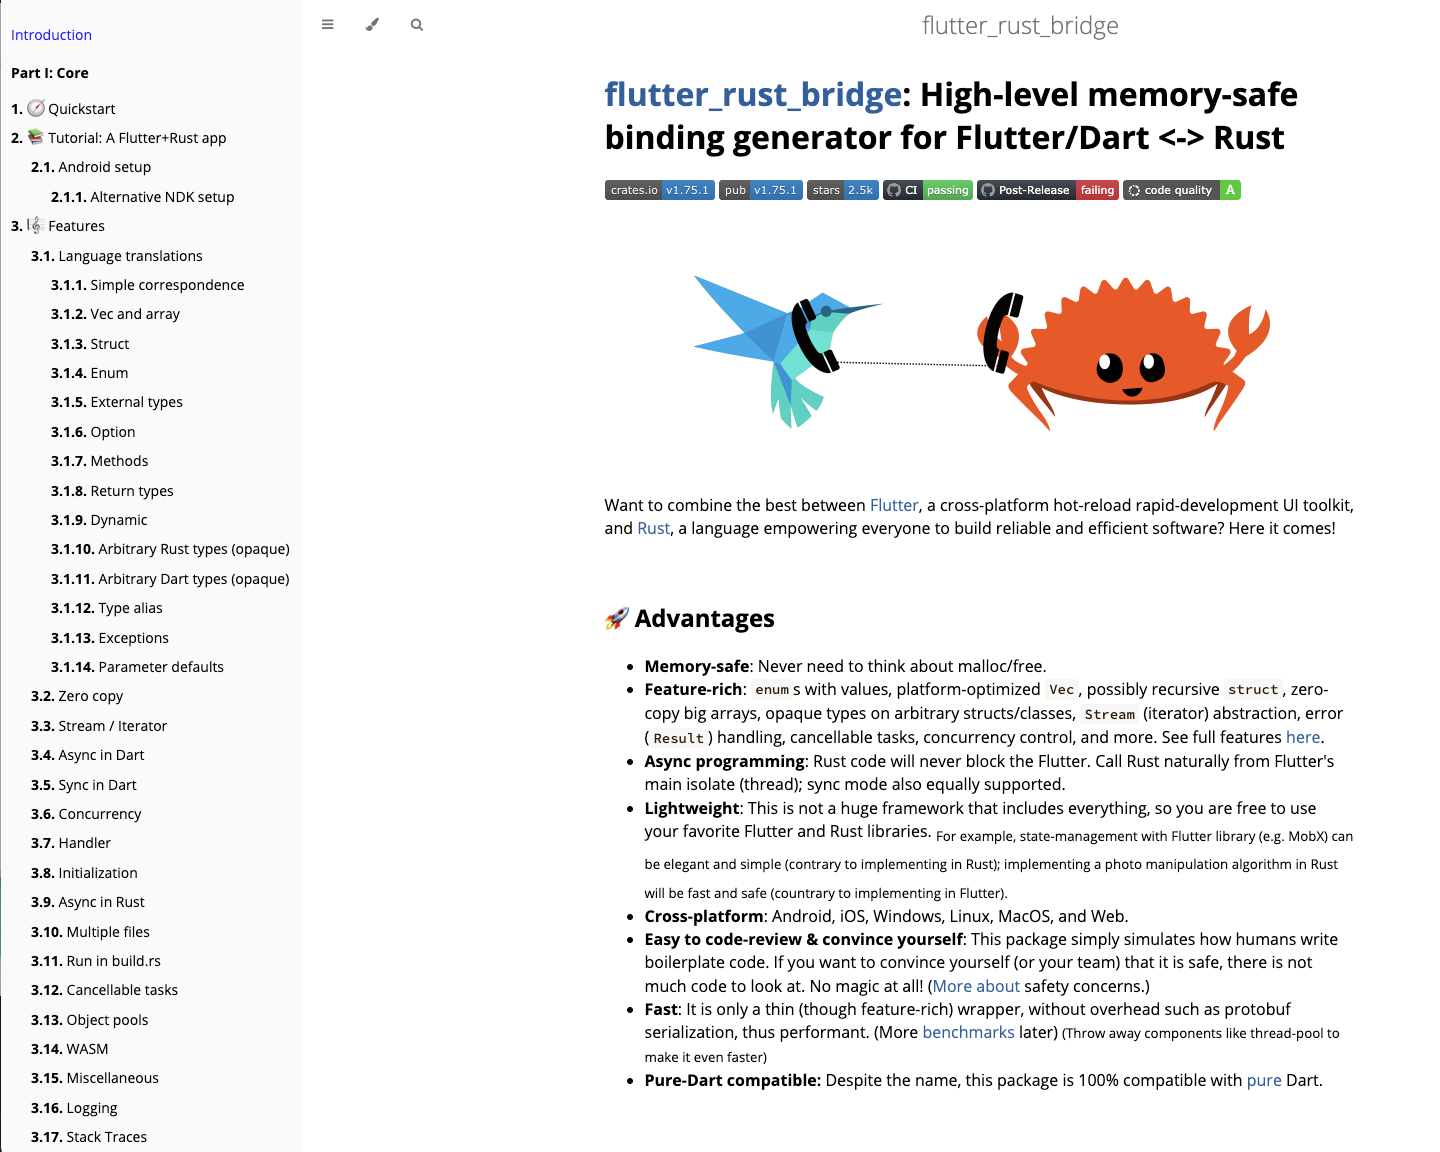
Enter the Flutter Rust Bridge, a GitHub project designed to address this very challenge of integrating both technologies.
It is important to highlight that, currently, the missing component in this equation is IOTA. However, this tutorial will delve into its integration in the later sections.
The Code Generator is a Rust executable that processes Rust code and produces two outputs: a generated module bridge_generated.rs on the Rust side and a Dart file bridge_generated.dart with definitions and implementations on the Dart side. The two files act as a bridge between the two programming languages.
The Code Generator offers a range of options that you can access by using this terminal command:
flutter_rust_bridge_codegen --help
This command provides you with a list of available options and their respective descriptions, allowing you to customize the code generation process according to your specific needs.
In the Workflow section documenting an Android demo, I used these options:
When working on code for iOS, you will require the following options for the Code Generator:
flutter_rust_bridge_codegen \
--rust-input rust/src/api.rs \                      // Source file
--dart-output ./lib/bridge_generated.dart \         // Output in Dart folder
--dart-decl-output ./lib/bridge_definitions.dart \  // Seperate definition file in Dart folder
--c-output ios/Runner/bridge_generated.h            // Generate a C header in the correct iOS folder
Similar for macOS:
flutter_rust_bridge_codegen \
--rust-input rust/src/api.rs \                      // Source file
--dart-output ./lib/bridge_generated.dart \         // Output in Dart folder
--dart-decl-output ./lib/bridge_definitions.dart \  // Seperate definition file in Dart folder
--c-output macos/Runner/bridge_generated.h          // Generate a C header in the correct macOS folder
A task for you
For other target platforms such as Browser, Linux, and Windows, please refer to the User Guide for specific instructions on using the Code Generator. Additionally, you have the option to create a YAML config file and utilize the command flutter_run_bridge_codegen [CONFIG_FILE] to streamline the code generation process. I encourage you to give it a try and explore the flexibility and convenience it offers.
Bridging the gap: The power of Flutter Rust Bridge
The Flutter Rust Bridge serves as the foundation for the "IOTA for Flutter" project. I was glad to have found this solution for the glueing task, with extensive documentation. There may be other alternatives out there, but I didn't look further because the Flutter Rust Bridge met my needs. The scope and features are so vast that I haven't even explored them all myself.
User Guide of the Flutter Rust Bridge
One of the selection criteria was the project's open-source nature and the fact that it is an active project. From my impression, regular updates ensure that the Flutter Rust Bridge stays up to date.
Additionally, it was important to me that I found support when I had questions. I received friendly and helpful answers, which was reassuring. It's great to know that there are dedicated individuals willing to help and facilitate the development process.
For developers embarking on the IOTA for Flutter journey, the GitHub page of the Flutter Rust Bridge is a valuable resource. Whether you have questions or can support others with your knowledge, it's a place to turn to.
How does IOTA for Flutter differ from Flutter Rust Bridge?
While the workflow of IOTA for Flutter utilizes the Flutter Rust Bridge as its foundation, it offers distinct advantages through its context-specific content centered around Shimmer and IOTA. The focus of IOTA for Flutter is to enhance the application and installation process, which has sometimes proven to be challenging. By addressing these difficulties, IOTA for Flutter aims to provide a smoother and more user-friendly experience.
What further convinced me is the power of the project itself: the Flutter Rust Bridge is packed with features! It's like a treasure chest waiting to be explored. I haven't discovered all its possibilities yet, and that's something for you to explore as well.
For example, IOTA for Flutter has not yet utilized the capability to create multiple API files, to run Flutter Unit tests or the integration of the command runner just, which could potentially optimize the workflow, among other things.
All in all, the Flutter Rust Bridge has become the indispensable tool for this project. I'm grateful to have found a solution that perfectly fits our needs and simplifies the development process.
Exploring the possibilities and limitations of integrating Dart and Rust.
The user guide devotes a large portion of Rust code vs. Dart code comparisons to highlight the possibilities and limitations of using the Flutter Rust Bridge. It is highly recommended to consult the user guide when starting to write your own code in api.rs:
In addition to these chapters in the user guide, the frb example folder in the GitHub repository serves as a valuable resource. It contains two files: one with Dart code with numerous examples, and another with corresponding Rust code demonstrating the same examples. This resource provides practical illustrations of how integration between Rust and Dart can be implemented and provides insight and inspiration for your own development projects.
In essence, the goal is to have a way to make requests from Flutter to the Rust backend. This is precisely what Rinf accomplishes. It resembles more of an API that allows you to make RustRequests associated with a specific operation from Flutter. In return, the call yields RustResponses as the response.
What matters most is the workflow. If another tool proves to offer a simpler and/or less error-prone workflow, it's worth exploring and evaluating. At the moment, I cannot personally assess whether this applies to Rinf. Therefore, I'm just highlighting this alternative and leave it to you, the developers, to try it out and make your own judgment.
In this tutorial, I consistently use the Flutter Rust Bridge. At this point (December 2023), it doesn't make sense for me to introduce another tool as the intermediary between Flutter and Rust.
Feel free to share your experiences with me on Twitter (@dj_kaiota). I'd love to hear about it!
How should one approach IOTA's Rust libraries? What sources of information are available? How can one discover the information needed for their work?
Note from 30/11/2023 : Please note that the iota.rs and wallet.rs libraries have been deprecated. The recommended approach for development is now using the new IOTA SDK, which consolidates iota.rs and wallet.rs into a single library.
It's important to be aware that, despite this not being the preferred choice from now on, the tutorial primarily utilizes the older libraries in most chapters. This decision is based on the fact that the tutorial and accompanying videos were initially created using the deprecated libraries.
While the workflow remains unchanged, there are slight differences in dependencies within Cargo.toml and the Rust backend code. To maintain consistency, the tutorial retains the use of the older libraries. However, an additional chapter will be included for the Playground App (see chapter "Building a Comprehensive App"), where the Rust code based on the IOTA SDK will be provided.
To approach IOTA's Rust libraries, there are several sources of information available to help you understand and work with them effectively:
Official Wiki Documentation: Start by referring to the official documentation provided by IOTA. It typically includes guides, tutorials, and API references specific to the Rust libraries. The documentation will give you an overview of the available functionality and important concepts to consider. You will also find some ...
... Examples: Look for examples that demonstrate the usage of IOTA's Rust libraries. These resources can provide hands-on guidance and practical insights into integrating the libraries into your own projects. I will use some of them in the later sections where I build the "Playground" app.
GitHub Repositories: Visit the GitHub repositories for the IOTA Rust libraries. It serves as the central hub for code ("single source of truth"), issue tracking, and community discussions. Explore the repositories to access the source code, documentation files, and discussions related to the libraries. You can also open issues or participate in discussions to seek clarification or contribute to the project.
Communication Channels: Stay connected with the IOTA community through official communication channels like the IOTA Discord server, where you can interact with developers, ask questions, and receive support. The Discord server is often a great place to connect with fellow developers and learn from their experiences.
Code's organization: How are IOTA's libraries structured?
Good news: it's getting easier!
To remind you: it is not the task of this tutorial to explain the libraries in detail. The purpose of the listed modules and features will become clearer when you create a project and use them. It's your responsibility to dive deep into it.
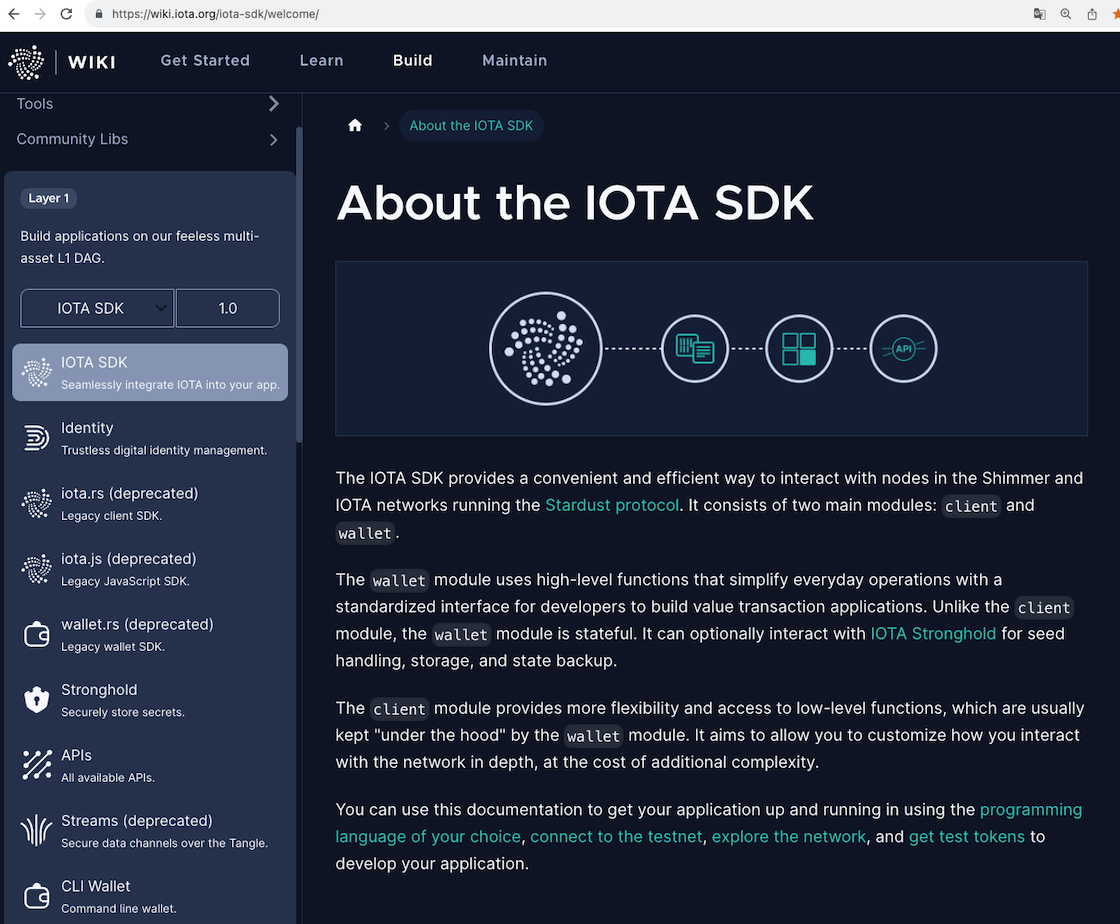
The IOTA SDK consolidates the two deprecated libraries iota.rs and wallet.rs. It also addresses the issue with rocksdb, making it easier for us to use on Android and iOS.
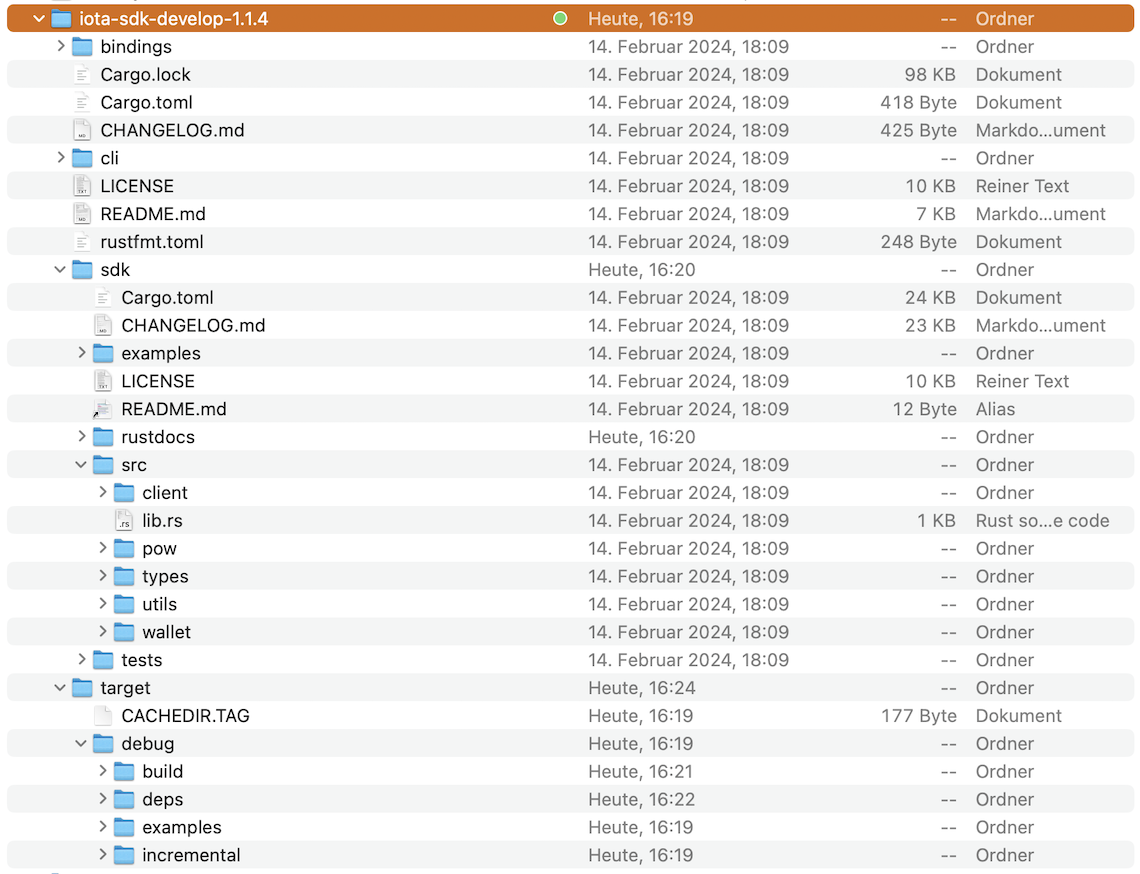
Downloading the latest version of the source code (either by downloading and extracting the zip file or using git clone) and opening it in your IDE.
Creating the Rust Docs as described in the chapter Create Rust Docs.
Take a look inside the src/ folder. You'll find the client and wallet directories there.
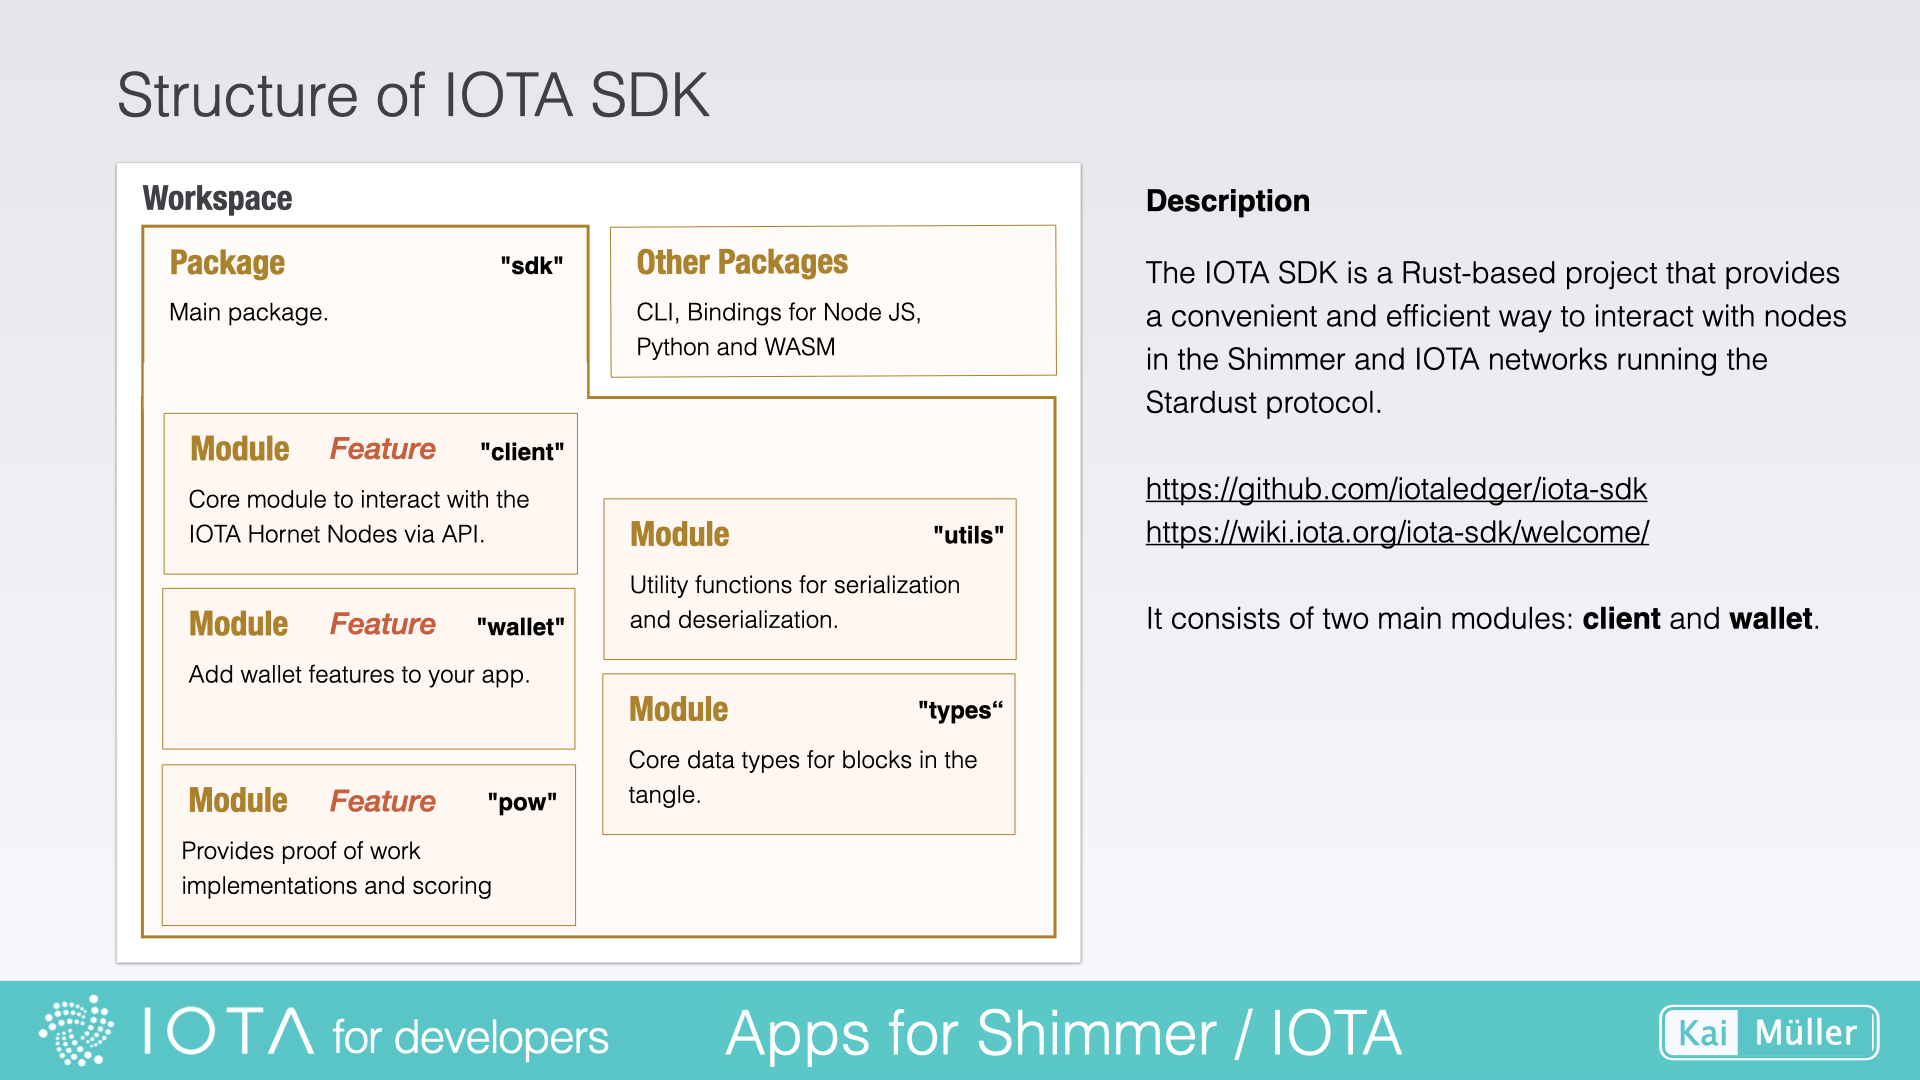
IOTA SDK
Structure of the IOTA SDK
Module
Description
client
A general purpose IOTA client for interaction with the IOTA network (Tangle). High-level functions are accessible via the Client struct.
wallet
The IOTA Wallet Library to create and use Accounts which can be secured by Stronghold and can be persisted in a database (rocksdb). Needed to send and receive values.
pow
Provides proof of work implementations and scoring for the IOTA protocol as a means to rate-limit the network. See Message PoW.
utils
Utility functions for serialization and deserialization.
types
Common types required by nodes and clients APIs like blocks, responses and DTOs.
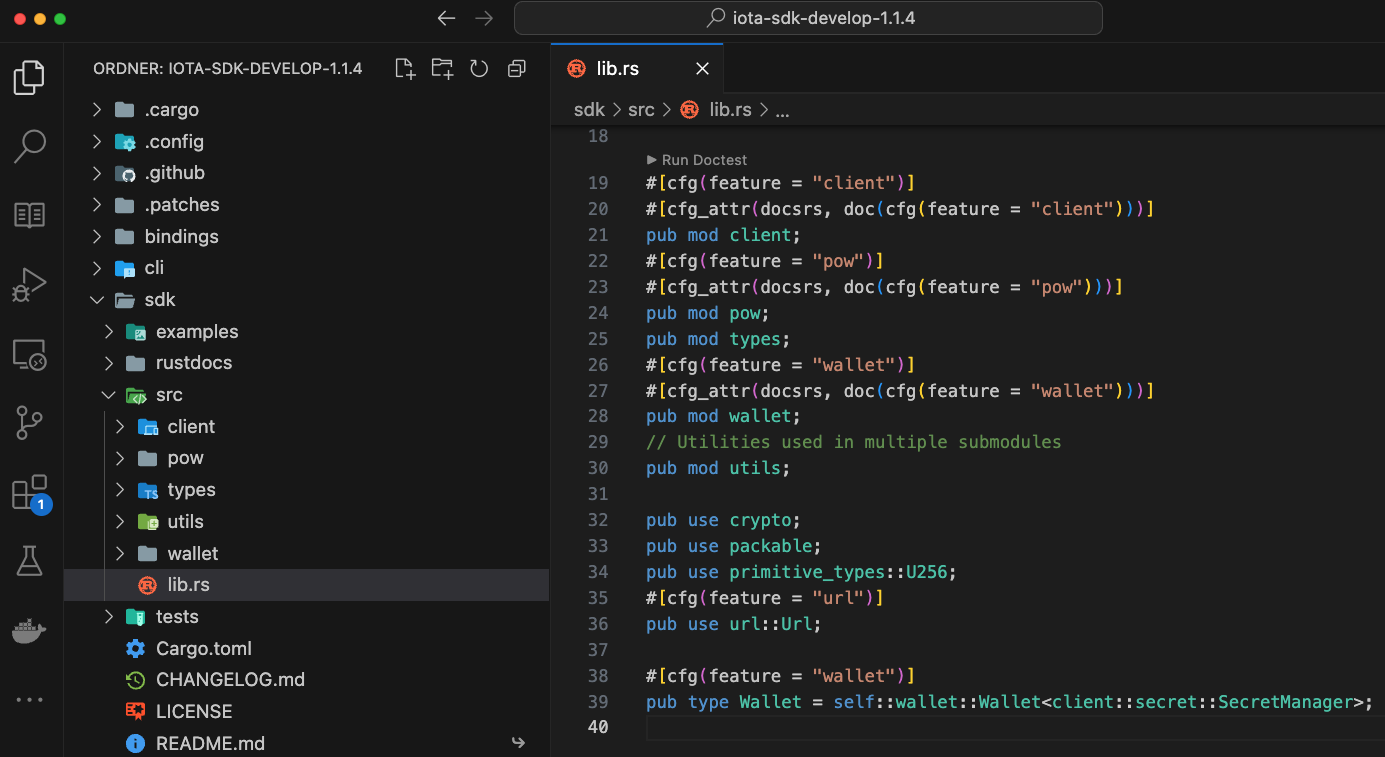
Your task: Review the feature definitions in sdk/Cargo.toml. Upon inspection, you'll notice that enabling the wallet feature will inherently incorporate the client feature.
Compare your insights with the source code in sdk/src/lib.rs:
The modules client, wallet and pow can be "switched on and off"
The source code of the modules client, wallet and pow can be included or excluded from the IOTA SDK Library, depending on the definition in YOUR PROJECT's Cargo.toml.
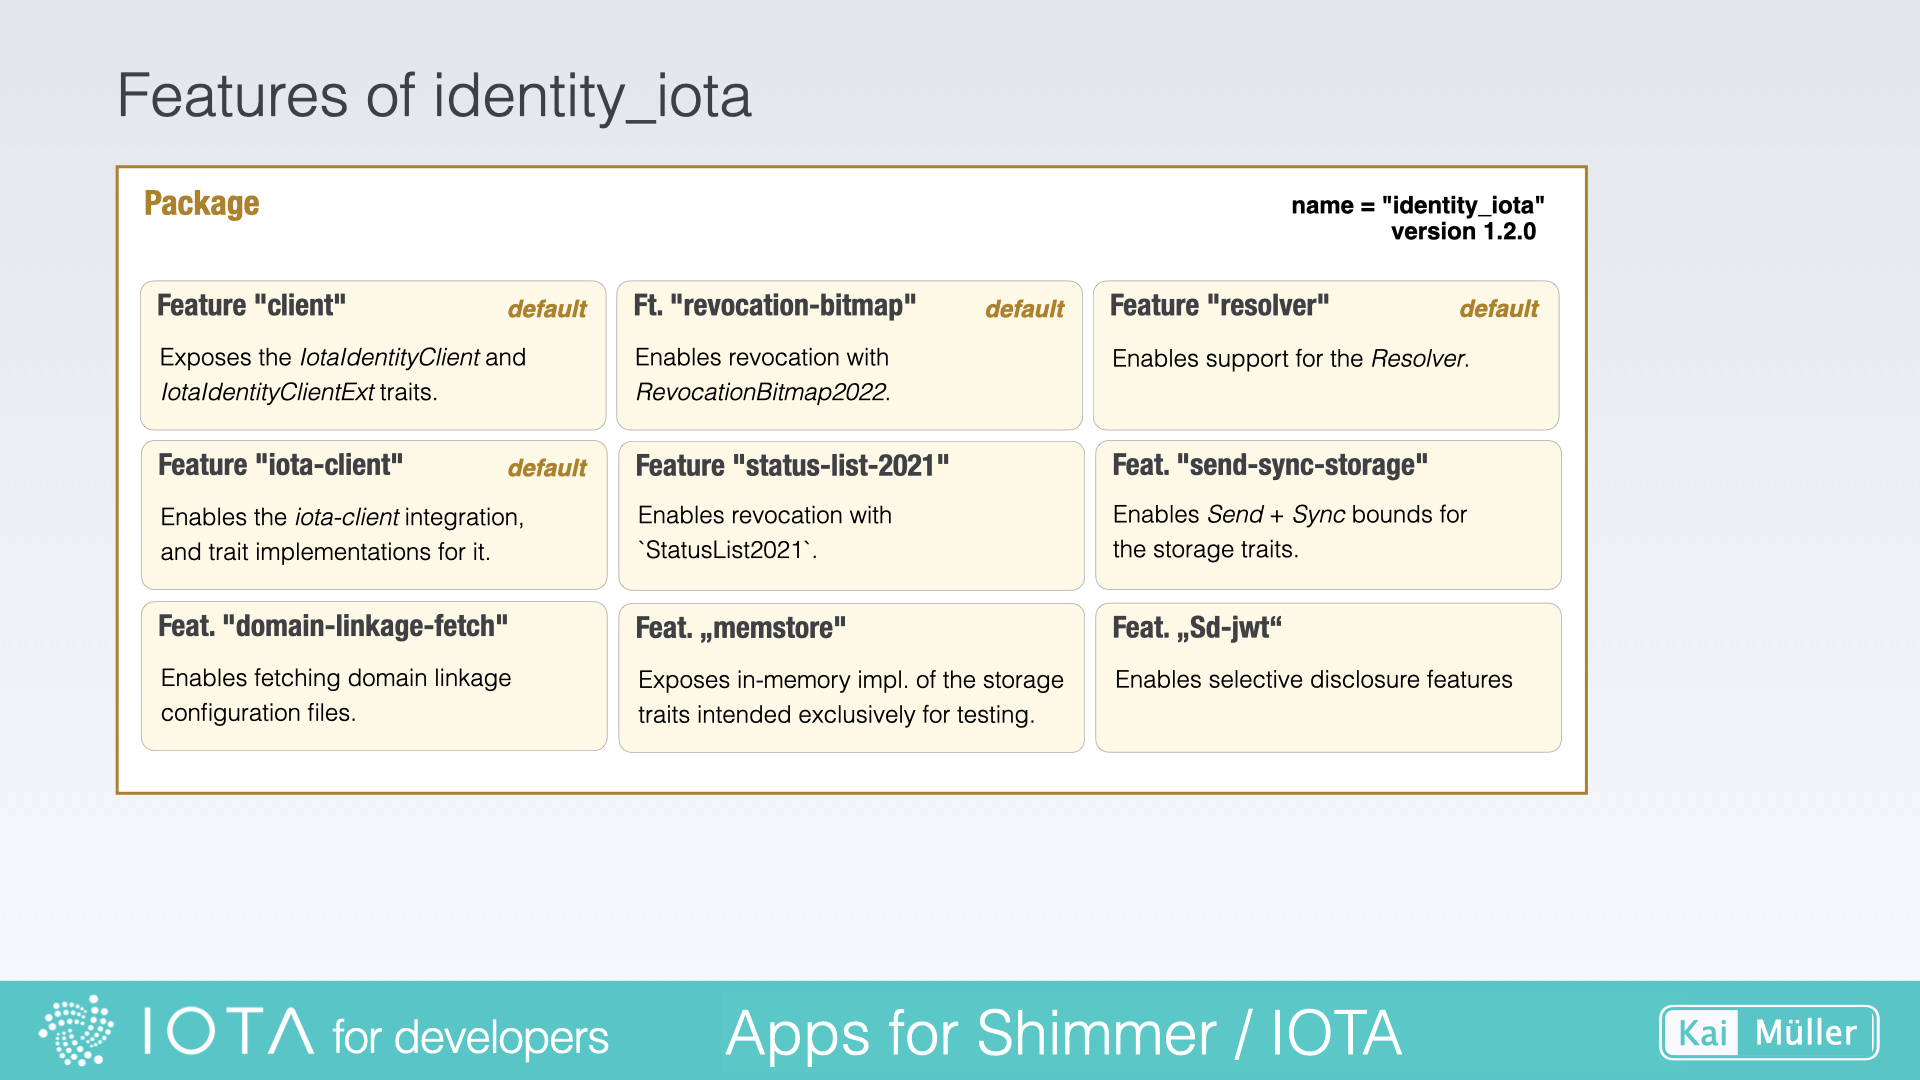
The main package of this workspace is located in the identity_iota/ directory. This package will be built as a crate with the name "identity_iota" (use this name to search for it in https://crates.io). The other packages of this workspace are dependencies of the main package.
The main module "identity_iota" contains the IOTA DID method implementation for the IOTA ledger. It implements the W3C Decentralized Identifiers (DID)
and Verifiable Credentials specifications.
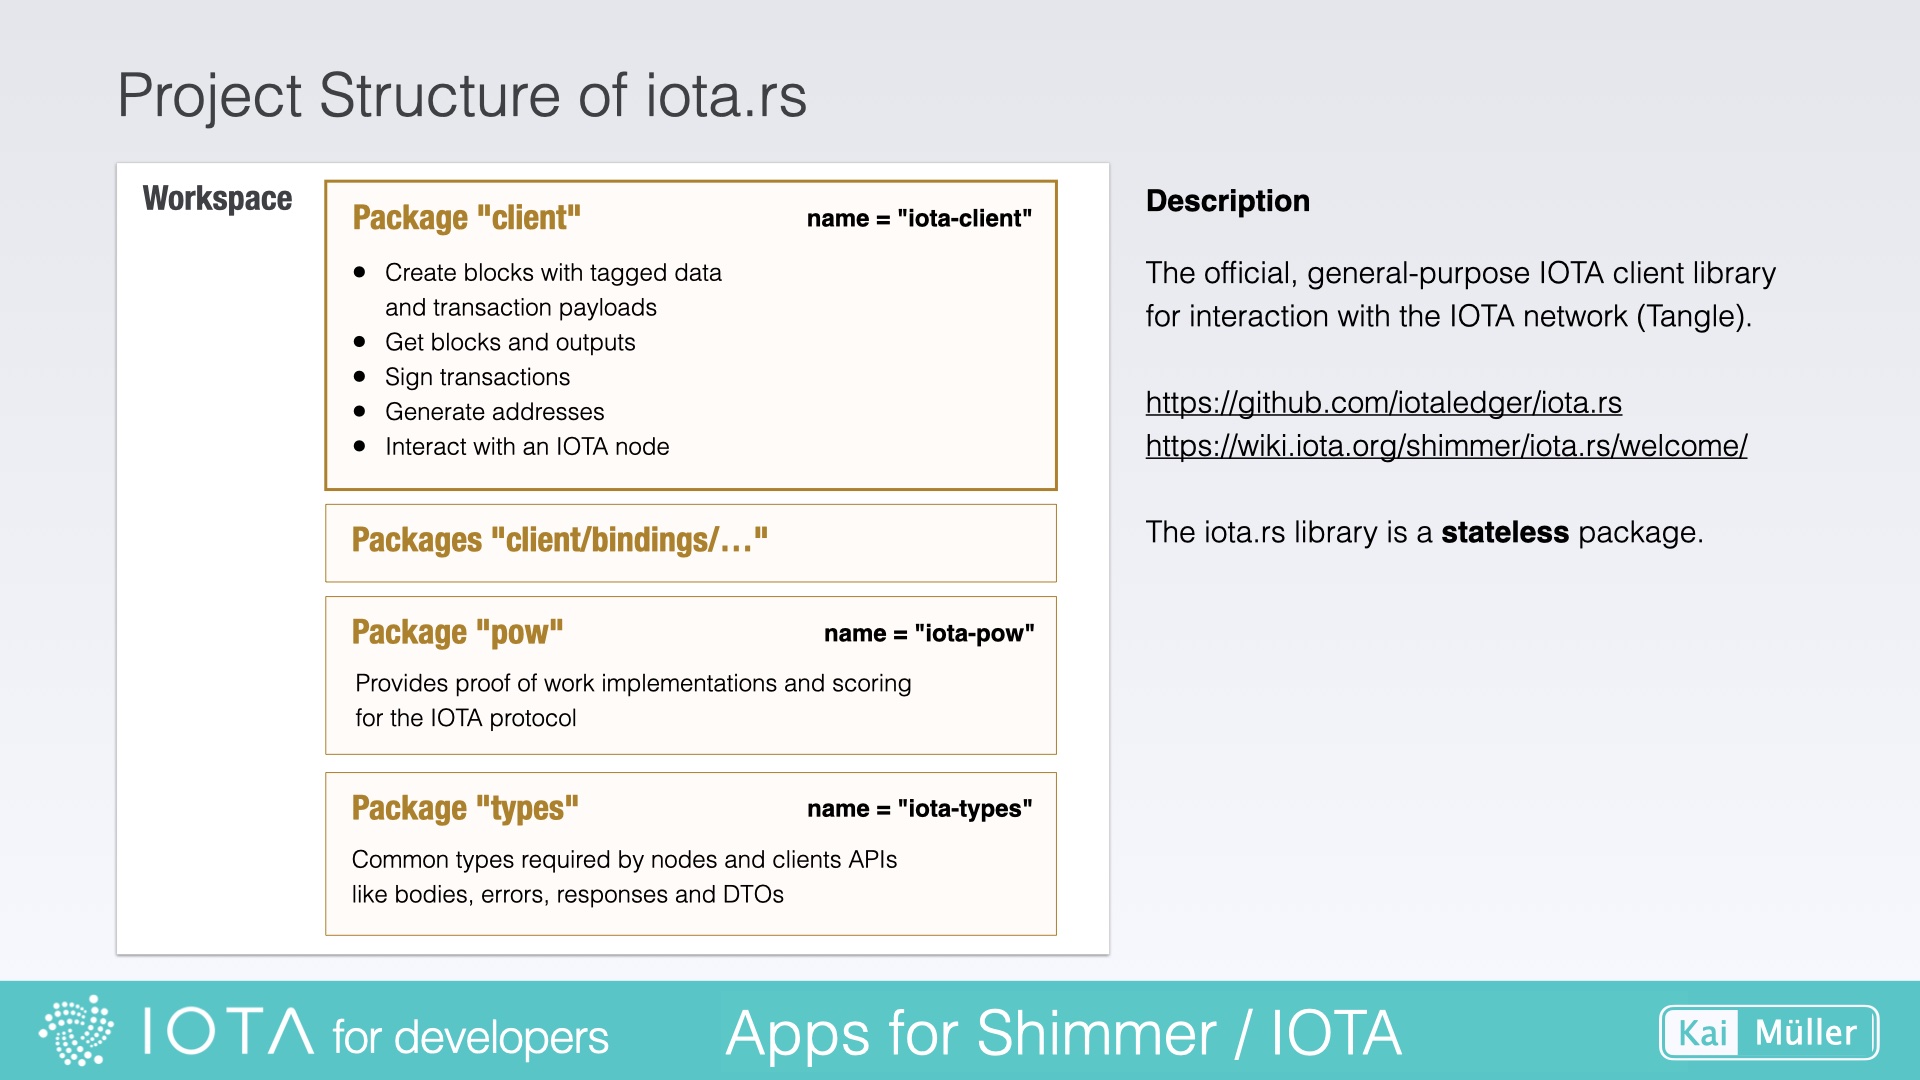
The main package of this workspace is located in the client/ directory. This package will be built as a crate with the name "iota-client" (use this name to search for it in https://crates.io).
Project Structure of iota.rs
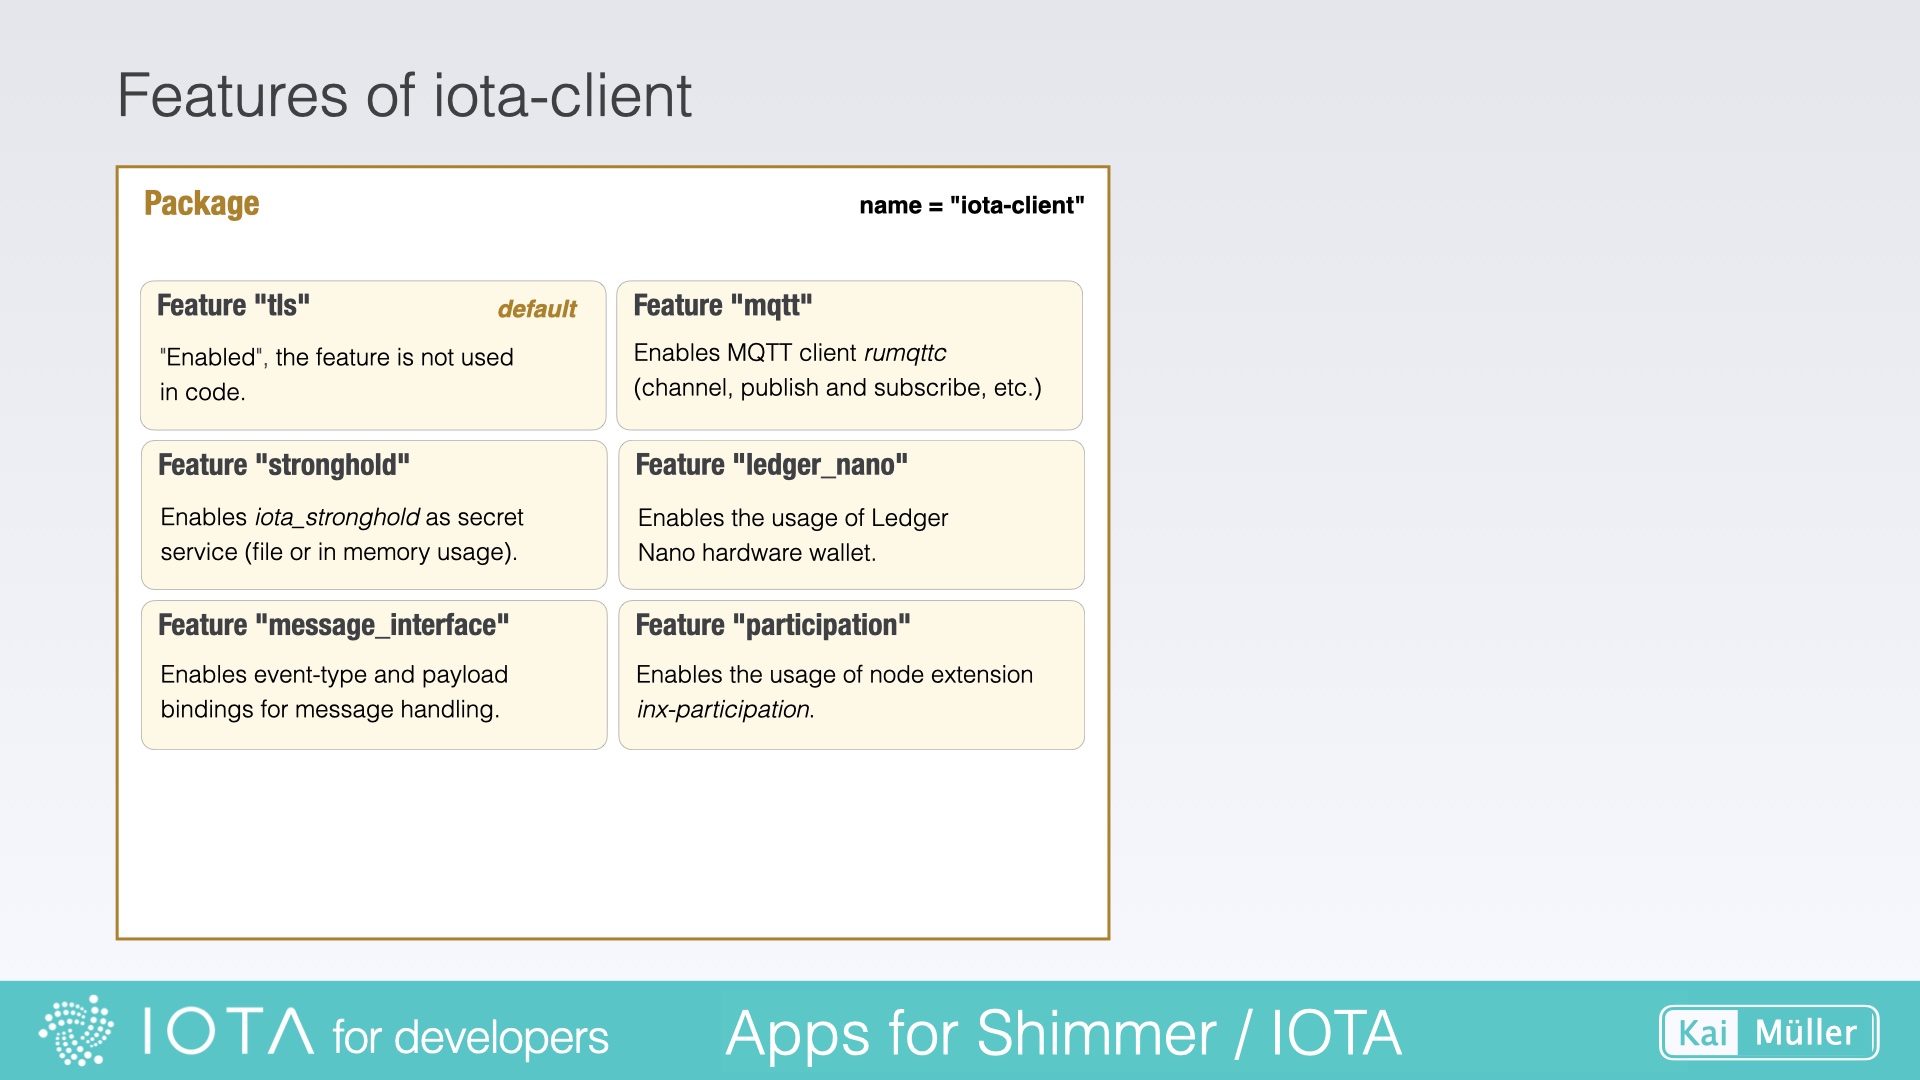
A look at client/Cargo.toml reveals the features of the library crate.
Features of iota-client
If you're looking for another entry point into iota.rs, you can check out the chapter titled Simple App -> Core API and iota.rs. This chapter provides more information about the structure of the iota-client using an example.
There is no workspace but only a package which will be built as a crate with the name "iota-wallet" (use this name to search for it in https://crates.io).
A look at Cargo.toml reveals the features of the library crate.
Structure of wallet.rs and features of iota-wallet
The main package of this workspace is located in the identity_iota/ directory. This package will be built as a crate with the name "identity_iota" (use this name to search for it in https://crates.io). The other packages of this workspace are dependencies of the main package.
The main module "identity_iota" contains the IOTA DID method implementation for the IOTA ledger. It implements the W3C Decentralized Identifiers (DID)
and Verifiable Credentials specifications.
This chapter focuses heavily on deprecated libraries like iota.rs and wallet.rs. Additionally, it addresses two different protocol versions: Chrysalis and Stardust, which were only relevant at the time of writing mid 2023. If you're new here, the information provided is outdated.
When configuring dependencies, it's crucial to consider the compatibility between different libraries and their versions, as well as their support for specific target platforms.
While some third-party crates like OpenSSL and RustLS may have mutually exclusive usage, this isn't a concern with the IOTA libraries. Instead, the key focus lies in addressing the following two questions:
Which versions are designated for Stardust, the current protocol version of the IOTA mainnet and Shimmer network, and which versions are intended for Chrysalis, the outdated protocol version of the IOTA mainnet?
Which versions can be successfully cross-compiled for the respective platform targets, including iOS, Android, and macOS?
To support both current networks, the deprecated libraries' versions used should start with major version 2, such as 2.0.1.rc-7. As a developer, you can verify this by checking the Cargo.lock file.
Why?
Browse the list of TIPs, and you will note that every item is tagged with Chrysalis (outdated) or Stardust.
TIP-0013 is labeled as Chrysalis, and it is associated with the REST API, which includes API calls using api/v1. These requests are utilized in version 1.4.0.
TIP-0025 is labeled as Stardust, and it is associated with the Core REST API that involves API calls using api/v2. These requests are utilized in versions 2.x.y.
The second question (see above) is more complex. It primarily revolves around determining which third-party libraries are used by the IOTA libraries and what dependencies are employed by those libraries, and so on.
Because each additional library increases the risk that it may not be cross-compiled for a specific target platform (iOS, Android, etc.). I specifically want to mention the two libraries, libsodium and rocksdb, at this point. Unfortunately, there are often issues when compiling for different targets with these libraries.
Here is a matrix illustrating the library versions utilized in a "full-featured" Stardust app. The objective is to employ iota-client, iota-wallet, and identity_iota simultaneously, along with the stronghold feature.
Status as of Jan 2023
Library Crate
Android
iOS/macOS
iota-client
iota-client = { version = "2.0.1-rc.7", default-features = false, features = [
"stronghold"
] }
iota-client = { version = "2.0.1-rc.7", default-features = false, features = [
"stronghold"
] }
identity_iota = { version = "0.7.0-alpha.6", default-features = true }
identity_iota = { version = "0.7.0-alpha.6", default-features = true }
You need to include different dependencies for the crate iota-wallet. This is due to an unsolved issue with regard to the third-party library of rocksdb.
The library developers are doing an exceptional job, which I greatly appreciate and admire. Their dedication and expertise shine through in the creation of such remarkable libraries. The thought and effort they have put into crafting a robust and user-friendly tool is truly commendable. I am genuinely grateful for their hard work and the invaluable contributions they have made to the development community. Kudos to the library developers for their outstanding efforts!
Ah, the mystical world of libraries and their captivating features! As an application developer, I yearn for the wisdom hidden within their depths. But lo and behold, it is not enough to wander through the labyrinth of documentation and tutorials, analyzing structures and classes. What I truly desire are the sacred scrolls of knowledge handed down by the library sages themselves — the library developers!
For who else possesses the arcane secrets of their creations? Only they hold the key to unlock the mysteries of design, capabilities, and best practices. With their insights and expertise, we can navigate the treacherous landscape of options and make informed choices.
There are examples, which are indeed quite helpful. Even if I apply them myself and try to understand them, it's still not easy to come up with my own use cases. It's like trying to tame a wild library beast — I lack the intuition to navigate its vast capabilities. The options are overwhelming, and the amount of knowledge I need feels like an insurmountable mountain. It's as if I'm standing at the entrance of a grand library, filled with books of endless possibilities, yet unsure of where to start.
One possible solution might be that library developers provide a greater number of examples and, in addition, offering more comprehensive explanations about it to enhance our understanding of the subject matter.
I as app developer, I'm curious to know which functions are being used and why, how they are structured, and what options are maybe available. How are options implemented? Are there any alternative approaches worth considering? What are the peculiarities of these examples, and when would you recommend opting for an alternative solution? Thorough elucidation of these aspects by library developers would be immensely welcome and help me navigate the library's intricacies with confidence.
The purpose of this section is to get familiar with Flutter and how to work with it in Visual Studio Code. The Flutter Default App is a small app that consists of only one file (main.dart). This app can be generated quickly, allowing you to practice how to launch the app on different target platforms using Visual Studio.
Executing this command will generate a new folder in the current directory that includes all necessary files and subfolders for a Flutter project. The default application is a Counter App, featuring a screen with a number that can be incremented by tapping on a Floating Action Button.
On Windows, the command code . should work out of the box.
If not working on Mac, you need to install the 'code' command once:
Open up VS Code, go to View -> Command Palette (or use the shortcut, see Keyboard Shortcuts below), type 'shell' and search for
Shell Command: Install 'code' command in PATH. Click on it and it will install in seconds.
Once Visual Studio Code is open you can launch the app in different ways.
a) By using flutter run command:
Open the Terminal in VS Code (see Shortcut below) and type in flutter run. If there are several targets, the execution is paused and you need to select the target:
Launching app by flutter run
b) By selecting the Target Platform first, and then by using one of several starting options (ensure that the main.dart file is open):
Current Target Platform - click to select another one
Start and/or select a Target Platform
Launch Options
Control Panel
When you launch the app using this method, any code changes you make will trigger a hot reload automatically. If you were to use "flutter run", you would need to manually press the "r" key to initiate a hot reload of the app.
When I first started exploring Flutter, I found this video to be particularly valuable. In addition to learning about the interplay of widgets and arguments, the tips on practical handling in VS Code were also very helpful to me.
As the creator of Flutter and Dart, Google has some excellent resources to make it easy for beginners to get started with Flutter. Here is a codelab that guides developers through the steps, which they can follow in their IDE. Simply click on the button Start codelab.
Unstoppable: The Power of Flutter, Rust, and FRB - Flutter Rust Bridge
The sun beat down mercilessly on the dusty parking lot. In the distance, the faint hum of a fan could be heard. Suddenly, two figures emerged from the shadows. One wore a colorful hat and a fluttering cape, the other a sturdy leather jacket and casually tossed a yo-yo.
Flutter and Rust stared deep into each other's eyes, as if they could read each other's thoughts. Suddenly, Flutter broke the silence and said, "I think we could achieve even more if we work together. Your strengths complement my weaknesses and vice versa."
Rust pondered for a moment before replying, "I agree. But how do we do it? How can we combine our powers?"
Flutter grinned and pulled out his phone. "I have an idea," he said, opening up the Flutter framework. "Let's develop an app that combines the best of both worlds. Speed and flexibility from me, and security and robustness from you."
Rust nodded in agreement. "But we'll need FRB to make it happen," he said. Flutter smiled. "Of course. With FRB, we're unbeatable."
With the super power of FRB, Flutter and Rust worked tirelessly to develop the perfect app. And when they finally launched it, the response was overwhelming. Users raved about its speed, security, and functionality.
As they basked in the success of their app, Flutter and Rust couldn't help but wonder, "Could we be even more successful? What if we brought in IOTA?"
But for now, they were content with their partnership and the success they had achieved together. Who knows what the future held? All they knew was that they were ready for whatever challenges lay ahead.
I would like to showcase the Flutter Rust Bridge Template app in this chapter. It's from one of the main contributors of the Flutter Rust Bridge, Viet Dinh.
This chapter is intended as an additional exercise to become more acquainted with integrating Rust into a Flutter project, without the added complexity of integrating with IOTA.
Additionally, this chapter will cover the configuration steps for macOS and iOS, and as a consequence, it will introduce a modified workflow.
I will start this project from scratch and only take the necessary code from the FRB repository.
You can simply list all the steps one after the other in a straight forward workflow.
Straight forward workflow
This works for Android.
Android: straight forward workflow
When working on macOS and iOS, you may encounter a Chicken and Egg problem, which is not a serious issue but may result in error messages that we would like to avoid.
Straight forward workflow doesn't work for macOS / iOS
The issue at hand is that the setup for FRB requires configuring a C header file that contains a list of all the exported symbols from the Rust library. However, this header file does not yet exist during the setup process. It will only be generated later when the Dart interface is generated.
Chicken and egg problem
To resolve this issue, I combine the Initialization and Development steps.
Combination of Initialization and Development steps
The Step about Setting up the Flutter Rust Bridge is now separated into two parts.
Modified workflow
I will be following the modified workflow in the upcoming subchapters. There are platform specific instructions for setting up the FRB on Android, macOS, and iOS. However, there are also some general steps that apply to all target platforms, which I will cover before and after the specific subchapters.
To create the FRB example app successfully, it's important to follow each subchapter in order, starting from the beginning and moving forward.
Create the file rust/src/api.rs and add this content:
// This is the entry point of your Rust library.
// When adding new code to your project, note that only items used
// here will be transformed to their Dart equivalents.

// A plain enum without any fields. This is similar to Dart- or C-style enums.
// flutter_rust_bridge is capable of generating code for enums with fields
// (@freezed classes in Dart and tagged unions in C).
pub enum Platform {
    Unknown,
    Android,
    Ios,
    Windows,
    Unix,
    MacIntel,
    MacApple,
    Wasm,
}

// A function definition in Rust. Similar to Dart, the return type must always be named
// and is never inferred.
pub fn platform() -> Platform {
    // This is a macro, a special expression that expands into code. In Rust, all macros
    // end with an exclamation mark and can be invoked with all kinds of brackets (parentheses,
    // brackets and curly braces). However, certain conventions exist, for example the
    // vector macro is almost always invoked as vec![..].
    //
    // The cfg!() macro returns a boolean value based on the current compiler configuration.
    // When attached to expressions (#[cfg(..)] form), they show or hide the expression at compile time.
    // Here, however, they evaluate to runtime values, which may or may not be optimized out
    // by the compiler. A variety of configurations are demonstrated here which cover most of
    // the modern oeprating systems. Try running the Flutter application on different machines
    // and see if it matches your expected OS.
    //
    // Furthermore, in Rust, the last expression in a function is the return value and does
    // not have the trailing semicolon. This entire if-else chain forms a single expression.
    if cfg!(windows) {
        Platform::Windows
    } else if cfg!(target_os = "android") {
        Platform::Android
    } else if cfg!(target_os = "ios") {
        Platform::Ios
    } else if cfg!(all(target_os = "macos", target_arch = "aarch64")) {
        Platform::MacApple
    } else if cfg!(target_os = "macos") {
        Platform::MacIntel
    } else if cfg!(target_family = "wasm") {
        Platform::Wasm
    } else if cfg!(unix) {
        Platform::Unix
    } else {
        Platform::Unknown
    }
}

// The convention for Rust identifiers is the snake_case,
// and they are automatically converted to camelCase on the Dart side.
pub fn rust_release_mode() -> bool {
    cfg!(not(debug_assertions))
}
An common step for macOS / iOS is needed: creating an Xcode project inside of the Rust library project folder (rust/). This can be done using the cargo-xcode command.
This Cargo subcommand is used to generate all Xcode project files for Rust projects. It will also create a build rule that will be used to create a dynamic and a static library from the Rust library code in Xcode's build step. If you don't remember, take a look back and read the section Xcode Essentials.
To install the cargo-xcode command use:
cargo install cargo-xcode@1.5.0
After the installation of the command, create the Rust Xcode project. Make sure to be in the rust/ directory. From the project's root folder you may switch into the right directory:
In this picture puzzle, you need to find the differences between two images. First, carefully examine the "before" image above ⬆️ - take note of all the details - and then look at the "after" image below ⬇️ and try to identify the differences.
Our next task is to create the generated code. This will also copy the C header file bridge_generated.h into the folder macos/Runner/. Use this command (you need to be in the root of your project):
Simply open the macos/Runner.xcodeproj in Xcode, open the rust/ directory in Finder and drag the rust.xcodeproj into the Runner folder. The next images will illustrate the steps.
Open Runner.xcodeproj
Drag the file rust.xcodeproj into the Runner Project
To ensure that your app can run on your host computer and Xcode version, you may only be able to support newer macOS versions. To set the minimum supported macOS version for your app, go to the General tab and select macOS version 13.1 as the Minimum Deployments target.
Switch to Visual Studio Code and open the file macos/Runner/AppDelegate.swift. We need to call the function dummy_method_to_enforce_bundling() (from FRB) somewhere to avoid that Xcode handles our library as dead code.
When it comes to building the libraries, you might be curious about the process. When you use the cargo-xcode command to create the Rust Xcode project, it also installs build rules. These build rules tell Xcode how to create the libraries during the build process. So, when Xcode builds the application, it first builds the subproject and then follows the build rules to create the necessary libraries.
Look twice! It's not the target of the Runner Project, but the target of the Rust subproject!
When you have installed the version 1.5.0 from cargo-xcode (as you can see in the Build rules image above), Flutter will not be able to find the dynamic library. You'll get an error like this:
Launching lib/main.dart on macOS in debug mode...
--- xcodebuild: WARNING: Using the first of multiple matching destinations:
{ platform:macOS, arch:arm64, id:00008103-001251441A62001E }
{ platform:macOS, arch:x86_64, id:00008103-001251441A62001E }
Building macOS application...
dyld[64001]: Library not loaded: /usr/local/lib/rust.dylib
  Referenced from: <29A02B41-EAF9-315B-977F-429B4DD80404> /Users/kaimueller/Documents/iota_for_flutter/example2/build/macos/Build/Products/Debug/example2.app/Contents/MacOS/example2
  Reason: tried: '/usr/local/lib/rust.dylib' (no such file), '/System/Volumes/Preboot/Cryptexes/OS/usr/local/lib/rust.dylib' (no such file), '/usr/local/lib/rust.dylib' (no such file), '/usr/lib/rust.dylib' (no such file, not in dyld cache)
Error waiting for a debug connection: The log reader stopped unexpectedly, or never started.
Error launching application on macOS.
To find out the version of cargo-xcode, you can run the command
cargo install --list
to list all installed Cargo subcommands along with their versions.
Our next task is to create the generated code. This will also copy the C header file bridge_generated.h into the folder ios/Runner/. Use this command (you need to be in the root of your project):
Simply open the ios/Runner.xcodeproj in Xcode, open the rust/ directory in Finder and drag the rust.xcodeproj into the Runner folder. The next images will illustrate the steps.
Open Runner.xcodeproj
Drag the file rust.xcodeproj into the Runner Project
In Visual Studio Code, open the file ios/Runner/AppDelegate.swift. We need to call the function dummy_method_to_enforce_bundling() (from FRB) somewhere to avoid that Xcode handles our library as dead code.
Add:
let dummy = dummy_method_to_enforce_bundling()
print(dummy)
Let's make a new file in the lib/ directory called ffi.dart. This file will help us load the library into our code. Here's what you should put inside the file:
// This file initializes the dynamic library and connects it with the stub
// generated by flutter_rust_bridge_codegen.

import 'dart:ffi';

import 'bridge_generated.dart';
import 'bridge_definitions.dart';
export 'bridge_definitions.dart';

// Re-export the bridge so it is only necessary to import this file.
export 'bridge_generated.dart';
import 'dart:io' as io;

const _base = 'rust';

// On MacOS, the dynamic library is not bundled with the binary,
// but rather directly **linked** against the binary.
final _dylib = io.Platform.isWindows ? '$_base.dll' : 'lib$_base.so';

final Rust api = RustImpl(io.Platform.isIOS || io.Platform.isMacOS
    ? DynamicLibrary.executable()
    : DynamicLibrary.open(_dylib));
This is where your Flutter app starts its journey! Usually, you'd have to write all the code yourself, but in this case, simply replace the entire content of the file with:
import 'package:flutter/material.dart';
import 'ffi.dart';

void main() {
  runApp(const MyApp());
}

class MyApp extends StatelessWidget {
  const MyApp({Key? key}) : super(key: key);

  // This widget is the root of your application.
  @override
  Widget build(BuildContext context) {
    return MaterialApp(
      title: 'Flutter Demo',
      theme: ThemeData(
        // This is the theme of your application.
        //
        // Try running your application with "flutter run". You'll see the
        // application has a blue toolbar. Then, without quitting the app, try
        // changing the primarySwatch below to Colors.green and then invoke
        // "hot reload" (press "r" in the console where you ran "flutter run",
        // or simply save your changes to "hot reload" in a Flutter IDE).
        // Notice that the counter didn't reset back to zero; the application
        // is not restarted.
        primarySwatch: Colors.blue,
      ),
      home: const MyHomePage(title: 'Flutter Demo Home Page'),
    );
  }
}

class MyHomePage extends StatefulWidget {
  const MyHomePage({Key? key, required this.title}) : super(key: key);

  // This widget is the home page of your application. It is stateful, meaning
  // that it has a State object (defined below) that contains fields that affect
  // how it looks.

  // This class is the configuration for the state. It holds the values (in this
  // case the title) provided by the parent (in this case the App widget) and
  // used by the build method of the State. Fields in a Widget subclass are
  // always marked "final".

  final String title;

  @override
  State<MyHomePage> createState() => _MyHomePageState();
}

class _MyHomePageState extends State<MyHomePage> {
  // These futures belong to the state and are only initialized once,
  // in the initState method.
  late Future<Platform> platform;
  late Future<bool> isRelease;

  @override
  void initState() {
    super.initState();
    platform = api.platform();
    isRelease = api.rustReleaseMode();
  }

  @override
  Widget build(BuildContext context) {
    // This method is rerun every time setState is called.
    //
    // The Flutter framework has been optimized to make rerunning build methods
    // fast, so that you can just rebuild anything that needs updating rather
    // than having to individually change instances of widgets.
    return Scaffold(
      appBar: AppBar(
        // Here we take the value from the MyHomePage object that was created by
        // the App.build method, and use it to set our appbar title.
        title: Text(widget.title),
      ),
      body: Center(
        // Center is a layout widget. It takes a single child and positions it
        // in the middle of the parent.
        child: Column(
          // Column is also a layout widget. It takes a list of children and
          // arranges them vertically. By default, it sizes itself to fit its
          // children horizontally, and tries to be as tall as its parent.
          //
          // Invoke "debug painting" (press "p" in the console, choose the
          // "Toggle Debug Paint" action from the Flutter Inspector in Android
          // Studio, or the "Toggle Debug Paint" command in Visual Studio Code)
          // to see the wireframe for each widget.
          //
          // Column has various properties to control how it sizes itself and
          // how it positions its children. Here we use mainAxisAlignment to
          // center the children vertically; the main axis here is the vertical
          // axis because Columns are vertical (the cross axis would be
          // horizontal).
          mainAxisAlignment: MainAxisAlignment.center,
          children: <Widget>[
            const Text("You're running on"),
            // To render the results of a Future, a FutureBuilder is used which
            // turns a Future into an AsyncSnapshot, which can be used to
            // extract the error state, the loading state and the data if
            // available.
            //
            // Here, the generic type that the FutureBuilder manages is
            // explicitly named, because if omitted the snapshot will have the
            // type of AsyncSnapshot<Object?>.
            FutureBuilder<List<dynamic>>(
              // We await two unrelated futures here, so the type has to be
              // List<dynamic>.
              future: Future.wait([platform, isRelease]),
              builder: (context, snap) {
                final style = Theme.of(context).textTheme.headline4;
                if (snap.error != null) {
                  // An error has been encountered, so give an appropriate response and
                  // pass the error details to an unobstructive tooltip.
                  debugPrint(snap.error.toString());
                  return Tooltip(
                    message: snap.error.toString(),
                    child: Text('Unknown OS', style: style),
                  );
                }

                // Guard return here, the data is not ready yet.
                final data = snap.data;
                if (data == null) return const CircularProgressIndicator();

                // Finally, retrieve the data expected in the same order provided
                // to the FutureBuilder.future.
                final Platform platform = data[0];
                final release = data[1] ? 'Release' : 'Debug';
                final text = const {
                      Platform.Android: 'Android',
                      Platform.Ios: 'iOS',
                      Platform.MacApple: 'MacOS with Apple Silicon',
                      Platform.MacIntel: 'MacOS',
                      Platform.Windows: 'Windows',
                      Platform.Unix: 'Unix',
                      Platform.Wasm: 'the Web',
                    }[platform] ??
                    'Unknown OS';
                return Text('$text ($release)', style: style);
              },
            )
          ],
        ),
      ),
    );
  }
}
All the necessary steps have been completed. If you're unsure about how to build and run the app for different targets, please refer to the launch instructions provided in Flutter only.
This chapter will focus on implementing logging in a Flutter + Rust application. When it comes to handling scenarios where you create a data consumer once and keep adding data to it continuously, Flutter provides a very useful abstraction called a Stream.
In this way, it is possible to create a function with little code that sends log messages from Rust to Flutter. Streaming in the opposite direction, from Flutter to Rust, unfortunately is not possible.
The aim is to use logger macros on the Rust side, such as trace!, debug!, warn!, info!, and error!, and integrate them into the Rust code in the application. Flutter is supposed to process the incoming log entries.
Here, in a slightly modified form, I present the logging example of the Flutter-Rust-Bridge:
The app uses the Flutter Chat UI plugin, which displays a list of incoming messages and allows users to send their own messages. For demonstration purposes, this message is converted into multiple log messages on the Rust side. Flutter receives the entries and can decide using a switch whether the new entry should be streamed to the chat list or to the console.
"logging" is the name of an existing Flutter package (search for it in Flutter packages)...
... which is a dependency of the package "ffigen" ...
... which is a dependency of YOUR project!
If your project name was "logging" you would run into serious troubles at some point:
// This file initializes the dynamic library and connects it with the stub
// generated by flutter_rust_bridge_codegen.

import 'dart:ffi';

import 'bridge_generated.dart';
import 'bridge_definitions.dart';
export 'bridge_definitions.dart';

// Re-export the bridge so it is only necessary to import this file.
export 'bridge_generated.dart';
import 'dart:io' as io;

const _base = 'rust';

// On MacOS, the dynamic library is not bundled with the binary,
// but rather directly **linked** against the binary.
final _dylib = io.Platform.isWindows ? '$_base.dll' : 'lib$_base.so';

final Rust api = RustImpl(io.Platform.isIOS || io.Platform.isMacOS
    ? DynamicLibrary.executable()
    : DynamicLibrary.open(_dylib));
As a user, I want to use an app to create a message and tag it, so that I can then send it to the tangle. I also want to be able to find my tag and message in the tangle in order to check if the data was sent correctly.
Acceptance Criteria:
The app should provide a user-friendly interface for creating and sending messages.
The app should allow me to enter the content of the message.
The app should have a field where I can add a tag to the message.
The app should have a button to send the message and the tag to the tangle.
Message and tag are sent as Block with Tagged Data Payload.
The app should store the tag, message and block id.
The app should provide a list of the sent tagged data blocks.
The app should allow to open the tangle explorer for a selected list item.
Note: It is assumed that the user is using the Shimmer Network.
As a developer, you are accustomed to querying REST APIs. The Shimmer and IOTA nodes provide such APIs. At a higher level, IOTA provides a library to support us as Rust developers by encapsulating certain calls and exposing them as functions in the so called client. This relationship has already been shown in the movie clip "How everything works together" starting from minute 2:53.
In the video you can see the Swagger page of a node with its endpoints. Then it is demonstrated that you could make individual endpoint calls using Postman.
Ultimately, the client in the IOTA SDK (formerly: iota.rs) takes over the task to communicate with the node's API.
To post a block of this kind using the features provided by the IOTA library, we can utilize the example 004_example_tagged_data.rs as a template. Let's first try it out.
Here's the source code:
// iota.rs -> client/examples/block/004_example_tagged_data.rs

// Copyright 2021 IOTA Stiftung
// SPDX-License-Identifier: Apache-2.0

//! This example sends a block with a tagged data payload.
//! Run: `cargo run --example block_tagged_data --release -- [NODE URL]`.

use iota_client::{block::payload::Payload, Client, Result};

#[tokio::main]
async fn main() -> Result<()> {
    // Take the node URL from command line argument or use one from env as default.
    let node_url = std::env::args().nth(1).unwrap_or_else(|| {
        // This example uses dotenv, which is not safe for use in production.
        dotenv::dotenv().ok();
        std::env::var("NODE_URL").unwrap()
    });

    // Create a client with that node.
    let client = Client::builder().with_node(&node_url)?.finish()?;

    // Create and send the block with tag and data.
    let block = client
        .block()
        .with_tag(b"Hello".to_vec())
        .with_data(b"Tangle".to_vec())
        .finish()
        .await?;

    println!("{block:#?}\n");

    if let Some(Payload::TaggedData(payload)) = block.payload() {
        println!(
            "Tag: {}",
            String::from_utf8(payload.tag().to_vec()).expect("found invalid UTF-8")
        );
        println!(
            "Data: {}",
            String::from_utf8(payload.data().to_vec()).expect("found invalid UTF-8")
        );
    }

    println!(
        "\nBlock with tag and data sent: {}/block/{}",
        std::env::var("EXPLORER_URL").unwrap(),
        block.id()
    );

    Ok(())
}
// IOTA SDK -> sdk/examples/client/block/04_block_tagged_data.rs

// Copyright 2021 IOTA Stiftung
// SPDX-License-Identifier: Apache-2.0

//! This example sends a block with a tagged data payload.
//!
//! Rename `.env.example` to `.env` first, then run the command:
//! ```sh
//! cargo run --release --example block_tagged_data [TAG] [DATA]
//! ```

use iota_sdk::{
    client::{Client, Result},
    types::block::payload::Payload,
};

#[tokio::main]
async fn main() -> Result<()> {
    // This example uses secrets in environment variables for simplicity which should not be done in production.
    dotenvy::dotenv().ok();

    for var in ["NODE_URL", "EXPLORER_URL"] {
        std::env::var(var).expect(&format!(".env variable '{var}' is undefined, see .env.example"));
    }

    let node_url = std::env::var("NODE_URL").unwrap();

    let tag = std::env::args().nth(1).unwrap_or_else(|| "Hello".to_string());
    let data = std::env::args().nth(2).unwrap_or_else(|| "Tangle".to_string());

    // Create a node client.
    let client = Client::builder().with_node(&node_url)?.finish().await?;

    // Create and send the block with tag and data.
    let block = client
        .build_block()
        .with_tag(tag.as_bytes().to_vec())
        .with_data(data.as_bytes().to_vec())
        .finish()
        .await?;

    println!("{block:#?}\n");

    if let Some(Payload::TaggedData(payload)) = block.payload() {
        println!(
            "Tag: {}",
            String::from_utf8(payload.tag().to_vec()).expect("found invalid UTF-8")
        );
        println!(
            "Data: {}",
            String::from_utf8(payload.data().to_vec()).expect("found invalid UTF-8")
        );
    }

    println!(
        "Block with tag and data sent: {}/block/{}",
        std::env::var("EXPLORER_URL").unwrap(),
        block.id()
    );

    Ok(())
}
Hint for the deprecated iota.rs example: If you run the example block_tagged_data using the command line with argument [NODE_URL], e.g. by
cargo run --example block_tagged_data --release -- "https://api.shimmer.network"
then you will get an error message indicating that the EXPLORER_URL is missing. This is because the environment variables have not been loaded. To fix that, include dotenv::dotenv().ok(); in the line before the last println! command.
The two important lines in the code above are the ones for
creating a client instance that can operate and exchange data with the tangle using a node, and
generating the block, which includes sending the block to the Tangle in the finish method.
I want to exemplify how a client instance is created. A static method of the Client struct first creates a ClientBuilder. The builder allows dynamic configuration of the client by chaining multiple methods to override default values. Only when the finish() method is called, the client instance is returned from the builder.
ClientBuilder used to configure a client instance
The principle used for creating instances with builders is frequently employed in the library, such as with the Node_Manager, Blocks (used in the code above), or Addresses. It's like the builder taking Lego blocks from a storage shelf and assembling them together.
The next important code line is:
    // Create and send the block with tag and data.
    let block = client
        .block()
        .with_tag(b"Hello".to_vec())
        .with_data(b"Tangle".to_vec())
        .finish()
        .await?;
    // Create and send the block with tag and data.
    let block = client
        .build_block()
        .with_tag(tag.as_bytes().to_vec())
        .with_data(data.as_bytes().to_vec())
        .finish()
        .await?;
At first, a ClientBlockBuilder is created by calling the function client.block(). This function can be found in client/src/api/block_builder/high_level.rs.
If you wonder why this client function is not defined in the client.rs file let me remind you that in Rust, you can provide implementations for your struct throughout the crate! This language feature is used in iota.rs.
By utilizing the with_* functions in client/src/api/block_builder/mod.rs a tag and a data payload are added to the block.
The function finish() examines the block configuration. As a tag is included, the finish_tagged_data() function is called next, and finally forwards to finish_block(). This last function not only creates a block instance but it also posts the block to the node api and the tangle using client.post_block_raw(). Do you find the definition for this post function? Tipp: there's another impl Client {...} in client/src/node_api/core/routes.rs.
At first, a ClientBlockBuilder is created by calling the function client.build_block(). This function can be found in src/client/api/block_builder/high_level.rs.
If you wonder why this client function is not defined in the same place where the Client struct is defined (that is in the client/core.rs file) let me remind you that in Rust, you can provide implementations for your struct throughout the crate! This language feature is used in IOTA SDK.
By utilizing the with_* functions in src/client/api/block_builder/mod.rs a tag and a data payload are added to the block.
The function finish() examines the block configuration. As a tag is included, the finish_tagged_data() function is called next, and finally forwards to finish_block(). This last function not only creates a block instance but it also posts the block to the node api and the tangle using client.post_block_raw(). Do you find the definition for this post function? Tipp: there's another impl Client {...} in src/client/node_api/core/routes.rs.
The question addressed here is: How can I create a public function in my own Rust API that is exposed to Flutter through our cross-compiled library?
There are some peculiarities in the official example.
The example contains an async main function.
NODE_URL and EXPLORER_URL are retrieved either from the .env file or from the command line.
The result is printed in the console.
So, how can we convert it into our API function?
At first, we should replace the main() function by a method to be exposed, let's say:
pub fn publish_tagged_data_block(...) {
    ...
}
It's an absolute must to make the function public, otherwise, it won't be exposed to the outside world.
Next up, our function needs a little something extra. It should accept parameters for the tag and the message. And in return, it should gracefully provide you with the blockId. So, let's add some flavor to our function:
Ah, decisions, decisions! While we could add the node_url as input parameter to our function, I've decided to take matters into my own hands. I'll go ahead and hard code this URL, based on the assumption we made in our User Story.
Inside the function, we need to establish a similar structure to the #[tokio::main] statement shown in the example. The Flutter-Rust-Bridge User Guide has published an article discussing this specific topic, which can be found at the following link: Async in Rust. Based on my experience, I recommend adopting approach 2, where we explicitly create a new Tokio runtime and use its block_on function to execute the future until it finishes its execution. This approach has proven to provide a reliable and effective solution.
What is Tokio?
Oh, the confusion! Let's clear things up! While "Tokio" might sound like the capital of Japan, it's actually an asynchronous runtime for Rust. Just like Tokyo is bustling with activity, Tokio handles the execution of asynchronous tasks in your program. It ensures that your API requests are executed asynchronously, so your program doesn't sit there twiddling its thumbs. With Tokio, you get a whole package of features and abstractions, including support for Rust's async/await syntax and futures, making your asynchronous code more readable and approachable.
Don't forget to add the following dependencies to Cargo.toml:
[dependencies]
tokio = { version = "1.34.0", features = ["full"] }
anyhow = { version = "1.0.75" }
Now we're almost done. It's time to add the core functionalities which are the two lines to create the client and the block, and to send it.
pub fn publish_tagged_data_block(tag: String, message: String) -> Result<String> {
    let node_url: String = String::from("https://api.shimmer.network");

    let rt = Runtime::new().unwrap();
    rt.block_on(async {
        // Create a client with that node.
        let client = Client::builder().with_node(&node_url)?.finish()?;

        // Create and send the block with tag and data.
        let block = client
            .block()
            .with_tag(tag.into_bytes())
            .with_data(message.into_bytes())
            .finish()
            .await?;

        ...
    })
}
pub fn publish_tagged_data_block(tag: String, message: String) -> Result<String> {
    let node_url: String = String::from("https://api.shimmer.network");

    let rt = Runtime::new().unwrap();
    rt.block_on(async {
        // Create a client with that node.
        let client = Client::builder().with_node(&node_url)?.finish().await?;

        // Create and send the block with tag and data.
        let block = client
            .build_block()
            .with_tag(tag.into_bytes())
            .with_data(message.into_bytes())
            .finish()
            .await?;

        ...
    })
}
To convert a Rust String into a vector of byte literals (Vec), you can use the String::into_bytes method.
The only missing part is returning the block_id as String, so we try this:
pub fn publish_tagged_data_block(tag: String, message: String) -> Result<String> {
    let node_url: String = String::from("https://api.shimmer.network");

    let rt = Runtime::new().unwrap();
    rt.block_on(async {
        // Create a client with that node.
        let client = Client::builder().with_node(&node_url)?.finish()?;

        // Create and send the block with tag and data.
        let block = client
            .block()
            .with_tag(tag.into_bytes())
            .with_data(message.into_bytes())
            .finish()
            .await?;

        let block_id:BlockId = block.id();

        Ok(block_id.to_string())
    })
}
pub fn publish_tagged_data_block(tag: String, message: String) -> Result<String> {
    let node_url: String = String::from("https://api.shimmer.network");

    let rt = Runtime::new().unwrap();
    rt.block_on(async {
        // Create a client with that node.
        let client = Client::builder().with_node(&node_url)?.finish().await?;

        // Create and send the block with tag and data.
        let block = client
            .build_block()
            .with_tag(tag.into_bytes())
            .with_data(message.into_bytes())
            .finish()
            .await?;

        let block_id:BlockId = block.id();

        Ok(block_id.to_string())
    })
}
BlockId is defined in package types/block of the libraries:
iota.rs: in types/src/block
IOTA SDK: in sdk/src/types/block.
To avoid that the compiler complains, you need to add the related paths to your api.rs, see below.
use iota_client::{block::BlockId, Client};
use tokio::runtime::Runtime;
use anyhow::Result;

pub fn publish_tagged_data_block(tag: String, message: String) -> Result<String> {
    let node_url: String = String::from("https://api.shimmer.network");

    let rt = Runtime::new().unwrap();
    rt.block_on(async {
        // Create a client with that node.
        let client = Client::builder().with_node(&node_url)?.finish()?;

        // Create and send the block with tag and data.
        let block = client
            .block()
            .with_tag(tag.into_bytes())
            .with_data(message.into_bytes())
            .finish()
            .await?;

        let block_id:BlockId = block.id();

        Ok(block_id.to_string())
    })
}
use iota_sdk::{
    client::Client,
    types::block::BlockId,
};

use anyhow::Result;
use tokio::runtime::Runtime;

pub fn publish_tagged_data_block(tag: String, message: String) -> Result<String> {
    let node_url: String = String::from("https://api.shimmer.network");

    let rt = Runtime::new().unwrap();
    rt.block_on(async {
        // Create a client with that node.
        let client = Client::builder().with_node(&node_url)?.finish().await?;

        // Create and send the block with tag and data.
        let block = client
            .build_block()
            .with_tag(tag.into_bytes())
            .with_data(message.into_bytes())
            .finish()
            .await?;

        let block_id:BlockId = block.id();

        Ok(block_id.to_string())
    })
}
What is the purpose of the section above in build.gradle?
Well, it is intended to ensure that Rust is recompiled when the app is launched. To make it all work, you need to pay special attention to the following things.
Adjust the correct build.gradle file: android/app/build.gradle
Adjust the correct file
Include all the targets you need. Recap the chapter about targets required for Android development in Cross-Compiling. Please note that every target you add will consume disk space, and it will take a considerable amount of time to compile when you launch the app for the first time.
In the case above I only included the ABI arm64-v8a from my Android Emulator. The other targets are commented out.
Make sure that the workingDir refers to the correct crate package.
workingDir "../../rust" // <-- ATTENTION: CHECK THE CORRECT FOLDER!!!
In my tutorial, I consistently use "rust" as the crate name - in the command cargo new --lib rust.
To ensure successful compilation, we have installed cargo-ndk as mentioned earlier. In order to utilize it, it is crucial to correctly define the constant ANDROID_NDK path. The recommended approach is to include the path in the ~gradle/gradle.properties file.
Create a file ffi.dart and paste this content. As you can see it returns the api variable.
// This file initializes the dynamic library and connects it with the stub
// generated by flutter_rust_bridge_codegen.
import 'dart:ffi';
import 'bridge_generated.dart';
import 'bridge_definitions.dart';
export 'bridge_definitions.dart';
// Re-export the bridge so it is only necessary to import this file.
export 'bridge_generated.dart';
import 'dart:io' as io;
const _base = 'rust';
// On MacOS, the dynamic library is not bundled with the binary,
// but rather directly **linked** against the binary.
final _dylib = io.Platform.isWindows ? '$_base.dll' : 'lib$_base.so';
final Rust api = RustImpl(io.Platform.isIOS || io.Platform.isMacOS
? DynamicLibrary.executable()
: DynamicLibrary.open(_dylib));
Wherever you intend to utilize the library functions, import the ffi.dart file into your Dart code. The exposed API function(s) can then be invoked by utilizing the returned api variable.
An common step for macOS / iOS is needed: creating an Xcode project inside of the Rust library project folder (rust/). This can be done using the cargo-xcode command.
I utilize cargo-xcode v1.5.0 to ensure smooth operation. For example, when I employed version v1.9.0, Xcode flagged an issue regarding the absence of a development team for signing (but: I couldn't add a development team because the "Signing & Capabilities" tab is missing for the target rust-cdylib in the Rust Xcode project).
To install the cargo-xcode command use:
cargo install cargo-xcode@1.5.0
After the installation of the command, create the Rust Xcode project. Make sure to be in the rust/ directory. From the project's root folder you may switch into the right directory:
cd rust
cargo xcode
cd ..
This step is for macOS only because the macOS app uses the dynamic library:
Open up that rust/rust.xcodeproj file with Xcode and select the root item rust, at the left pane on top.
Select the Target rust-cdylib and the Build Settings tab. Here, search for Dynamic Library Install Name Base and change the value into $(TARGET_BUILD_DIR).
Make sure that you are REALLY in the rust/ directory (where Cargo.toml is located) when executing the cargo xcode command.
When macOS cannot locate the dynamic library:
This might happen due to cargo-xcode version v1.5.0.
To prevent this, execute the third step of the macOS Setup above (maintain the Dynamic Library Install Name Base). Make sure that you have selected the Target for the dynamic library, called rust-cdylib. It enables an macOS executable to properly locate dynamic *.dylib library files in the package. Do NOT select rust-staticlib !
To find out the version of cargo-xcode, you can run the command
cargo install --list
to list all installed Cargo subcommands along with their versions.
FYI, there is an alternative solution described in the tutorial section macOS Instructions at the bottom.
The error message no healthy node available, or SocketException: Connection failed is encountered when making API calls:
No healthy node available
macOS applications are sandboxed by default. To avoid a SocketException, you need to add the network.client entitlement to macOS/Runner/DebugProfile.entitlements:
Our next task is to create the generated code. This will also copy the C header file bridge_generated.h into the folder macos/Runner/. Use this command (you need to be in the root of your project):
An common step for macOS / iOS is needed: creating an Xcode project inside of the Rust library project folder (rust/). This can be done using the cargo-xcode command.
To install the cargo-xcode command use:
cargo install cargo-xcode@1.5.0
After the installation of the command, create the Rust Xcode project. Make sure to be in the rust/ directory. From the project's root folder you may switch into the right directory:
Our next task is to create the generated code. This will also copy the C header file bridge_generated.h into the folder ios/Runner/. Use this command (you need to be in the root of your project):
A user informed me about encountering issues when attempting to run the app on the iOS Simulator. Having not used the app for several months, I decided to test it myself and encountered some problems, too. Here is my response to the user.
Upon receiving your notification about the issue, I dedicated time today to rebuild the project. Since I initially set up and completed the project, there have been changes in my personal development environment. Specifically, I upgraded to macOS Sonoma 14.1.1 and installed Xcode 15. Upon launching VS Code, the project prompted me to execute "flutter pub upgrade" due to a change in the Flutter version during this period. Unfortunately, when attempting to run the project on iOS using "flutter run," the build process encountered a failure.
Despite not being aware of your specific circumstances, I managed to resolve all errors, successfully rebuild the project, and run it on the iOS Simulator, specifically using iPhone 15 Pro Max with iOS 17.0.
I followed these steps to address the issue:
Updated Rust to the latest version using "rustup update."
Deleted the Cargo.lock file.
Deleted the rust/target/ folder.
Deleted the following generated files: rust/src/bridge_generated.io.rs, rust/src/bridge_generated.rs, bridge_definitions.dart, bridge_generated.dart.
Removed the first generated line in rust/src/lib.rs.
Restarted VS Code.
Regenerated the Dart Code using the command in the tutorial, resulting in the creation of two Rust files and two Dart files.
Initially, VS Code displayed an error in the bridge_generated.rs file. After restarting VS Code, the error disappeared.
In the Terminal, navigated to the rust/ directory and executed "cargo build --target aarch64-apple-ios-sim," which was successful.
Returned to the root directory (cd ..) and ran "flutter run"
I received messages about "Xcode 15 compatibility" (or similar) and ultimately, the library and the app were successfully built, launching without any issues.
These steps were necessary because I initially created the project under macOS 13, Xcode 14, and lower versions of Flutter and Rust. I assume if you build the project from scratch using the Flutter-only version on GitHub and follow the steps outlined in the tutorial, you shouldn't encounter the same issue.
The subsequent two comprehensive sections of the tutorial detail the process of constructing the Playground App - an app using several of IOTA's libraries. Watch the video to understand its purpose.
This section serves as the foundation. The following chapter will utilize the IOTA SDK for implementation.
When developing apps, especially those that involve file storage, it is important to know where these files can be stored within the app. This knowledge is crucial for both development and app verification.
In the Playground App, a snapshot file and a database file are stored within the app. This is needed for the usage of Stronghold and the Wallet. The creation and storage of these files are handled by the Rust library. However, the Rust library does not know where exactly these files should be stored.
To solve this problem, the Flutter code needs to determine the folder path and pass it to Rust. This is where the path_provider comes into play. This official Flutter package enables Flutter to find commonly used locations on the filesystem. It supports Android, iOS, Linux, macOS and Windows - but not all methods ("directories") are supported on all platforms. You can find a compatibility matrix on the path_provider page:
The installation and usage of the plugin are very simple and should be performed by you as a short exercise (Flutter only). Create a new app (e.g. "location_tester") and open it in VS Code:
flutter create --empty location_tester
cd location_tester
code .
Within your IDE, open a Terminal and install the plugin with the command:
flutter pub add path_provider
Then, copy the Path Provider Example and replace the content of your main.dart file by the example.
Launch the Flutter app on different platforms. You will see a bunch of buttons each refering to a certain directory.
Click on a button and observe the result. Then, try to locate the displayed file location:
In the Android Emulator, open Android Studio and search for the specified directory in the Device File Explorer.
For macOS and iOS, use Finder to open the corresponding directory. Tip: If you don't see hidden directories or files, use the keyboard shortcut COMMAND + Shift + . to toggle the visibility.
Android
Result example on Android: Application Support Directory
macOS
Result example on macOS: Application Documents Directory
iOS
Result example on iOS: Application Support Directory
I only focus here on the following two directories.
The Application Support directory is primarily used for storing permanent data and files that are used by the app but may not necessarily need to be visible to the user. It often contains configuration files, caches, and other data necessary for the smooth operation of the app. This directory is intended for app-specific and internal use.
On the other hand, the Application Documents directory is intended for data and files generated by the app or created by the user that should be accessible to the user. It is the recommended location for user data, such as user-created documents, images, or other files managed by the app. It is also typically associated with iCloud synchronization, which means that the data in this directory can be automatically synchronized with the user's other devices.
Based on the information provided here, it follows that for storing the database and the snapshot file, only the Application Support directory is suitable. It is supported on all platforms.
Are you encountering the "Could not create task ':generateLockfiles" issue after cloning the project and launching VSCode? Here's the cause: Gradle files are absent in the Android subfolder at this stage. These files are fetched when you initially run the project on your Virtual Android device. To resolve it, follow these steps: Run the Flutter app on your Android device, stop it, and then restart VSCode. The error should disappear.
This is a brief explanation of the Example Structure. The examples contain the core functionality of the app and implement the integration with the Rust interface. If you're interested, you can also add your own examples.
Each Example consists of a sequence of ExampleSteps, which have a similar structure.
It's a minor detail: The numbering of Examples and ExampleSteps begin with 1 in the User Interface, but in the code, the index starts with 0. Therefore, example_0.dart corresponds to Example 1, and so on.
Example Structure
Along with a title and an information text, an ExampleStep can display an input value as text and/or as an input field.
The "Execute" button invokes a function that can be freely defined. After executing the action, it is useful to present an output text to the user. The action can be repeated any number of times, but in order to proceed to the next step (by clicking the "Continue" button), it must be executed at least once. In the last step, there is no "Continue" button.
The App Provider can be used at any point to retrieve stored data or to store new or updated data.
In my examples, I generally follow a pattern where I use the first step for resetting or entering values, and intermediate steps when I require multiple data inputs from the user to execute the final step. The final step always involves calling the Rust API method.
Important
Some examples assume that previous examples have been executed and the data generated during those executions is stored in the app. For example, the third example (Create Wallet Account) assumes that mnemonics were generated in Example 2. It is best to follow the sequence of executing all the examples one after another, starting with "Get Node Info," when using the app for the first time.
A hidden feature is located behind the "Input" and "Output" labels. When you click on either of these labels, the content of the input or output will be copied to the clipboard.
In the next subchapters, we will test individually for each example whether our library can be cross-compiled to the target platforms Android, macOS, and iOS.
This way, we can independently test the correctness of the dependencies in Cargo.toml, and the paths and the syntax of our Rust Code in api.rs, regardless of the Flutter build process.
This struct bundles various network information. Through code generation of the Flutter-Rust-Bridge, the struct is translated into a Flutter class and becomes part of the bridge_definitions.dart file.
Therefore, it is not necessary to explicitly create it in Flutter! On the other hand, this means that the code generator needs to be executed once for the class to be seamlessly used in Flutter without any errors.
#[allow(dead_code)]
pub fn get_node_info(network_info: NetworkInfo) -> Result<String> {
let rt = Runtime::new().unwrap();
rt.block_on(async {
let node_url = network_info.node_url;
// Create a client with that node.
let client = Client::builder()
.with_node(&node_url)?
.with_ignore_node_health()
.finish()?;
// Get node info.
let info = client.get_info().await?;
Ok(serde_json::to_string_pretty(&info).unwrap())
//Ok(info.node_info.base_token.name)
})
}
In the next subchapters, we will test individually for each example whether our library can be cross-compiled to the target platforms Android, macOS, and iOS.
This way, we can independently test the correctness of the dependencies in Cargo.toml, and the paths and the syntax of our Rust Code in api.rs, regardless of the Flutter build process.
Let's try to use the iota-client from iota-wallet. So first, comment out the dependency:
# iota-client = { version = "2.0.1-rc" }
Second, add this crate to the existing dependencies:
[dependencies]
iota-wallet = { version = "1.0.0-rc" }
By checking Cargo.lock you can determine the real downloaded versions. At the time of writing this tutorial section (June 2023) we are using iota-wallet version v1.0.0-rc.6. Please refer to Crates.io to get more information about the current versions.
But how can you determine if this version supports the Stardust Protocol, used by the Shimmer network and the IOTA Mainnet (since 4th of October 2023)?
After adding and saving the library in Cargo.toml_ check the Cargo.lock file. Look for the iota-client version included. If it's a v2 version, then it's compatible for Stardust. For more information, refer to Stardust and (outdated) Chrysalis Versions documentation.
Instead, we are using the Client from iota_wallet::iota_client::Client:
use iota_wallet::{
iota_client::Client, // <- Let's use this one
iota_client::constants::SHIMMER_COIN_TYPE,
ClientOptions,
account_manager::AccountManager,
secret::{stronghold::StrongholdSecretManager as WalletStrongholdSecretManager},
secret::{SecretManager as WalletSecretManager}
};
use std::{env, fs, path::PathBuf};
In Rust you can shorten several lines, e.g.
use iota_wallet::iota_client::Client;
use iota_wallet::ClientOptions;
use iota_wallet::account_manager::AccountManager;
by using curly brackets:
use iota_wallet::{
iota_client::Client,
ClientOptions,
account_manager::AccountManager
};
This struct bundles various wallet information. Through code generation of the Flutter-Rust-Bridge, the struct is translated into a Flutter class and becomes part of the bridge_definitions.dart file.
Therefore, it is not necessary to explicitly create it in Flutter! On the other hand, this means that the code generator needs to be executed once for the class to be seamlessly used in Flutter without any errors.
There is a lot to talk about here. But first, let's start with the source code.
#[allow(dead_code)]
pub fn create_wallet_account(network_info: NetworkInfo, wallet_info: WalletInfo) -> Result<String> {
let rt = Runtime::new().unwrap();
rt.block_on(async {
let node_url = network_info.node_url;
let stronghold_password = wallet_info.stronghold_password;
let stronghold_filepath = wallet_info.stronghold_filepath;
// Create the needed directory according to the given path
let mut path_buf = PathBuf::new();
path_buf.push(&stronghold_filepath);
let path = PathBuf::from(path_buf);
fs::create_dir_all(path).ok();
// THIS NEXT STEP IS CRUCIAL:
// Point the "current working directory" to the given path
env::set_current_dir(&stronghold_filepath).ok();
// Create the Rust file for the stronghold snapshot file
let mut path_buf_snapshot = PathBuf::new();
path_buf_snapshot.push(&stronghold_filepath);
path_buf_snapshot.push("wallet.stronghold");
let path_snapshot = PathBuf::from(path_buf_snapshot);
let mut secret_manager = WalletStrongholdSecretManager::builder()
.password(&stronghold_password)
.build(path_snapshot)?;
// Storing the mnemonic is ONLY REQUIRED THE FIRST TIME
// calling it TWICE THROWS AN ERROR
secret_manager.store_mnemonic(wallet_info.mnemonic).await?;
// Create a ClientBuilder (= client_options in wallet.rs)
// See wallet.rs:
// -> src/lib.rs
// -> line "pub use iota_client::ClientBuilder as ClientOptions"
let client_options = ClientOptions::new().with_node(&node_url)?;
// Create the account manager with the secret_manager
// and client_options (= ClientBuilder).
// The Client itself is created in the AccountManagerBuilder's finish() method.
// See wallet.rs:
// -> src/account_manager/builder.rs
// -> line "let client = client_options.clone().finish()?;"
let manager = AccountManager::builder()
.with_secret_manager(WalletSecretManager::Stronghold(secret_manager))
.with_client_options(client_options)
.with_coin_type(SHIMMER_COIN_TYPE)
.finish()
.await?;
// Create a new account
let _account = manager
.create_account()
.with_alias((&wallet_info.alias).to_string())
.finish()
.await?;
Ok("Wallet Account was created successfully.".into())
})
}
The two structs passed as input parameters contain data from Flutter that is needed to create the wallet. These include the node URL, the mnemonics, the Wallet Alias, the Stronghold Password, and the directory path where both the wallet's database and the Stronghold Snapshot file will be stored.
In the first part of the function, we need to create a PathBuf. It is commonly used when dealing with file I/O operations and working with file systems in Rust.
PathBuf is a type that represents a platform-dependent path. It is used to manipulate and work with file paths in a convenient and cross-platform manner. PathBuf provides various methods for path manipulation, such as joining paths, appending components, and resolving relative paths.
The crucial part of working with paths in our library is that we change the current working directory to our specific path for the database and snapshot file. By doing so, we can perform file operations relative to that directory or access files located in that specific path.
In the next part of the function, we create a Stronghold Secret Manager that is initialized with our Stronghold password and mnemonics. We have chosen to use Stronghold in our wallet for secure storage and management of sensitive information.
The StrongholdSecretManager uses advanced encryption techniques to protect the stored data and provides secure access methods for retrieving and using the secrets when required. It offers features like encryption, decryption, secure key generation, and secure storage of cryptographic material.
Our goal of creating a wallet account is achieved through the Account Manager. The Account Manager provides a set of functionalities and APIs to manage multiple accounts within a wallet. It allows us to create, modify, and interact with individual accounts, such as generating addresses, sending transactions, and retrieving account information.
The Account Manager is configured with our Stronghold Secret Manager and the Client "Options". ClientOptions is nothing more than the ClientBuilder in the original iota-client. Keep this in mind!
Once we have created the Account Manager, there is only one step left, which is creating a new Account for the given wallet Alias. The account's Alias serves as a name or identifier for the account within the wallet.
By creating a new Account, we establish a distinct entity within the wallet to manage specific funds, transactions, and associated addresses. This step enables us to organize and track different accounts within the wallet application effectively.
Behind the scenes, when creating the Stronghold Secret Manager, the snapshot file is generated. Additionally, when creating the Account Manager, a RocksDB database is created.
It is worth noting that the use of RocksDB has previously caused issues between different target platforms with older versions of wallet.rs. Let's see if this problem still persists. In the next section, I will attempt to build the library for all platforms and investigate if any conflicts arise.
Since the latest Android NDK version 25 is being used, I have been encountering issues compiling the libsodium-sys library (v0.2.7) on macOS (M1 chip). This problem did not exist with the previous NDK version 22, which I was using in January.
Cross-compilation error - Android
It's possible that you may not encounter this issue if you use a different hosting operating system. If you manage to successfully compile libsodium-sys on your host system, consider yourself fortunate.
Fix
Since I haven't identified the root cause of the issue, I am currently unable to propose a specific solution or fix.
Workaround
As a temporary workaround, I can suggest building the libsodium.so library for each target individually and including it in our target Rust library. This can be achieved by utilizing the SODIUM_LIB_DIR and SODIUM_SHARED environment variables, as described in the libsodium-sys documentation. I will elaborate on this approach in the upcoming subsection Libsodium library for Android.
The compilation fails because there is an unknown build target in libsodium-sys build script:
Cross-compilation error - iOS
The fact that the libsodium-sys project is marked as deprecated is unfortunate since it limits the opportunity to address and resolve the issue within the repository. See Sodiumoxide's documentation:
"[DEPRECATED]
This project has reached the end of its development as a cryptographic library for rust. Feel free to browse the code, and feel free to use it, but it will not see any more updates (unless a security issue arises, those will be fixed)."
Fix
One potential solution could be to add a target to the build.rs file within the libsodium-sys folder. However, since the repository is not actively maintained, implementing this fix is currently not possible. As a suggestion, I proposed that the Stronghold team could consider forking the repository and taking up maintenance responsibilities. You can find more information about this suggestion here:
To utilize Stronghold for iOS, the only viable workaround at the moment is to compile the code and employ your iOS Device as a test device. Unfortunately, the Simulator cannot be utilized due to the aforementioned problem.
Please refer to this chapter to learn about a Workaround for Android that can be used if you wish to utilize Stronghold AND if you have problems creating libsodium.
The libsodium library is a widely used library for cryptography, offering a variety of functions for encryption, decryption, hashing, signatures, and more.
libsodium-sys is a Rust wrapper around the libsodium library. It provides the necessary Rust bindings and FFI (Foreign Function Interface) declarations to link and interact with the libsodium library from Rust code.
libsodium-sys is a dependency of the stronghold-runtime crate.
In general, managing dependencies can be tricky, particularly when your project relies on multiple dependencies and you need to cross-compile it for various targets.
The utilization of the deprecated libsodium-sys project in Stronghold poses such a challenge. It came up that it is a time-intensive show-stopper and places a significant burden on the developer's life.
It's not enjoyable to search for workarounds and complicate workflows with special rules. Unfortunately, encountering such situations is quite common when aiming to support a wide range of target platforms.
Isn't it pathetic that one has to create the library at all !?
Before proceeding with Step 1 yourself, please note that I provide a download for a prebuilt library (created on macOS) for each of the possible ABIs with the following links. However, it is important to mention that I provide no warranty for its contents or functionality:
Check with autoconf --version if you can skip the installation. If already installed, a version is returned. Otherwise install autoconf with the command:
brew install autoconf
c) automake
Check with automake --version if you can skip the installation. If already installed, a version is returned. Otherwise install automake with the command:
brew install automake
Once you've setup everything, you can navigate into the "libsodium-master" directory and execute:
./autogen.sh -s
This will create the configure file. The next command will create the library for the ABI arm64-v8a:
./dist-build/android-armv8-a.sh
The console output tells you where you can find the libsodium.so: It's located in the folder "libsodium-android-armv8-a+crypto/lib/".
You will need to repeat the last command for each ABI/target accordingly.
Copy the created library and paste it into a directory of your choice. Personally, I utilize the folder "android/app/src/main/jniLibs/<ABI>/", where all libraries are stored together in the appropriate ABI directory for libs, see the image below.
Now, I recommend to test the playground_app build in Terminal by setting the following environment variables before executing the commands. Please replace "/path/to/library" with the correct directory path you have chosen (do NOT append "libsodium.so" at the end of the path).
In the aforementioned test, we defined the variables SODIUM_LIB_DIR and SODIUM_SHARED within the command line. However, these definitions will not persist.
To ensure proper setup for usage in Flutter, you need to make adjustments to the android/app/build.gradle file, see below (once again, replace "/path/to/library" with the actual directory path you have selected).
#[allow(dead_code)]
pub fn generate_address(wallet_info: WalletInfo) -> Result<String> {
let rt = Runtime::new().unwrap();
rt.block_on(async {
let stronghold_filepath = wallet_info.stronghold_filepath;
env::set_current_dir(&stronghold_filepath).ok();
// Create the account manager
let manager = AccountManager::builder().finish().await?;
// Get the account we generated with `01_create_wallet`
let account = manager.get_account((&wallet_info.alias).to_string()).await?;
// Set the stronghold password
manager
.set_stronghold_password(&wallet_info.stronghold_password)
.await?;
let addresses = account.generate_addresses(1, None).await?;
//println!("Generated address: {}", address[0].address().to_bech32());
Ok(addresses[0].address().to_bech32())
})
}
All checks (-> except iOS Simulator) should work without any issue. Please also refer to the explanations of Example 3 and the corresponding video (2023-09-03: ToDo).
To examine the various targets, you should navigate from playground_app root directory to the rust directory:
cd rust
Then, within the rust directory, excute the following commands.
Add the function iota_wallet::iota_client::request_funds_from_faucet:
use iota_wallet::{
iota_client::Client,
iota_client::request_funds_from_faucet, // <- Add this one
iota_client::constants::SHIMMER_COIN_TYPE,
ClientOptions,
account_manager::AccountManager,
secret::{stronghold::StrongholdSecretManager as WalletStrongholdSecretManager},
secret::{SecretManager as WalletSecretManager}
};
All checks (-> except iOS Simulator) should work without any issue. Please also refer to the explanations of Example 3 and the corresponding video (2023-09-03: ToDo).
To examine the various targets, you should navigate from playground_app root directory to the rust directory:
cd rust
Then, within the rust directory, excute the following commands.
This struct bundles some information about total and available amounts. Through code generation of the Flutter-Rust-Bridge, the struct is translated into a Flutter class and becomes part of the bridge_definitions.dart file.
Therefore, it is not necessary to explicitly create it in Flutter! On the other hand, this means that the code generator needs to be executed once for the class to be seamlessly used in Flutter without any errors.
#[derive(Debug, Clone)]
pub struct BaseCoinBalance {
/// Total amount
pub total: u64,
/// Balance that can currently be spent
pub available: u64,
}
#[allow(dead_code)]
pub fn check_balance(wallet_info: WalletInfo) -> Result<BaseCoinBalance> {
let rt = Runtime::new().unwrap();
rt.block_on(async {
let stronghold_filepath = wallet_info.stronghold_filepath;
env::set_current_dir(&stronghold_filepath).ok();
// Create the account manager
let manager = AccountManager::builder().finish().await?;
// Get the account we generated with `create_wallet_account`
let account = manager.get_account((&wallet_info.alias).to_string()).await?;
// Sync and get the balance
let _account_balance = account.sync(None).await?;
// If already synced, just get the balance
let account_balance = account.balance().await?;
//let base_coin_balance = account_balance.base_coin;
let base_coin_balance = BaseCoinBalance {
total: account_balance.base_coin.total,
available: account_balance.base_coin.available,
};
//let total = account_balance.base_coin.total;
//println!("{:?}", account_balance);
//Ok(total.to_string())
//Ok(base_coin_balance)
Ok(base_coin_balance)
})
}
All checks (-> except iOS Simulator) should work without any issue. Please also refer to the explanations of Example 3 and the corresponding video (2023-09-03: ToDo).
To examine the various targets, you should navigate from playground_app root directory to the rust directory:
cd rust
Then, within the rust directory, excute the following commands.
[dependencies]
identity_iota = { version = "<0.7.0-alpha.6" }
Here, I've employed iota_identity's v0.7.0-alpha.5 release. If you intend to utilize a different version, kindly refer to the documentation for information on the paths used, and adapt them in the sample code provided below.
Add these two paths for Address and AliasOutput here:
use iota_wallet::{
account_manager::AccountManager,
iota_client::block::address::Address, // <- Add this for Identity-Example
iota_client::block::output::AliasOutput, // <- Add this for Identity-Example
iota_client::constants::SHIMMER_COIN_TYPE,
iota_client::request_funds_from_faucet,
iota_client::Client,
secret::stronghold::StrongholdSecretManager as WalletStrongholdSecretManager,
secret::SecretManager as WalletSecretManager,
ClientOptions,
};
#[allow(dead_code)]
pub fn create_decentralized_identifier(
network_info: NetworkInfo,
wallet_info: WalletInfo,
) -> Result<String> {
let rt = Runtime::new().unwrap();
rt.block_on(async {
let node_url = network_info.node_url;
let stronghold_password = wallet_info.stronghold_password;
let stronghold_filepath = wallet_info.stronghold_filepath;
env::set_current_dir(&stronghold_filepath).ok();
let mut path_buf_snapshot = PathBuf::new();
path_buf_snapshot.push(&stronghold_filepath);
path_buf_snapshot.push("wallet.stronghold");
let path_snapshot = PathBuf::from(path_buf_snapshot);
// THIS returns a StrongholdAdapter:
// let mut secret_manager = StrongholdSecretManager::builder()
// .password(&stronghold_password)
// .build(path_snapshot)?;
// THIS returns a StrongholdSecretManager:
let secret_manager: WalletSecretManager = WalletSecretManager::Stronghold(
WalletStrongholdSecretManager::builder()
.password(&stronghold_password)
.build(path_snapshot)?,
);
//Create a client with that node.
// let client = Client::builder()
// .with_node(&node_url)?
// .with_ignore_node_health()
// .finish()?;
// Create a new client to interact with the IOTA ledger.
let client: Client = Client::builder()
.with_primary_node(&node_url, None)?
.finish()?;
//let client: Client = Client::builder().with_primary_node(node_url, None)?.finish()?;
// Get the Bech32 human-readable part (HRP) of the network.
let network_name: NetworkName = client.network_name().await?;
// Create a new DID document with a placeholder DID.
// The DID will be derived from the Alias Id of the Alias Output after publishing.
let mut document: IotaDocument = IotaDocument::new(&network_name);
// Insert a new Ed25519 verification method in the DID document.
let keypair: KeyPair = KeyPair::new(KeyType::Ed25519)?;
let method: VerificationMethod = VerificationMethod::new(
document.id().clone(),
keypair.type_(),
keypair.public(),
"#key-1",
)?;
document.insert_method(method, MethodScope::VerificationMethod)?;
// Construct an Alias Output containing the DID document, with the wallet address
// set as both the state controller and governor.
//let address: Address = client.get_addresses(&secret_manager).with_range(0..1).get_raw().await?[0];
// Convert given address (BECH32 string) to Address struct
let (_, address) = Address::try_from_bech32(&wallet_info.last_address)?;
let alias_output: AliasOutput = client.new_did_output(address, document, None).await?;
// Publish the Alias Output and get the published DID document.
let document: IotaDocument = client
.publish_did_output(&secret_manager, alias_output)
.await?;
Ok(document.to_string())
//println!("Published DID document: {:#}", document);
// let governor_address = alias_output.governor_address();
// let result_string = governor_address.to_bech32(network_name.to_string());
// Ok(result_string)
//Ok(document.to_string() + &(address.is_ed25519().to_string()))
//Ok(address.is_ed25519().to_string())
//Ok(document.to_string())
})
}
All checks (-> except iOS Simulator) should work without any issue. Please also refer to the explanations of Example 3 and the corresponding video (2023-09-03: ToDo).
To examine the various targets, you should navigate from playground_app root directory to the rust directory:
cd rust
Then, within the rust directory, excute the following commands.
In the preceding sections, we've effectively configured Flutter and Rust code independently. Additionally, we've incorporated IOTA's Rust libraries into Cargo.toml. Furthermore, we've confirmed the validity of the Rust code for each example by compiling the libraries for our target platforms (Android, macOS, and iOS devices). Now, it's time for the finalizing steps.
If you've had NO problem with the 3rd party library libsodium, add at the bottom:
[
        Debug: null,
        Profile: '--release',
        Release: '--release'
].each {
    def taskPostfix = it.key
    def profileMode = it.value
    tasks.whenTaskAdded { task ->
        if (task.name == "javaPreCompile$taskPostfix") {
            task.dependsOn "cargoBuild$taskPostfix"
        }
    }
    tasks.register("cargoBuild$taskPostfix", Exec) {
        workingDir "../../rust"  // <-- ATTENTION: CHECK THE CORRECT FOLDER!!!
        environment ANDROID_NDK_HOME: "$ANDROID_NDK"
        commandLine 'cargo', 'ndk',
                // the 2 ABIs below are used by real Android devices
                // '-t', 'armeabi-v7a',
                '-t', 'arm64-v8a',
                // the below 2 ABIs are usually used for Android simulators,
                // add or remove these ABIs as needed.
                // '-t', 'x86',
                // '-t', 'x86_64',
                '-o', '../android/app/src/main/jniLibs', 'build'
        if (profileMode != null) {
            args profileMode
        }
    }
}
Otherwise, if you've HAD a problem with the 3rd party library libsodium, add at the bottom:
[
Debug: null,
Profile: '--release',
Release: '--release'
].each {
def taskPostfix = it.key
def profileMode = it.value
tasks.whenTaskAdded { task ->
if (task.name == "javaPreCompile$taskPostfix") {
task.dependsOn "cargoBuild$taskPostfix"
}
}
tasks.register("cargoBuild$taskPostfix", Exec) {
workingDir "../../rust" // <-- ATTENTION: CHECK THE CORRECT FOLDER!!!
environment ANDROID_NDK_HOME: "$ANDROID_NDK"
environment SODIUM_LIB_DIR: "/Users/yourname/playground_app/android/app/src/main/jniLibs/arm64-v8a" // <-- ATTENTION: CHECK THE CORRECT FOLDER!!!
environment SODIUM_SHARED: 1
commandLine 'cargo', 'ndk',
// the 2 ABIs below are used by real Android devices
// '-t', 'armeabi-v7a',
'-t', 'arm64-v8a',
// the below 2 ABIs are usually used for Android simulators,
// add or remove these ABIs as needed.
// '-t', 'x86',
// '-t', 'x86_64',
'-o', '../android/app/src/main/jniLibs', 'build'
if (profileMode != null) {
args profileMode
}
}
}
Please note that due to the manual use of libsodium, there are two additional lines related to SODIUM_LIB_DIR and SODIUM_SHARED (compared to the former configurations) -> please also refer to Libsodium library for Android.
Even if the our dynamic library librust.so has been successfully compiled in Android, you haven't won yet. It also needs to be able to be loaded.
There is an error message that only becomes apparent when using the app, after you have completed all steps and successfully launched the app in Flutter.
Let's say you want to invoke the "Generate Mnemonic" example. Here's where you stumble when you click on "Execute" in Example 2, as the console displays the following message:
Error message: "Failed to load dynamic library 'librust.so'"
As the message text also says: The "library 'libc++_shared.so' is not found". So, adding this library is the solution.
Where do we get this one from?
It is provided by the NDK. For example, if you're using NDK v25.2.9519653 on macOS, navigate to the folder ~/Library/Android/sdk/ndk/25.2.9519653/toolchains/llvm/prebuilt/darwin-x86_64/sysroot/usr/lib/ where you will find subfolders for each of the targets:
Location to copy libc++_shared.so from
Alternatively, here are also some download links from Android NDK 25 on macOS:
Once you have copied or downloaded the libc++_shared.so library, you should ensure that you place it in a directory where it can be accessed by your application. To simplify the process, you can place it in the same folder as the librust.so library.
Create a file ffi.dart and paste this content. As you can see it returns the api variable.
// This file initializes the dynamic library and connects it with the stub
// generated by flutter_rust_bridge_codegen.

import 'dart:ffi';

import 'bridge_generated.dart';
import 'bridge_definitions.dart';
export 'bridge_definitions.dart';

// Re-export the bridge so it is only necessary to import this file.
export 'bridge_generated.dart';
import 'dart:io' as io;

const _base = 'rust';

// On MacOS, the dynamic library is not bundled with the binary,
// but rather directly **linked** against the binary.
final _dylib = io.Platform.isWindows ? '$_base.dll' : 'lib$_base.so';

final Rust api = RustImpl(io.Platform.isIOS || io.Platform.isMacOS
    ? DynamicLibrary.executable()
    : DynamicLibrary.open(_dylib));
To integrate our Rust backend, we create an additional Xcode project first and add it as a "subproject" to the existing Flutter Xcode project (macos/Runner.xcodeproj). During the build, the inner Xcode project is built first, enabling its use by the parent project.
An common step for macOS / iOS is needed: creating an Xcode project inside of the Rust library project folder (rust/). This can be done using the cargo-xcode command.
I utilize cargo-xcode v1.5.0 to ensure smooth operation. For example, when I employed version v1.9.0, Xcode flagged an issue regarding the absence of a development team for signing (but: I couldn't add a development team because the "Signing & Capabilities" tab is missing for the target rust-cdylib in the Rust Xcode project).
To install the cargo-xcode command use:
cargo install cargo-xcode@1.5.0
After the installation of the command, create the Rust Xcode project. Make sure to be in the rust/ directory. From the project's root folder you may switch into the right directory:
cd rust
cargo xcode
cd ..
This step is for macOS only because the macOS app uses the dynamic library:
Open up that rust/rust.xcodeproj file with Xcode and select the root item rust, at the left pane on top.
Select the Target rust-cdylib and the Build Settings tab. Here, search for Dynamic Library Install Name Base and change the value into $(TARGET_BUILD_DIR).
We need to incorporate the new Rust XCode project (rust/rust.xcodeproj) into our Flutter XCode project which was created inside the macos folder when Flutter initialized our project.
Simply open the macos/Runner.xcodeproj in Xcode, open the rust/ directory in Finder and drag the rust.xcodeproj into the Runner folder. The next images will illustrate the steps.
Open Runner.xcodeproj
Drag the file rust.xcodeproj into the Runner Project
To ensure that your app can run on your host computer and Xcode version, you may only be able to support newer macOS versions. To set the minimum supported macOS version for your app, go to the General tab and select macOS version 13.1 as the Minimum Deployments target.
Our next task is to create the generated code. This will also copy the C header file bridge_generated.h into the folder macos/Runner/. Use this command (you need to be in the root of your project):
Switch to Visual Studio Code and open the file macos/Runner/AppDelegate.swift. We need to call the function dummy_method_to_enforce_bundling() (from FRB) somewhere to avoid that Xcode handles our library as dead code.
macOS applications are sandboxed by default. To avoid a SocketException, you need to add the network.client entitlement to macOS/Runner/DebugProfile.entitlements:
So, why do we even need this chapter, you ask? Well, buckle up, my advanced coding compadres!
I've decided to skip the nitty-gritty details this time around. No more elaborate tales of how and why I configure things the way I do. We're sticking to the essentials. If you're craving more info, do yourself a favor and flip through the previous chapters.
Now, why the IOTA SDK, you wonder? Picture this: I couldn't get rocksdb in the wallet.rs to play nice with iOS. Enter IOTA SDK to save the day!
And guess what? The IOTA SDK isn't just a random choice; it's the successor to the now-deprecated duo of iota.rs and wallet.rs. Team it up with identity.rs, and you've got yourself the future of Shimmer/IOTA libraries. Future-proofing, baby!
Quick observation: whipping up a wallet and accounts with the IOTA SDK takes way more time than the breezy wallet.rs. The mystery behind this? Still working on cracking that code.
Oh, and I did a bit of code spring cleaning. Pulled out all the wallet-related functions from the behemoth api.rs and corralled them into a cozy wallet_singleton module. The plan? One wallet object to rule them all. Don't call me out if this isn't your standard Rust wizardry; I'm just doing my best here.
Now, the next two chapters are your Android and iOS love stories. I'm walking you through building the entire shebang from scratch and tweaking all configurations for both platforms. These chapters are joined at the hip, so start with Android and then waltz into iOS territory.
This is a chapter for advanced users. If it is moving too quickly for you, I would like to refer you to the previous chapters where all the steps were explained.
I forgot the 2 dependencies meta and uuid. So please add in pubspec.yaml:
dependencies:
...
meta: ^1.9.1
uuid: ^4.0.0
You might also encounter a message asking you to update the dependencies. You can execute updates by typing flutter pub upgrade. There is one exception regarding the dev_dependency ffi_gen: The version number should be
[package]
name = "rust"
version = "0.1.0"
edition = "2021"
[dependencies]
flutter_rust_bridge = "1"
iota-sdk = { version = "1.1.3", default-features = false, features = [
"client",
"wallet",
"tls",
"rocksdb",
"stronghold",
] }
identity_iota = { version = "1.0.0", features = ["memstore"] }
tokio = { version = "1.34.0", features = ["full"] }
anyhow = { version = "1.0.75" }
serde = { version = "1.0.193", default-features = false, features = ["derive"] }
serde_json = { version = "1.0.108", default-features = false }
lazy_static = "1.4.0"
once_cell = "1.19.0"
[lib]
crate-type = ["staticlib", "cdylib"]
Make sure to include the necessary features for utilizing Stronghold and RocksDB. Forgetting any feature might render certain code inaccessible. If you're interested, simply download the library code from GitHub and check it out.
use anyhow::Result;
use tokio::runtime::Runtime;
use iota_sdk::{
client::secret::stronghold::StrongholdSecretManager as WalletStrongholdSecretManager,
client::secret::SecretManager as WalletSecretManager,
client::utils::request_funds_from_faucet,
client::Client,
types::block::{address::Bech32Address, output::AliasOutput},
};
use std::{env, path::PathBuf, u32};
use identity_iota::{
iota::{IotaClientExt, IotaDocument, IotaIdentityClientExt, NetworkName},
storage::{JwkDocumentExt, JwkMemStore, KeyIdMemstore, Storage},
verification::{jws::JwsAlgorithm, MethodScope},
};
mod wallet_singleton;
#[derive(Debug, Clone)]
pub struct NetworkInfo {
    pub node_url: String,
    pub faucet_url: String,
}
#[allow(dead_code)]
pub fn get_node_info(network_info: NetworkInfo) -> Result<String> {
let rt = Runtime::new().unwrap();
rt.block_on(async {
let node_url = network_info.node_url;
// Create a client with that node.
let client = Client::builder()
.with_node(&node_url)?
.with_ignore_node_health()
.finish()
.await?;
// Get node info.
let info = client.get_info().await?.node_info;
Ok(serde_json::to_string_pretty(&info).unwrap())
//Ok(info.node_info.base_token.name)
})
}
#[allow(dead_code)]
pub fn generate_mnemonic() -> String {
let mnemonic = Client::generate_mnemonic();
mnemonic.unwrap().to_string()
}
#[derive(Debug, Clone)]
pub struct WalletInfo {
pub alias: String,
pub mnemonic: String,
pub stronghold_password: String,
pub stronghold_filepath: String,
pub last_address: String,
}
#[allow(dead_code)]
pub fn create_wallet_account(network_info: NetworkInfo, wallet_info: WalletInfo) -> Result<String> {
wallet_singleton::create_wallet_account(network_info, wallet_info)
}
#[allow(dead_code)]
pub fn generate_address(wallet_info: WalletInfo) -> Result<String> {
wallet_singleton::generate_address(wallet_info)
}
#[allow(dead_code)]
pub fn request_funds(network_info: NetworkInfo, wallet_info: WalletInfo) -> Result<String> {
let rt = Runtime::new().unwrap();
rt.block_on(async {
let stronghold_filepath = wallet_info.stronghold_filepath;
let last_address = wallet_info.last_address;
env::set_current_dir(&stronghold_filepath).ok();
let faucet_url = network_info.faucet_url;
// Convert given address (BECH32 string) to Address struct
let address = Bech32Address::try_from_str(&last_address)?;
// Use the function iota_wallet::iota_client::request_funds_from_faucet
let faucet_response = request_funds_from_faucet(&faucet_url, &address).await?;
Ok(faucet_response.to_string())
})
}
#[derive(Debug, Clone)]
pub struct BaseCoinBalance {
    /// Total amount
    pub total: u64,
    /// Balance that can currently be spent
    pub available: u64,
}
#[allow(dead_code)]
pub fn check_balance(wallet_info: WalletInfo) -> Result<BaseCoinBalance> {
wallet_singleton::check_balance(wallet_info)
}
type MemStorage = Storage<JwkMemStore, KeyIdMemstore>;
#[allow(dead_code)]
pub fn create_decentralized_identifier(
network_info: NetworkInfo,
wallet_info: WalletInfo,
) -> Result<String> {
let rt = Runtime::new().unwrap();
rt.block_on(async {
let node_url = network_info.node_url;
let stronghold_password = wallet_info.stronghold_password;
let stronghold_filepath = wallet_info.stronghold_filepath;
let last_address = wallet_info.last_address;
env::set_current_dir(&stronghold_filepath).ok();
let mut path_buf_snapshot = PathBuf::new();
path_buf_snapshot.push(&stronghold_filepath);
path_buf_snapshot.push("wallet.stronghold");
let path_snapshot = PathBuf::from(path_buf_snapshot);
// Create a new client to interact with the IOTA ledger.
let client: Client = Client::builder()
.with_primary_node(&node_url, None)?
.finish()
.await?;
// Create a new secret manager backed by a Stronghold.
let secret_manager: WalletSecretManager = WalletSecretManager::Stronghold(
WalletStrongholdSecretManager::builder()
.password(stronghold_password)
.build(path_snapshot)?,
);
// Convert given address (BECH32 string) to Address struct
let address = Bech32Address::try_from_str(&last_address)?;
// Get the Bech32 human-readable part (HRP) of the network.
let network_name: NetworkName = client.network_name().await?;
// Create a new DID document with a placeholder DID.
// The DID will be derived from the Alias Id of the Alias Output after publishing.
let mut document: IotaDocument = IotaDocument::new(&network_name);
// Insert a new Ed25519 verification method in the DID document.
let storage: MemStorage = MemStorage::new(JwkMemStore::new(), KeyIdMemstore::new());
document
.generate_method(
&storage,
JwkMemStore::ED25519_KEY_TYPE,
JwsAlgorithm::EdDSA,
None,
MethodScope::VerificationMethod,
)
.await?;
// Insert a new Ed25519 verification method in the DID document.
let storage: MemStorage = MemStorage::new(JwkMemStore::new(), KeyIdMemstore::new());
document
.generate_method(
&storage,
JwkMemStore::ED25519_KEY_TYPE,
JwsAlgorithm::EdDSA,
None,
MethodScope::VerificationMethod,
)
.await?;
// Construct an Alias Output containing the DID document, with the wallet address
// set as both the state controller and governor.
let alias_output: AliasOutput = client.new_did_output(*address, document, None).await?;
// Publish the Alias Output and get the published DID document.
let document: IotaDocument = client
.publish_did_output(&secret_manager, alias_output)
.await?;
Ok(document.to_string())
})
}
#[allow(dead_code)]
pub fn bin_to_hex(val: String, len: usize) -> String {
    let n: u32 = u32::from_str_radix(&val, 2).unwrap();
    format!("{:01$x}", n, len * 2)
}
Create a folder named api next to api.rs. Inside of this folder, create a new file wallet_singleton.rs and copy/paste this content in it:
use crate::api::{BaseCoinBalance, NetworkInfo, WalletInfo};
use anyhow::{Error, Result};
use iota_sdk::{
client::constants::SHIMMER_COIN_TYPE,
client::secret::stronghold::StrongholdSecretManager as WalletStrongholdSecretManager,
client::secret::SecretManager as WalletSecretManager,
crypto::keys::bip39::Mnemonic,
wallet::{ClientOptions, Wallet},
};
use std::env;
use std::fs;
use std::path::PathBuf;
use std::sync::{Mutex, Once};
use tokio::runtime::Runtime;
struct WalletSingleton {
network_info: NetworkInfo,
wallet_info: WalletInfo,
wallet: Option<Wallet>,
}
impl WalletSingleton {
fn new(network_info: NetworkInfo, wallet_info: WalletInfo) -> Result<Self> {
let mut wallet_singleton = Self {
network_info,
wallet_info,
wallet: None,
};
wallet_singleton.create_wallet()?;
Ok(wallet_singleton)
}
fn create_wallet(&mut self) -> Result<String> {
let rt = Runtime::new().unwrap();
rt.block_on(async {
let node_url = &self.network_info.node_url;
let stronghold_password = self.wallet_info.stronghold_password.clone();
let stronghold_filepath = self.wallet_info.stronghold_filepath.clone();
let mnemonic_string: String = self.wallet_info.mnemonic.clone();
let mnemonic = Mnemonic::from(mnemonic_string);
// Create the needed directory according to the given path
let mut path_buf = PathBuf::new();
path_buf.push(&stronghold_filepath);
let path = PathBuf::from(path_buf);
fs::create_dir_all(path).ok();
// THIS NEXT STEP IS CRUCIAL:
// Point the "current working directory" to the given path
env::set_current_dir(&stronghold_filepath).ok();
// Create the Rust file for the stronghold snapshot file
let mut path_buf_snapshot = PathBuf::new();
path_buf_snapshot.push(&stronghold_filepath);
path_buf_snapshot.push("wallet.stronghold");
let path_snapshot = PathBuf::from(path_buf_snapshot);
let secret_manager = WalletStrongholdSecretManager::builder()
.password(stronghold_password)
.build(path_snapshot)?;
// Storing the mnemonic is ONLY REQUIRED THE FIRST TIME
// calling it TWICE THROWS AN ERROR
secret_manager.store_mnemonic(mnemonic).await?;
// Create a ClientBuilder (= client_options in wallet.rs)
// See wallet.rs:
// -> src/lib.rs
// -> line "pub use iota_client::ClientBuilder as ClientOptions"
let client_options = ClientOptions::new().with_node(&node_url)?;
// Create the account manager with the secret_manager
// and client_options (= ClientBuilder).
// The Client itself is created in the AccountManagerBuilder's finish() method.
// See wallet.rs:
// -> src/account_manager/builder.rs
// -> line "let client = client_options.clone().finish()?;"
self.wallet = Some(
Wallet::builder()
.with_secret_manager(WalletSecretManager::Stronghold(secret_manager))
.with_client_options(client_options)
.with_coin_type(SHIMMER_COIN_TYPE)
.finish()
.await?,
);
Ok("Wallet Account was created successfully.".into())
})
}
fn create_account(&self, wallet_info: WalletInfo) -> Result<String> {
let wallet_singleton = self;
let result = Runtime::new().unwrap().block_on(async {
if let Some(ref wallet) = wallet_singleton.wallet {
let wallet_alias = wallet_info.alias;
let _account = wallet
.create_account()
.with_alias((&wallet_alias).to_string())
.finish()
.await?;
Ok("Account was created successfully.".into())
} else {
Err(Error::msg("No wallet set."))
}
});
result
}
fn generate_address(&self, wallet_info: WalletInfo) -> Result<String> {
let wallet_singleton = self;
let rt = Runtime::new().unwrap();
rt.block_on(async {
if let Some(ref wallet) = wallet_singleton.wallet {
let stronghold_password = wallet_info.stronghold_password;
let wallet_alias = wallet_info.alias;
let account = wallet.get_account((&wallet_alias).to_string()).await?;
wallet.set_stronghold_password(stronghold_password).await?;
let addresses = account.generate_ed25519_addresses(1, None).await?;
Ok(addresses[0].address().to_string())
} else {
Err(Error::msg("No wallet set."))
}
})
}
fn check_balance(&self, wallet_info: WalletInfo) -> Result<BaseCoinBalance> {
let wallet_singleton = self;
let rt = Runtime::new().unwrap();
rt.block_on(async {
if let Some(ref wallet) = wallet_singleton.wallet {
let stronghold_filepath = wallet_info.stronghold_filepath;
env::set_current_dir(&stronghold_filepath).ok();
let wallet_alias = wallet_info.alias;
let account = wallet.get_account((&wallet_alias).to_string()).await?;
// Sync and get the balance
let account_balance = account.sync(None).await?;
let base_coin_balance = BaseCoinBalance {
total: account_balance.base_coin().total(),
available: account_balance.base_coin().available(),
};
//let total = account_balance.base_coin.total;
//println!("{:?}", account_balance);
//Ok(total.to_string())
Ok(base_coin_balance)
} else {
Err(Error::msg("No wallet set."))
}
})
}
}
lazy_static::lazy_static! {
static ref WALLET_SINGLETON: Mutex<Option<WalletSingleton>> = Mutex::new(None);
static ref INIT: Once = Once::new();
}
fn create_wallet_singleton_if_needed(network_info: NetworkInfo, wallet_info: WalletInfo) {
INIT.call_once(|| {
if let Ok(wallet_singleton) = WalletSingleton::new(network_info, wallet_info) {
let mut locked_wallet_singleton = WALLET_SINGLETON.lock().unwrap();
*locked_wallet_singleton = Some(wallet_singleton);
} else {
// Handle the error
// You can log an error, panic, or choose an appropriate action.
panic!("Error creating wallet singleton");
}
});
}
pub fn create_wallet_account(network_info: NetworkInfo, wallet_info: WalletInfo) -> Result<String> {
create_wallet_singleton_if_needed(network_info, wallet_info.clone());
let locked_wallet_singleton = WALLET_SINGLETON.lock().unwrap();
let wallet_singleton = locked_wallet_singleton.as_ref().unwrap();
wallet_singleton.create_account(wallet_info)
}
pub fn generate_address(wallet_info: WalletInfo) -> Result<String> {
let locked_wallet_singleton = WALLET_SINGLETON.lock().unwrap();
let wallet_singleton = locked_wallet_singleton.as_ref().unwrap();
wallet_singleton.generate_address(wallet_info)
}
pub fn check_balance(wallet_info: WalletInfo) -> Result<BaseCoinBalance> {
let locked_wallet_singleton = WALLET_SINGLETON.lock().unwrap();
let wallet_singleton = locked_wallet_singleton.as_ref().unwrap();
wallet_singleton.check_balance(wallet_info)
}
Create a file ffi.dart next to main.dart and paste this content. As you can see it returns the api variable.
// This file initializes the dynamic library and connects it with the stub
// generated by flutter_rust_bridge_codegen.

import 'dart:ffi';

import 'bridge_generated.dart';
import 'bridge_definitions.dart';
export 'bridge_definitions.dart';

// Re-export the bridge so it is only necessary to import this file.
export 'bridge_generated.dart';
import 'dart:io' as io;

const _base = 'rust';

// On MacOS, the dynamic library is not bundled with the binary,
// but rather directly **linked** against the binary.
final _dylib = io.Platform.isWindows ? '$_base.dll' : 'lib$_base.so';

final Rust api = RustImpl(io.Platform.isIOS || io.Platform.isMacOS
    ? DynamicLibrary.executable()
    : DynamicLibrary.open(_dylib));
To enable dynamic library loading, you must place the libc++_shared.so file next to the librust.so (which is generated when you execute flutter run). The output directory android/app/src/main/jniLibs/{abi}/ is automatically created after the first execution, but not before.
I want to address this point before I run flutter run for the first time. Therefore, I create the directory android/app/src/main/jniLibs/{abi}/ manually and place the library libc++_shared.so in there.
Here are some download links from Android NDK 25 on macOS:
Building The Playground App for iOS using IOTA SDK and identity.rs.
This will be a tough nut to crack once again.
I presume the functionality of the -> Android app is operational. From the iOS standpoint, this implies that you've configured the Flutter Rust Bridge and incorporated both Rust and Dart code.
I am working on a MacBook Air (Apple M1) with macOS Sonoma 14.2.1 and Xcode 15.2. It's possible that the standard workflow works smoothly in other working environments.
Unfortunately, on my system, I faced challenges working with iOS. The libsodium-sys wrapper only built successfully when the libsodium library was pre-built as a static lib and manually added. The app only ran on my iPhone, not in the simulator (but refer to the little note at the bottom). It could only be launched from the Runner.xcworkspace project, not the Runner.xcodeproj. These were quite intricate issues that were very time-consuming to resolve.
Before you start working on iOS, I suggest you check your environment by running flutter doctor or flutter doctor -v for detailed information.
Based on my experience, updating your macOS, Xcode, and/or iOS versions can lead to unforeseen issues. Each update tends to bring about new problems, so it requires patience to set up your workspace properly. It's essential to make it a routine to verify that everything is configured correctly.
See example "CocoaPods installed but not working" in the section "Other Issues you might encounter" at the bottom of this page.
After the installation of the command, create the Rust Xcode project. Make sure to be in the rust/ directory. From the project's root folder you may switch into the right directory:
Little note: if libsodium.a can be built for the iOS Simulator using the Extended usage, perhaps the app will also strut its stuff on the iOS Simulator... I didn't follow this way after all my attempts... I am a bit tired...
Options to launch the app
a) Launch with flutter run
=> *Could fail when the compile process stops - you will get more detailed information when you launch the app from Xcode
b) Launch with Runner.xcodeproj
=> *Could fail because "shared_preferences_foundation" is not found
c) Launch with Runner.xcworkspace
=> *Could fail whenever libsodium-sys cannot be built; doesn't fail when you precompile libsodium.a as described in the subchapter
=> *Could fail when the Pods (dependencies) aren't yet installed
The first time around, the dependencies "path_provider_foundation" and "shared_preferences_foundation" are not yet installed. You will notice it in Xcode.
What "pod install" does
The straightforward method is to let Flutter handle the install. Switch to VS Code and launch the app using flutter run. You'll notice that before the Xcode build, the command pod install will be executed.
Throughout the Xcode build process, you may receive an alert indicating that the current iOS Deployment target is incorrect. Example:
Message about "iOS Deployment Target"
You should go through ALL targets (Runner, Rust, Pods -> path_provider_foundation, Pods -> shared_preferences_foundation) and adjust the default iOS Deployment Targets to your version of choice. In my situation, I often chose the latest available version 17.2 (after updating to Xcode 15.2 and installing iOS SDK 17.2), but it's up to you. It MUST be a version greater than v11.0.
After updating from Xcode v15.0.1 to Xcode v15.2, I encountered the following error:
Linking failed: linker command failed with exit code 1 (use -v to see invocation).
  ld: warning: Could not find or use auto-linked framework 'CoreAudioTypes': framework 'CoreAudioTypes' not found.
The message indicating that the framework 'CoreAudioTypes' could not be found is highly misleading!
Potential solutions:
Option 1: Attempt to include the Linker Flags -lc++ and/or -framework Flutter (if they are not already present) in the build settings "Other Linker Flags" of the Runner target.
Solution for linking failure
Option 2: Rebuild the app from scratch. Surprisingly, this seemingly drastic step resolved the issue for me.
Please refer to this chapter to learn about a Workaround for iOS that can be used if you wish to utilize Stronghold.
The libsodium library is a widely used library for cryptography, offering a variety of functions for encryption, decryption, hashing, signatures, and more.
libsodium-sys is a Rust wrapper around the libsodium library. It provides the necessary Rust bindings and FFI (Foreign Function Interface) declarations to link and interact with the libsodium library from Rust code.
libsodium-sys is a dependency of the stronghold-runtime crate.
It's crucial to grasp that the wrapper (libsodium-sys) inherently includes a snapshot of libsodium and automatically builds it by default, which doesn't work for iOS as we have seen. HOWEVER, you have the option to substitute this bundled version with any precompiled library that you've built independently. This is the task at hand. The environment variables SODIUM_LIB_DIR and SODIUM_SHARED play a pivotal role in this context.
In Step 1, create the libsodium.a library file for the iOS target.
In Step 2, test the built library by using the environment variables SODIUM_LIB_DIR and SODIUM_SHARED.
In Step 3, include the created libsodium.a in the Runner's build process in Xcode as static library and define SODIUM_LIB_DIR and SODIUM_SHARED in Rust's build phase in Xcode.
Check with autoconf --version if you can skip the installation. If already installed, a version is returned. Otherwise install autoconf with the command:
brew install autoconf
c) automake
Check with automake --version if you can skip the installation. If already installed, a version is returned. Otherwise install automake with the command:
brew install automake
d) libtool
Install libtool with the command:
brew install libtool
If it's already installed, you'll get a message returned: "Warning: libtool 2.4.7 is already installed and up-to-date."
Once you've setup everything, you can navigate into the "libsodium" directory and execute:
./autogen.sh -s
This will create the configure file. The next command will create the libraries for several Apple targets (iOS, macOS, tvOS, watchOS):
./dist-build/apple-xcframework.sh
To save time feel free to adjust the script in order to skip some of the targets.
The console output tells you where you will find the wanted libsodium.a: It's located in the folder "<path/to/your/libsodium>/libsodium-apple/tmp/ios64/lib/".
Navigate to the rust folder of the Playground App you have created in the Android section.
Now, I recommend to test the cargo build in Terminal by setting the following environment variables before executing the commands. Please replace "/path/to/library" with the correct directory path to your library (do NOT append "libsodium.a" at the end of the path).
In the aforementioned test, we defined the variables SODIUM_LIB_DIR and SODIUM_SHARED within the command line. However, these definitions will not persist.
To ensure proper setup, you need to
Open the Runner.xcworkspace
Add a new group "sodium" in the Runner
Switch to Finder, copy the libsodium.a from /Users/<yourname>/libsodium/libsodium-apple/tmp/ios64/lib into the new folder /Users/<yourname>/playground_app/ios/Runner/sodium
Simultaneously open the Runner.xcworkspace and drag the libsodium.a library from the Finder into the newly created group "sodium"
Adjust the Build Rules (line 25) of the target "Rust" in order to persist the environment variables SODIUM_LIB_DIR and SODIUM_SHARED, e.g. in my case:
That sounds like a real challenge. Yep, I'm talking about the app I used to test out MQTT chat. Clone the app from the repository (see below) if you're feeling adventurous.
I did put together a tutorial chapter, trying to give at least some information and tips how to get it running on macOS and in the iOS Simulator simultaneously. But here's the kicker—I couldn't crack the Android security issue regarding certificates. Sorry, Android fans, you're on your own with this one.
So, what's the verdict? Well, let's just say this app is tailor-made for the daredevils among us, the ones who thrive on a good challenge. If you've got a knack for troubleshooting and a touch of masochism, then by all means, dive right in. But for the rest of us mere mortals? Maybe stick to apps that don't require a crash course in programming just to send a message.
Now here's a hurdle: I'm not exactly a pro at downloading repositories and making them spring to life with just one magic install command (especially when it comes to this complex amalgamation of Rust, Flutter, Flutter-Rust Bridge, Android, and Xcode). Nope, no hand-holding from me on this one. Proceed at your own risk, folks. You've been warned.
My recommendation: Build the app from scratch as you have learned in the previous chapters. Copy the most important code snippets for Flutter and Rust from the MQTT Chat App repository and paste it into your app.
When rebuilding an app from scratch, ensure that you take into account all the workarounds, tips, and pitfalls described in the previous chapters. For example:
A common mistake on iOS is that Pods (dependencies) need to be installed before the initial launch using the additional command "pod install". However, this is automatically done when the application is launched via flutter run.
On macOS, there might be issues with loading dynamic libraries or forgetting to set the key 'com.apple.security.network.client' to true.
As shown in the video, the aim of the app is to allow individuals to exchange messages while they are simultaneously utilizing the same channel of a selected network. Users can choose their own names.
In the app, there are currently two network nodes selectable, one in the Shimmer Testnet and the other in the Shimmer Network. If you operate your own node, you can easily redirect the message transmission of the app through your node by simply exchanging the URLs.
The term "channel" or "tag" is synonymous with a chatroom. The choice of the channel/tag name is entirely arbitrary. For clarity, I've opted to prepend a "#" symbol before the name.
The app does not store messages broadcasted by the channel/tag.
The idea is for the app to register with a network node using the inx-mqtt extension. INX-MQTT extends the node endpoints to provide an Event API for listening to live changes occurring in the Tangle.
This API is by default reachable using MQTT over WebSockets.
To test this, the app must be opened simultaneously on at least two devices. For this purpose, I've chosen the iOS Simulator on one end and the macOS app on the other. Further down I'll describe how to launch both apps simultaneously.
Apart from known long transmission times, which for reasons unknown to me can range from a few seconds (acceptable) to a few minutes, there are a few errors that I have not investigated.
Messages are sometimes sent multiple times. This may be due to faulty registration or deregistration in the Rust backend.
When switching networks, settings are not cleanly saved and updated. This is a problem on the Flutter side.
After changing channels or networks, there are occasional error messages.
This plugin serves as the heart of the user interface, handling a significant portion of the programming for message display and transmission functionalities. It's configurable, and I've set it up to only transmit text messages. Essentially, the programming effort boils down to registering the app with the node, enabling message publishing, and populating the message stream with messages from the Rust backend.
This plugin is utilized for reading and writing simple key-value pairs in the frontend. It wraps NSUserDefaults on iOS and SharedPreferences on Android. The app stores the last chosen settings using this mechanism.
I wanted to encapsulate the MQTT functionalities into a separate file. Therefore, on the Rust side, there is the module mqtt, which contains an MQTT client with functions for initializing, opening, and closing a channel, publishing a message, as well as receiving messages from the MQTT extension.
When opening a channel, it is implemented that incoming messages are further processed through log.info! by the Rust logger within the backend. The uniqueness of the logger is described in the next section.
At this point, I refer to the chapter Logging Example App. Here, a simple mechanism is described for forwarding Rust logging messages to the Flutter frontend in the form of a stream.
We leverage this approach here.
The logger module in the MQTT Chat App is structured similarly to the one described in the mentioned chapter. With one exception. Here, I've incorporated a switch that allows differentiation based on syntax or special delimiters '@@@' in the message string, indicating whether it's a "normal" log info or a log info containing an MQTT message.
Admittedly, this is programmed rather poorly. But my focus here was on a quick solution that allows the entire process from A to Z to be tested in the simplest way possible.
In VSCode, I first launch the iOS Simulator using open -a Simulator. Then, I launch the app using flutter run. This automatically executes "pod install" if necessary.
Next, I start the second instance of the application from Xcode. I use the Runner.xcworkspace in the macOS directory for this purpose.
A tiny little thing trips us up. It's nestled in the log file as an error message:
Bad Certificate
Android seems to have some qualms about the certificate, which is why it's not allowing the connection to the MQTT server via rustls.
I've searched for any settings in Android that could fix it. For instance, I tried to establish the server's certificate as trusted within the Android app. I also experimented with different nodes using various certificates. The number of attempts I've made is numerous, and after a long time, it's hard for me to describe them all.
At this point, I'd like to hand over the task to you guys. If you manage to find a solution for Android, I'd appreciate it if you could send me a description of your approach.