Building for macOS
Listing some pitfalls and completing the remaining steps for macOS.
macOS Setup
An common step for macOS / iOS is needed: creating an Xcode project inside of the Rust library project folder (rust/). This can be done using the cargo-xcode command.
I utilize cargo-xcode v1.5.0 to ensure smooth operation. For example, when I employed version v1.9.0, Xcode flagged an issue regarding the absence of a development team for signing (but: I couldn't add a development team because the "Signing & Capabilities" tab is missing for the target rust-cdylib in the Rust Xcode project).
-
To install the
cargo-xcodecommand use:cargo install cargo-xcode@1.5.0 -
After the installation of the command, create the Rust Xcode project. Make sure to be in the rust/ directory. From the project's root folder you may switch into the right directory:
cd rustcargo xcodecd .. -
This step is for macOS only because the macOS app uses the dynamic library:
Open up that
rust/rust.xcodeprojfile with Xcode and select the root item rust, at the left pane on top. Select the Target rust-cdylib and the Build Settings tab. Here, search for Dynamic Library Install Name Base and change the value into$(TARGET_BUILD_DIR).
Pitfalls and Solutions
- Make sure that you are REALLY in the
rust/directory (whereCargo.tomlis located) when executing thecargo xcodecommand.
-
When macOS cannot locate the dynamic library:
This might happen due to cargo-xcode version v1.5.0.
To prevent this, execute the third step of the macOS Setup above (maintain the Dynamic Library Install Name Base). Make sure that you have selected the Target for the dynamic library, called rust-cdylib. It enables an macOS executable to properly locate dynamic
*.dyliblibrary files in the package. Do NOT select rust-staticlib !To find out the version of cargo-xcode, you can run the command
cargo install --listto list all installed Cargo subcommands along with their versions.FYI, there is an alternative solution described in the tutorial section macOS Instructions at the bottom.
-
The error message no healthy node available, or SocketException: Connection failed is encountered when making API calls:
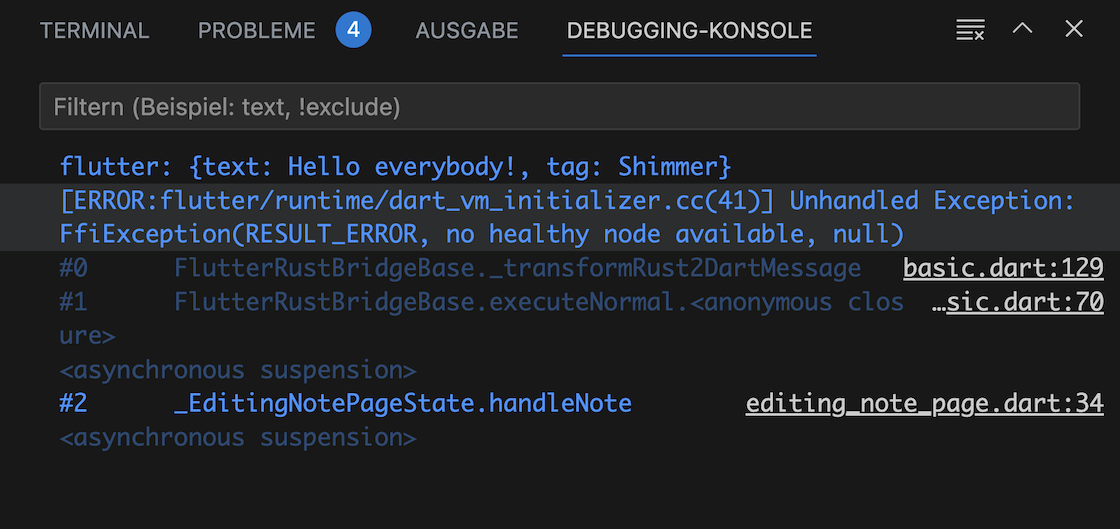
No healthy node available
macOS applications are sandboxed by default. To avoid a SocketException, you need to add the network.client entitlement to
macOS/Runner/DebugProfile.entitlements:<key>com.apple.security.network.client</key> <true/>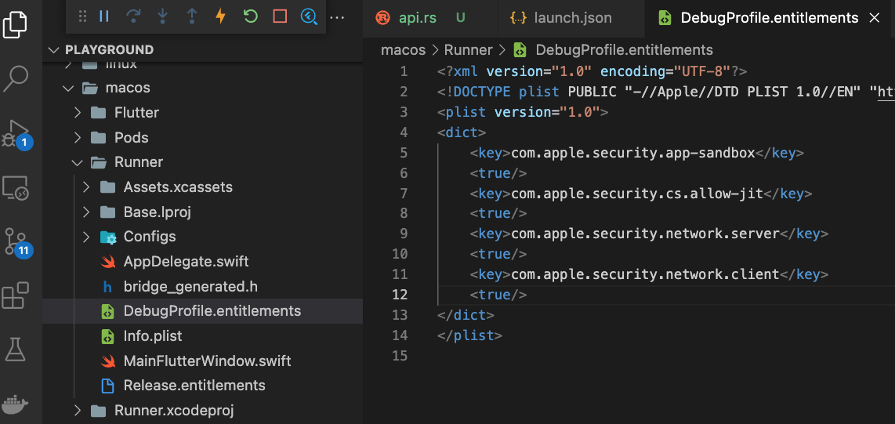
Solution for Sandbox Problem
Completing the macOS App
Generate the Dart Interface
Our next task is to create the generated code. This will also copy the C header file bridge_generated.h into the folder macos/Runner/. Use this command (you need to be in the root of your project):
flutter_rust_bridge_codegen \
--rust-input rust/src/api.rs \
--dart-output ./lib/bridge_generated.dart \
--dart-decl-output ./lib/bridge_definitions.dart \
--c-output macos/Runner/bridge_generated.h
Video
Follow the video for the remaining steps.