Building for Android
Listing some pitfalls and completing the remaining steps for Android.
Android Setup
To install the cargo-ndk command use:
cargo install cargo-ndk
In android/app/build.gradle, fix error:
Replace GradleException by FileNotFoundException
In android/app/build.gradle, add at the bottom:
[
        Debug: null,
        Profile: '--release',
        Release: '--release'
].each {
    def taskPostfix = it.key
    def profileMode = it.value
    tasks.whenTaskAdded { task ->
        if (task.name == "javaPreCompile$taskPostfix") {
            task.dependsOn "cargoBuild$taskPostfix"
        }
    }
    tasks.register("cargoBuild$taskPostfix", Exec) {
        workingDir "../../rust"  // <-- ATTENTION: CHECK THE CORRECT FOLDER!!!
        environment ANDROID_NDK_HOME: "$ANDROID_NDK"
        commandLine 'cargo', 'ndk',
                // the 2 ABIs below are used by real Android devices
                // '-t', 'armeabi-v7a',
                '-t', 'arm64-v8a',
                // the below 2 ABIs are usually used for Android simulators,
                // add or remove these ABIs as needed.
                // '-t', 'x86',
                // '-t', 'x86_64',
                '-o', '../android/app/src/main/jniLibs', 'build'
        if (profileMode != null) {
            args profileMode
        }
    }
}
Pitfalls and Solutions
What is the purpose of the section above in build.gradle?
Well, it is intended to ensure that Rust is recompiled when the app is launched. To make it all work, you need to pay special attention to the following things.
- Adjust the correct build.gradle file:
android/app/build.gradle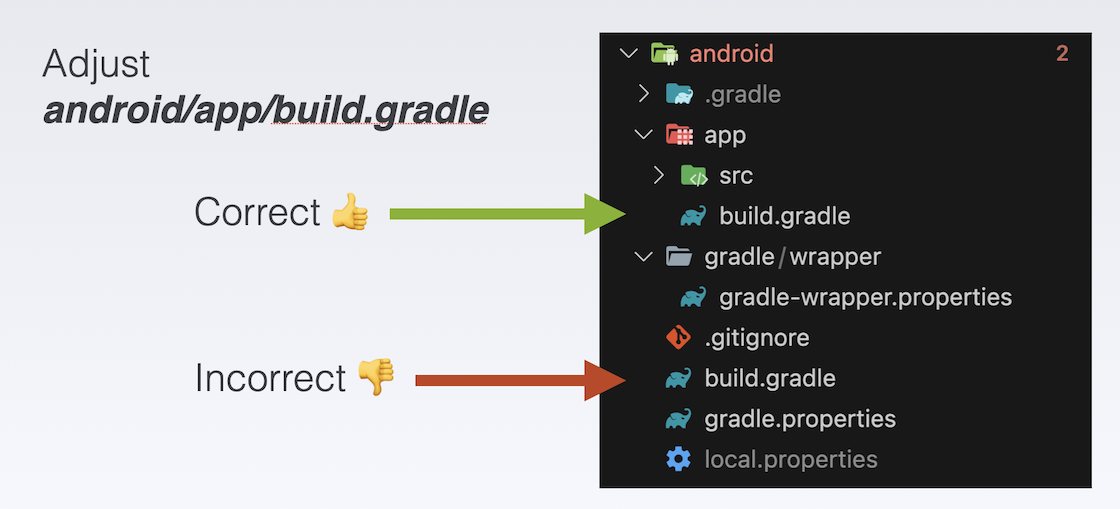
Adjust the correct file
-
Include all the targets you need. Recap the chapter about targets required for Android development in Cross-Compiling. Please note that every target you add will consume disk space, and it will take a considerable amount of time to compile when you launch the app for the first time.
In the case above I only included the ABI arm64-v8a from my Android Emulator. The other targets are commented out.
-
Make sure that the workingDir refers to the correct crate package.
workingDir "../../rust" // <-- ATTENTION: CHECK THE CORRECT FOLDER!!!In my tutorial, I consistently use "rust" as the crate name - in the command
cargo new --lib rust.
-
To ensure successful compilation, we have installed cargo-ndk as mentioned earlier. In order to utilize it, it is crucial to correctly define the constant ANDROID_NDK path. The recommended approach is to include the path in the ~gradle/gradle.properties file.
On macOS I have added this value:
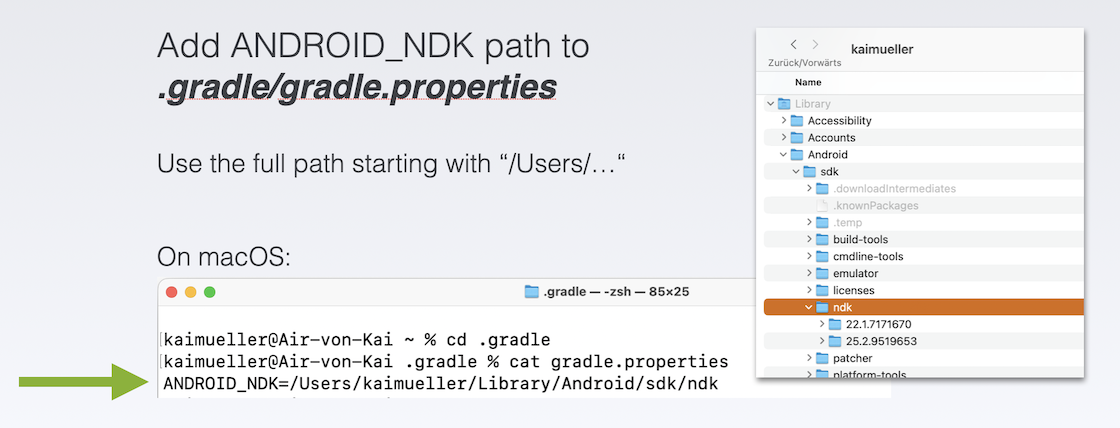
Add ANDROID_NDK path
Completing the Android App
Generate the Dart Interface
Use this command (you need to be in the root of your project):
flutter_rust_bridge_codegen \
--rust-input rust/src/api.rs \
--dart-output ./lib/bridge_generated.dart \
--dart-decl-output ./lib/bridge_definitions.dart \
--wasm
Include the library
Create a file ffi.dart and paste this content. As you can see it returns the api variable.
// This file initializes the dynamic library and connects it with the stub
// generated by flutter_rust_bridge_codegen.

import 'dart:ffi';

import 'bridge_generated.dart';
import 'bridge_definitions.dart';
export 'bridge_definitions.dart';

// Re-export the bridge so it is only necessary to import this file.
export 'bridge_generated.dart';
import 'dart:io' as io;

const _base = 'rust';

// On MacOS, the dynamic library is not bundled with the binary,
// but rather directly **linked** against the binary.
final _dylib = io.Platform.isWindows ? '$_base.dll' : 'lib$_base.so';

final Rust api = RustImpl(io.Platform.isIOS || io.Platform.isMacOS
    ? DynamicLibrary.executable()
    : DynamicLibrary.open(_dylib));
Wherever you intend to utilize the library functions, import the ffi.dart file into your Dart code. The exposed API function(s) can then be invoked by utilizing the returned api variable.
Adjust the Dart Code
In lib/pages/editing_note_page.dart adjust:
...
import '../ffi.dart';
...
  Future<void> handleNote(String tag, String text) async {
    final receivedBlockId =
        await api.publishTaggedDataBlock(tag: tag, message: text);

    // add the new note
    storeAndReturnToHomepage(tag, text, receivedBlockId);
  }

  void storeAndReturnToHomepage(tag, text, receivedBlockId) {
    Provider.of<NoteData>(context, listen: false).addNewNote(Note(
        id: widget.note.id, tag: tag, text: text, blockId: receivedBlockId));
    Navigator.pop(context);
  }
...
Video
Follow the video for the described steps.