Libsodium library for Android
Please refer to this chapter to learn about a Workaround for Android that can be used if you wish to utilize Stronghold AND if you have problems creating libsodium.
The libsodium library is a widely used library for cryptography, offering a variety of functions for encryption, decryption, hashing, signatures, and more.
libsodium-sys is a Rust wrapper around the libsodium library. It provides the necessary Rust bindings and FFI (Foreign Function Interface) declarations to link and interact with the libsodium library from Rust code.
libsodium-sys is a dependency of the stronghold-runtime crate.
GitHub Repositories
Challenge
In general, managing dependencies can be tricky, particularly when your project relies on multiple dependencies and you need to cross-compile it for various targets.
The utilization of the deprecated libsodium-sys project in Stronghold poses such a challenge. It came up that it is a time-intensive show-stopper and places a significant burden on the developer's life.
It's not enjoyable to search for workarounds and complicate workflows with special rules. Unfortunately, encountering such situations is quite common when aiming to support a wide range of target platforms.
Workaround
These are the three steps:
In Step 1, create the libsodium.so library file for the desired Android target, here e.g. ABI arm64-v8a (which is target aarch64-linux-android).
In Step 2, copy the created libsodium.so into a project folder and test the build.
In Step 3, include the library in Android's build process within Flutter by defining SODIUM_LIB_DIR and SODIUM_SHARED environment variables.
Step 1: Create libsodium.so
Isn't it pathetic that one has to create the library at all !?
Before proceeding with Step 1 yourself, please note that I provide a download for a prebuilt library (created on macOS) for each of the possible ABIs with the following links. However, it is important to mention that I provide no warranty for its contents or functionality:
If the prebuilt libraries work, you can skip the rest of Step 1.
You'll need to clone the libsodium repository in a new IDE project.
git clone https://github.com/jedisct1/libsodium.git
You will need to install some tools on your macOS:
a) Homebrew
Check with brew --version if you can skip the installation. If already installed, a version is returned. Otherwise install Homebrew with the command:
/bin/bash -c "$(curl -fsSL https://raw.githubusercontent.com/Homebrew/install/HEAD/install.sh)"
b) autoconf
Check with autoconf --version if you can skip the installation. If already installed, a version is returned. Otherwise install autoconf with the command:
brew install autoconf
c) automake
Check with automake --version if you can skip the installation. If already installed, a version is returned. Otherwise install automake with the command:
brew install automake
Once you've setup everything, you can navigate into the "libsodium-master" directory and execute:
./autogen.sh -s
This will create the configure file. The next command will create the library for the ABI arm64-v8a:
./dist-build/android-armv8-a.sh
The console output tells you where you can find the libsodium.so: It's located in the folder "libsodium-android-armv8-a+crypto/lib/".
You will need to repeat the last command for each ABI/target accordingly.
Step 2: Copy the libsodium.so file and test the build
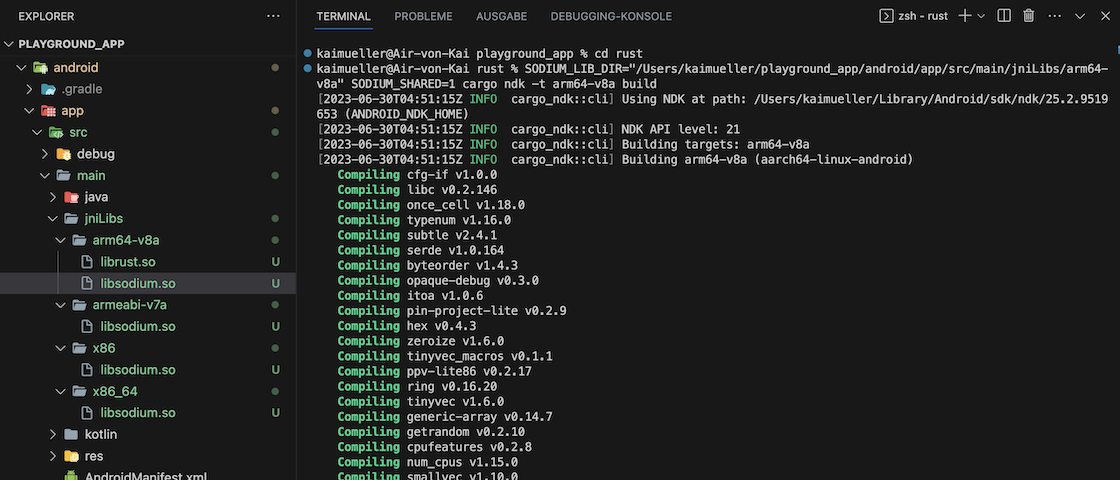
Copy the created library and paste it into a directory of your choice. Personally, I utilize the folder "android/app/src/main/jniLibs/<ABI>/", where all libraries are stored together in the appropriate ABI directory for libs, see the image below.
Now, I recommend to test the playground_app build in Terminal by setting the following environment variables before executing the commands. Please replace "/path/to/library" with the correct directory path you have chosen (do NOT append "libsodium.so" at the end of the path).
Make a test build by executing:
SODIUM_LIB_DIR="/path/to/library" SODIUM_SHARED=1 cargo ndk -t arm64-v8a build
e.g.
SODIUM_LIB_DIR="/Users/yourname/playground_app/android/app/src/main/jniLibs/arm64-v8a" SODIUM_SHARED=1 cargo ndk -t arm64-v8a build

Successful test of cross-compilation for Android arm64-v8a
Step 3: Update build.gradle
In the aforementioned test, we defined the variables SODIUM_LIB_DIR and SODIUM_SHARED within the command line. However, these definitions will not persist.
To ensure proper setup for usage in Flutter, you need to make adjustments to the android/app/build.gradle file, see below (once again, replace "/path/to/library" with the actual directory path you have selected).
        ...
        environment ANDROID_NDK_HOME: "$ANDROID_NDK"
        environment SODIUM_LIB_DIR: "/path/to/library"
        environment SODIUM_SHARED: 1
        commandLine 'cargo', 'ndk',
        ...
Be aware: At this point, I am anticipating the Android setup!
In android/app/build.gradle, fix error:
Replace GradleException by FileNotFoundException
In android/app/build.gradle, add at the bottom:
[
        Debug: null,
        Profile: '--release',
        Release: '--release'
].each {
    def taskPostfix = it.key
    def profileMode = it.value
    tasks.whenTaskAdded { task ->
        if (task.name == "javaPreCompile$taskPostfix") {
            task.dependsOn "cargoBuild$taskPostfix"
        }
    }
    tasks.register("cargoBuild$taskPostfix", Exec) {
        workingDir "../../rust"  // <-- ATTENTION: CHECK THE CORRECT FOLDER!!!
        environment ANDROID_NDK_HOME: "$ANDROID_NDK"
        environment SODIUM_LIB_DIR: "/Users/yourname/playground_app/android/app/src/main/jniLibs/arm64-v8a" // <-- ATTENTION: CHECK THE CORRECT FOLDER!!!
        environment SODIUM_SHARED: 1
        commandLine 'cargo', 'ndk',
                // the 2 ABIs below are used by real Android devices
                // '-t', 'armeabi-v7a',
                '-t', 'arm64-v8a',
                // the below 2 ABIs are usually used for Android simulators,
                // add or remove these ABIs as needed.
                // '-t', 'x86',
                // '-t', 'x86_64',
                '-o', '../android/app/src/main/jniLibs', 'build'
        if (profileMode != null) {
            args profileMode
        }
    }
}